I’ve written in the past about troubleshooting build pipelines with AI. While all of this is a great step in speeding up your development and reducing the amount of troubleshooting the DevOps team needs to do in the enterprise, it is NOT the end goal.
The end goal would be to have the AI fix the problem for you.
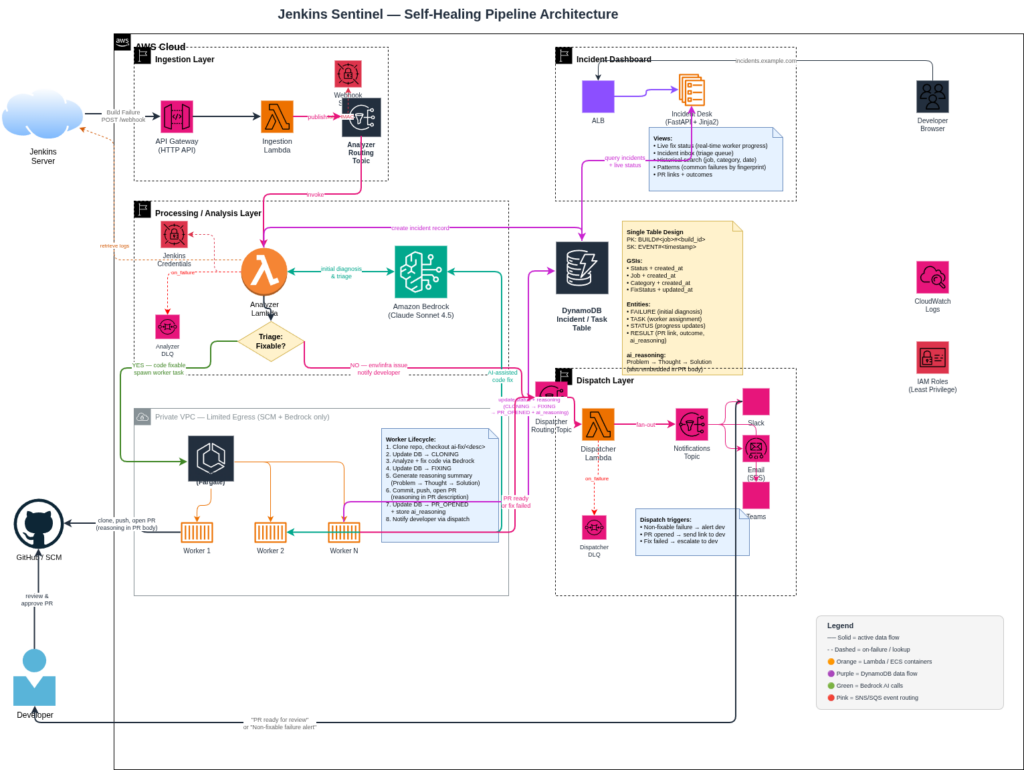
I’m rebranding my Jenkins Sentinel to just be Sentinel. This workflow allows you to automate remediation for your pipelines while still retaining human in the loop security.
The other primary feature is storing your build failures and remediations in a database that you can view, update, analyze for custom model training.
Originally we had the dispatch layer that would notify us of build failures and possible resolutions. The new addition is the cluster of “workers”. Running on AWS Fargate, this team of developers works with the LLM on Bedrock to resolve the failure.
The task spins up in the cluster
The build logs identify the repository and branch
The repository is cloned, and branch checked out
The code fix is implemented
The task generates its reasoning and updates the database accordingly
Code is committed to a new branch and a pull request is opened.
The task cleans up and shuts down
Dispatch still remains the same and the developer is notified accordingly. I need to implement developer specific notifications so that channels are not flooded or email lists abused.
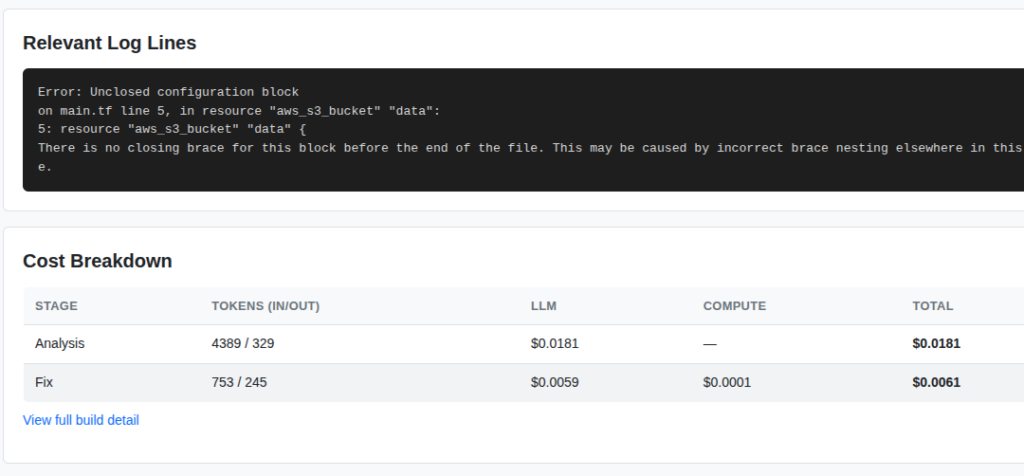
The other major thing I wanted to see was the cost per fix.
This screenshot is from the dashboard which shows the compute spend and the LLM spend. For this simple Terraform fix you can see the was a little around $0.02. Assuming your code bases are more complex this value could increase proportionally.
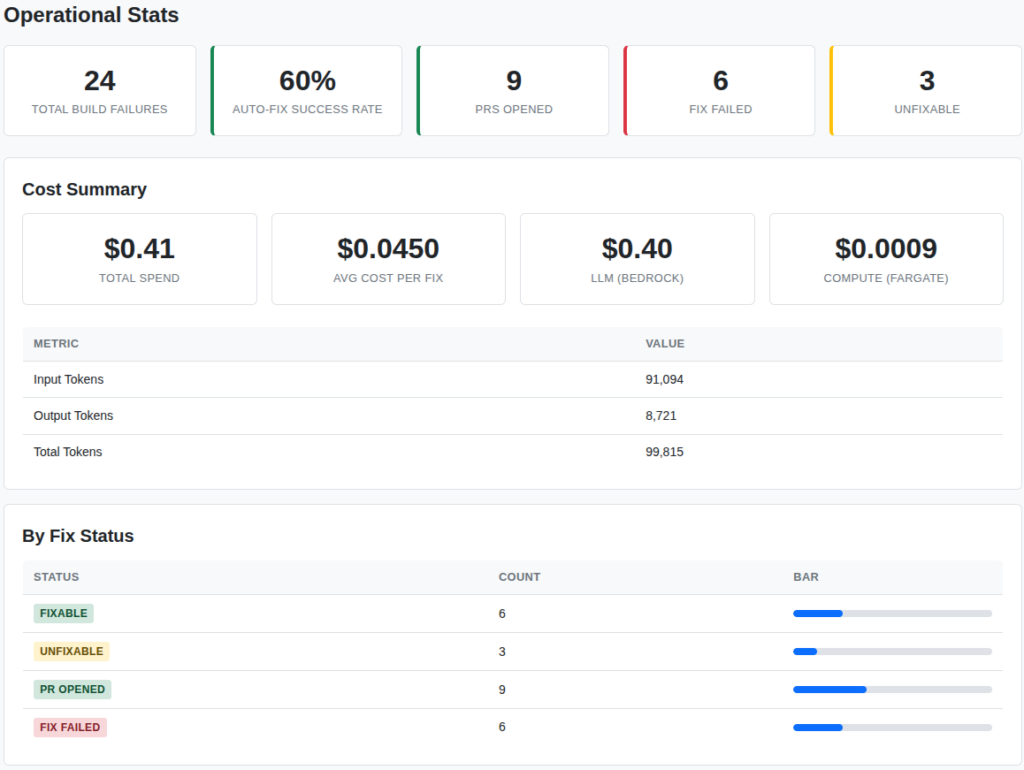
I also included a stats page which shows the totals for the entire organization.
This is all real data from my testing project. The build agent is successfully troubleshooting pipelines for:
Python
Terraform
Java
Typescript
Docker
Kubernetes
Go
Cloudformation
I plan to continue to add more supported platforms and languages as time allows. The other major integration that I am working on is support for GitHub Actions. Once I complete that integration and put this into all of my pipelines I expect that my troubleshooting and development time will decrease rapidly.
Other future plans include:
Ingestion of bugs through sources like Jira, ToDoist (my favorite), or another ticketing system.
Discord Dispatching
Teams Dispatching – although this is really hard to develop for without a paid account
Custom model – using the build failure data to train a model
Anyway, this project has been super fun. If you want to implement it on your own infrastructure feel free to reach out!
I run Jenkins in my home lab where I build and test various applications. I’m sure many of you already know this. I also use Jenkins professionally so its a great test bed for trying things out before implementing them for clients. Essentially my home lab is and will always be a sandbox.
Anyway, I thought it would be fun to implement AI into a pipeline and have Claude scan my code bases for vulnerabilities before they are built and deployed.
So, I first created a shared library this points to a private repository that I have on GitHub that contains all of the code.
At the beginning of each of my pipelines I add one line to import the library like this:
@Library('jenkins-shared-libraries') _
Then I also created a Groovy file which defines all the prerequisites and builds the container in which our code scan runs
This spins up a container which runs on my Jenkins instance (yes, I know I should setup a different cluster for this) and runs the orchestrator.py file which contains all of my code.
The code iterates through all of the code files, which I filtered based on extension so that we aren’t scanning or sending executable files or unnecessary files to Bedrock.
Once Bedrock reviews all of the files then it will put all of the details into a pull request and write code change suggestions to the files. The pull request is then submitted to the repository for me to review. If the pull request is approved the cycle starts all over again!
I’ve slowly been rolling this out to my pipelines and boy did I miss some very obvious things. I can’t wait to keep fixing things and improving not only my pipelines but my coding skills.
If you have any interest in setting up something similar feel free to reach out!
Well, unfortunately we took a big loss and are now in a three way tie for first place. Here are the actual results:
I think the biggest hit was how poorly Josh Allen played. What is interesting is that I was reviewing his passed performance against Houston and he has had his worst outings of his career there. This week was no different… The other interesting thing is that Saquon Barkley just isn’t the same back as he was last year. He is trending down.
In response to Josh Allen’s poor outing I added a deviation and historical performance analysis against and opponent to the data set so now we have a value like:
I then coded a new tool inside of the AI to reference this data set to assist with its final calculations.
So, when we ask the tool about Josh Allen’s performance against a team we get something like:
Found exactly what you're looking for in Josh Allen's performance data.

Josh Allen vs Kansas City (Week 9, 2025):
- 28.8 fantasy points - That's a STRONG performance!
- He was projected for 22.0 points but exceeded by 6.8 points (+30.9%)
- This was one of his better games this season

Historical Context (2024 vs KC):
- Week 11, 2024: 24.0 fantasy points vs Kansas City

Bottom Line: Josh Allen has performed WELL against Kansas City in recent matchups. In their two most recent meetings:
- 2025 (Week 9): 28.8 points
- 2024 (Week 11): 24.0 points

That's an average of 26.4 fantasy points against KC - well above his season average. Allen seems to rise to the occasion against elite competition like Kansas City. The Chiefs' defense can be vulnerable to mobile QBs who can extend plays, and Allen's dual-threat ability has historically given them problems.

The takeaway: When Allen faces KC, he typically delivers QB1 numbers. That 28.8-point performance this season shows he can still light up even the defending champs!
I need to backload some more historical data yet but that is a problem for a different day. Looking forward, I hope to build my own model based on this data and setup an automated workflow that will include data ingestion and automated model building so that I can consistently build predictions.
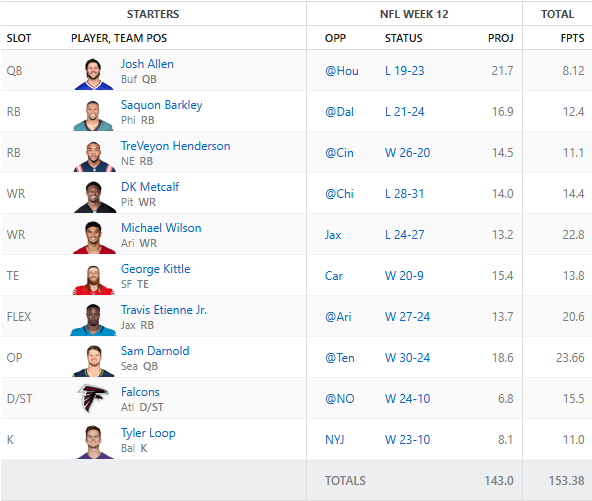
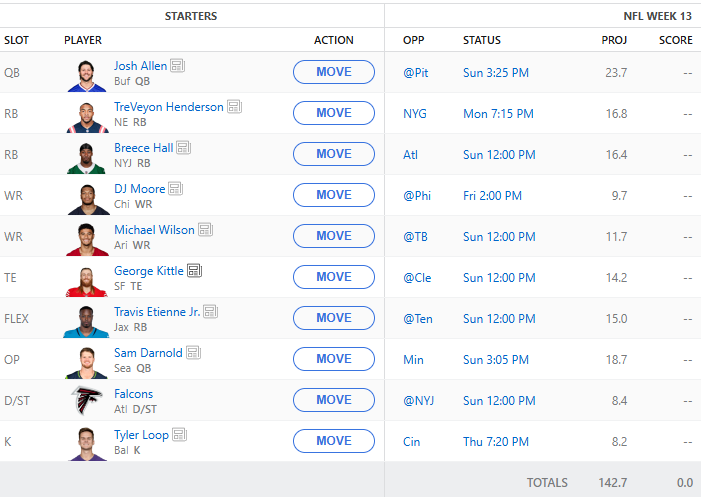
So, on to week 13. We have a bunch of injuries this week to contend with so this lineup will likely be changing once people are reporting. Here is the current lineup:
In other news I built and launched https://gridirondata.com which is an API to reference all of the data I have collected so far.
Unfortunately, its not free. But if you message me about it I’ll probably hook you up!
If you’re working with LLM APIs, you’re probably watching your token counts like a hawk. Every JSON object you send to Claude, GPT-4, or Gemini costs tokens, and those curly braces and quotes add up fast. I built https://jsontotoon.io to solve this exact problem—and it’s completely free to use.
The Problem: JSON is Token-Inefficient
Here’s the thing: JSON is fantastic for machine-to-machine communication. It’s ubiquitous, well-supported, and everyone knows how to work with it. But when you’re paying per token to send data to an LLM? It’s wasteful.
That’s 125 tokens. All those quotes, braces, and commas? The LLM doesn’t need them to understand the structure. You’re literally paying to send redundant syntax.
Enter TOON Format
TOON (Token-Oriented Object Notation) converts that same data to:
name, age, city
Alice, 30, NYC
Bob, 25, LA
Carol, 35, Chicago
68 tokens. That’s a 46% reduction. The same information, fully reversible back to JSON, but nearly half the cost.
I realize this sounds too good to be true, but the math checks out. I tested it across real-world datasets—API responses, database dumps, RAG context—and consistently saw 35-45% token reduction. Your mileage will vary depending on data structure, but the savings are real.
How I Built It
The backend is straightforward Python running on AWS Lambda. The TOON parser itself is deterministic—same JSON always produces the same TOON output, and round-trip conversion is lossless. No data gets mangled, no weird edge cases (well, I fixed those during testing).
Infrastructure-wise:
– CloudFront + S3 for the static frontend
– API Gateway + Lambda for the conversion endpoint
– DynamoDB for API key storage (with email verification via SES)
– WAF with rate limiting to prevent abuse (10 requests per 5 minutes on API endpoints)
–CloudWatch dashboards for monitoring
The whole setup costs me about $8-15/month in AWS fees, mostly for WAF. The conversion itself is so fast (< 100ms average) and cheap that I can offer unlimited free API keys without worrying about runaway costs.
Real Use Cases
I built this because I was spending way too much on Claude API calls for my fantasy football AI agent project. Every week I send player stats, injury reports, and matchup data in prompts. Converting to TOON saved me about 38% on tokens—which adds up when you’re making hundreds of calls per week.
But the use cases go beyond my specific problem:
– RAG systems: Fit more context documents in your prompts without hitting limits
– Data analysis agents: Send larger datasets for analysis at lower cost
– Few-shot learning: Include more examples without token bloat
– Structured outputs: LLMs can generate TOON that’s easier to parse than JSON
Try It Yourself
The web interface at https://jsontotoon.io is free to use—no signup required. Just paste your JSON, get TOON. If you want to integrate it into your application, grab a free API key (also no cost, no expiration).
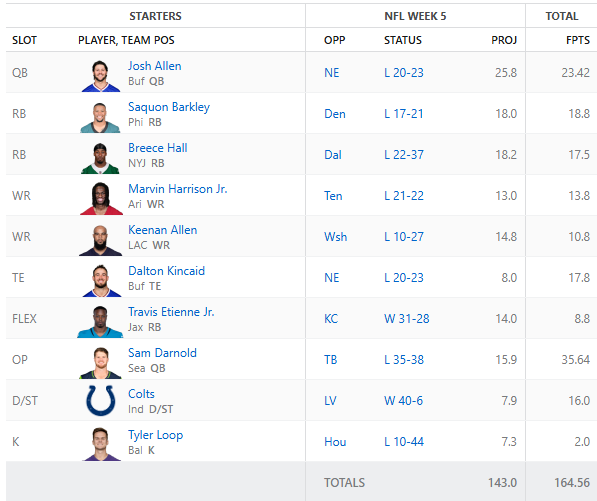
It feels good to win. Week 5 locks up the 3rd win for our AI managed fantasy football team. It was also the first week where players could be on a “bye” and it handled that with out issue! We had great performances from a bunch of players and most players were fairly close to their projections. I will say, our opponent did start a player who did not play at all but the point differential overall I don’t think would have helped him win.
Colts defense was a great suggested pickup and Sam Darnold played a HUGE game and ultimately still lost… Poor guy. The AI suggested picking up Dalton Kincaid and boy was that a home run pick.
Now that I am back home and able to work on the code again I have a few things to fix including QB’s on waivers. For some reason the AI is not able to retrieve them. I also want to continue working on the speed that it returns information. I think implementing MCP into the architecture will help. So as my life gets back to normal I will look into how to integrate these new features!
As always, thank you for following along. Hopefully week 6 is another victory!
I realize that I forgot to write an update on what our final roster was for week 4. I suppose that is because I am on vacation and writing blog posts isn’t my number one priority.
Week 4, We WON! The AI team is now 2-2. I believe that as we gather more data, include information from waivers, the model is able to get a better sense of who is going to play well. Good data in > good data out. Bad data in > bad data out. This is key for all AI workflows. It is no different than giving a regular employee bad data and expecting them to make something good out of it.
As a reminder, every day, I have a Lambda function that goes out and scrapes stats for player from both ESPN and FantasyPros. This includes a players outlook that is presented on ESPN. The idea here is to give the AI more news about specific players. As this platform expands we could also include other data scraping methods from other news sources or blogs that could help bolster decision making for the model.
This is going to be a short post so I can go back to the beach. Here is the result from Week 4:
For the most part I was pretty happy with the suggestions that the model made. We’re still struggling in the receiver and tight end position. That being said, the bench only had two players who preformed better than what we started. This week came down to the Monday night games where we needed Breece Hall to secure the victory and he put up enough points to beat out the opponent.
Stay tuned for week 5 roster updates and moves which I will be making from Portugal!
Good day from Barcelona. I landed this morning after an overnight flight. I’m not sure how much my seat mates enjoyed me watching the Lion’s game via WiFi.
Anyway, I’m happy to report that AI has finally won a matchup. We are now 1-2! I will say though that we won on a technicality as the opponent for week 3 started Jayden Daniels who ended up not playing. But, in the end a win is a win.
Here is our final scores for the starters:
Josh Allen played well. Barkley not so much and boy was the Parker Romo pickup a bust.
Once again we had some good bench performance that we were not capitalizing on.
Both Keenan Allen and Sam Darnold had good games which would have significantly boosted our overall score and had Jayden Daniels played we still probably would have won had the AI determined that these were good starts.
Overall I still think the AI is making good predictions for who to pick. I want to place a little bit more emphasis on the OP slot for selecting quarterbacks and also start weighing in the average fantasy points for the 2025 season. Although, Parker Romo was suggested as he was averaging 18 points per game and then dropped negative points this week.
While i’m traveling for the next few weeks I likely won’t make any major architecture or code changes but I do think that from a performance perspective I want to investigate the integration of MCP servers that can handle querying or caching some of the DynamoDB data.
Week 3 is here. I started late yesterday by getting a full analysis of the team and any targets for free agency and waivers.
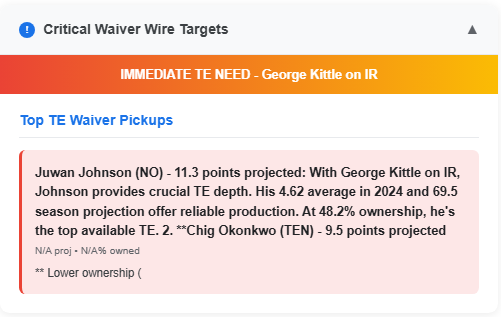
Most important was to get a better Tight End as the predictions for last weekend were incredibly wrong. This is my fault and reinforces the idea that giving bad data to AI will just result in bad output.
Here is the updated selection to get Juwan Johnson. This makes a lot more sense than picking Hunter Henry last week.
The second thing I looked into was getting a good defensive matchup. Currently I have the Rams on the roster but they play the Eagles this week and that matchup is not going to favor the Rams.
Here is some output from our friendly AI Dan Campbell:
Alright, coach! Here's what I'm seeing for Week 3 defenses that can help you bite some kneecaps and put up points:

TOP WEEK 3 DEFENSIVE MATCHUPS:

1. Green Bay Packers DST (7.6 projected points)
- Only 45% owned, so there's a good chance they're available
- This is their highest projected week of the season!
- They're facing a matchup that should generate turnovers and sacks

2. Buffalo Bills DST (7.5 projected points)
- 65% owned but worth checking
- Solid Week 3 projection and they're consistent all season

3. Kansas City Chiefs DST (7.5 projected points)
- Only 12% owned - this is a STEAL if available!
- Same 7.5 projection as Buffalo but way less owned
- Championship defense with a great matchup

Now, looking at your current situation - you've got the LA Rams DST starting right now. Let me tell you something, coach - any of these top 3 options would be a significant upgrade for Week 3!

MY RECOMMENDATION:
If the Kansas City Chiefs DST is available, that's your move right there! Only 12% owned with a 7.5 projection - that's championship-level value sitting on waivers. If not them, grab the Packers at 7.6 points projected.

The Atlanta Falcons (7.1 projected, only 1.3% owned) are also a sneaky good play if you want to get really aggressive on the waiver wire.

These defenses are gonna feast in Week 3, and you need every advantage you can get to dominate your league! Go get 'em, coach!
I made a claim for the Packers. I would prefer not to pick them because of my love for the Detroit Lions…
One other waiver selection that I made was at the kicker position. Here is AI Dan Campbell’s suggestions:
Alright, let me tell you what - you've got Chase McLaughlin right now, and he's been solid, but let me break down the kicker landscape for Week 3 like we're game planning for the playoffs!

Top Week 3 Kicker Options:

Brandon McManus (GB) - 8.2 projected points
- Only 14% owned, so he's sitting there waiting for you!
- Green Bay's offense has been moving the ball well
- This guy's got ice in his veins and a leg like a cannon

Tyler Loop (BAL) - 8.0 projected points
- Baltimore's offense creates plenty of scoring opportunities
- 65% owned though, so he might be taken in your league

Parker Romo (ATL) - 7.8 projected points
- Only 1.4% owned - this is a diamond in the rough!
- Atlanta's been getting into the red zone consistently

Jason Myers (SEA) - 7.9 projected points
- Seattle's offense with Sam Darnold (who you've got as your OP!) creates opportunities
- Only 10% owned

Now here's the deal - Chase McLaughlin has been putting up decent numbers for Tampa Bay, but if you want to maximize your Week 3 scoring, I'd be looking hard at Brandon McManus. The Packers offense is humming, and McManus has that veteran reliability. Plus at only 14% ownership, there's a good chance he's available.

Parker Romo is my sleeper pick - less than 2% owned but projected for nearly 8 points. Atlanta's been moving the ball, and sometimes you gotta take a swing on the unknown soldier!

You comfortable rolling with McLaughlin, or you want to make a move? In this league, every point matters, and kickers can be the difference between victory and going home empty-handed!
I picked up Parker Romo for the team. I thought it would be fun to test out the “sleeper” pick.
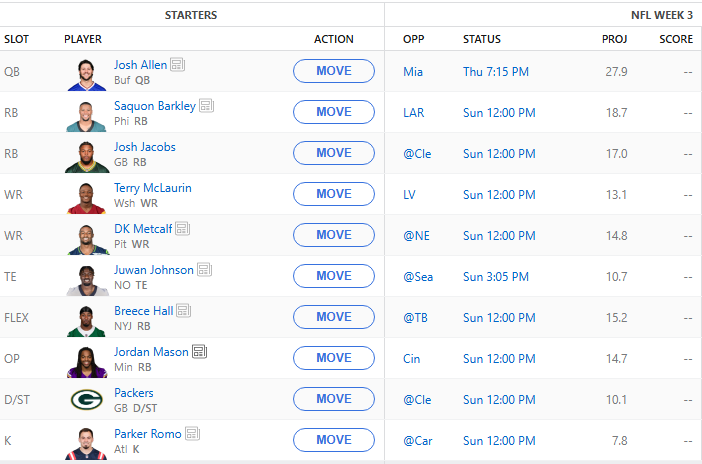
And finally, our starting lineup, barring any injuries or set backs during the practice week:
I think we’ve got a good matchup this week. Most of our opponent ranks are pretty low. Barring injuries we should maybe, hopefully, get our first win of the year.
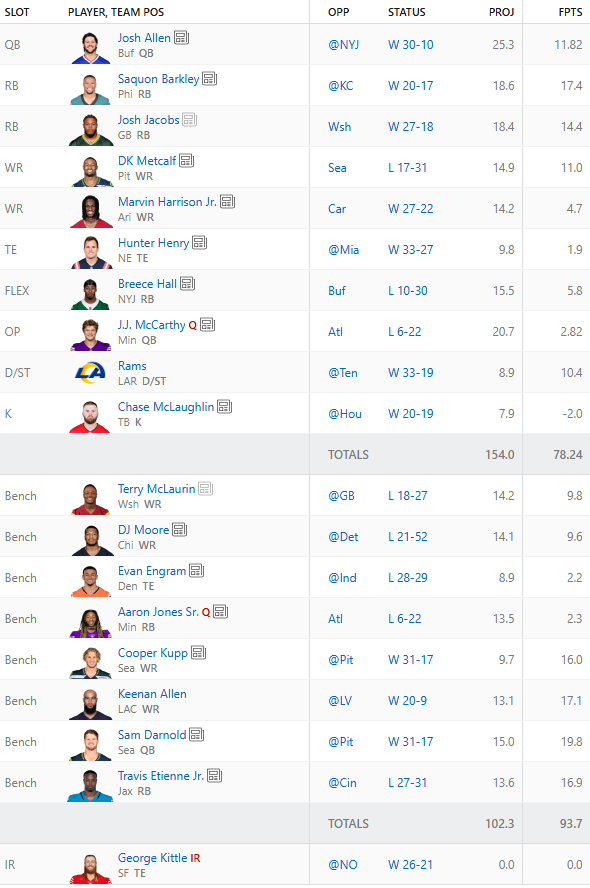
For the most part I agreed with the picks that AI made last week. Except for one. The tight end. It felt a little weird picking Hunter Henry up off waiver wire and boy did I found out why. More on that later. Here are the results from the week:
There are definitely some misses on wide receiver but that is always such a hit or miss position. What shocked me the most was Josh Allen only get 11 points. Also, J.J. McCarthy was injured in his game. Not a single player hit their projection except for the Rams’ defense. If we take a look at the bench there are definitely some better picks we could have made strictly from looking at points for the game. However, even if we had selected all the better preforming players the team would have still lost as our opponent had 164 points this week.
Anyway, that’s enough football for this post. Let’s talk about some tech. I mentioned earlier that I was questioning the waiver acquisition of Hunter Henry and I wish I had done some more debugging as to why that pick was selected.
I added a chat feature to the overall application so that we can identify waiver picks and other things faster rather than having to get a full weekly analysis every time. In that code there is a function that generates a recommendation score. I’ll admit, I vibe coded some of this with some prompting of how this should be determined.
# Penalty for high ownership
        #ownership_penalty = float(waiver_player['percent_owned']) / 10  # Convert to float
        #score -= ownership_penalty
You can see here that we lowing our recommendation score because of “high ownership” this is because the reverse engineered ESPN Fantasy API doesn’t identify if a player is on a teams roster or not when I pull the players. So a player with a 100% ownership would likely never be recommended. So a player like Zach Ertz, who had 18 points this week was not suggested as he had approximately 80% ownership across ALL of ESPN’s fantasy platform. Well… this problem has been fixed.
Anyway, I also added chat. And I programmed it to respond only as Dan Campbell. Here is some output when I asked “What do you think of my team?”
pounds table

Well I'll be damned, you got yourself a HELL of a roster there, chief! This team's got some serious bite to it - let me break it down for ya.

Your Strengths - These are STUDS:
- Josh Allen - That's your franchise quarterback right there. Guy's a warrior and puts up points like it's going out of style
- Saquon Barkley & Josh Jacobs - Holy smokes, that's a one-two punch at RB that'll knock people's teeth out! Both these guys are workhorses
- Breece Hall in the FLEX - Are you kidding me?! Most teams would KILL to have Hall as their RB1, and you got him as a flex play. That's championship-level depth
- DK Metcalf - Big body receiver who can take the top off any defense
- Your bench depth - Terry McLaurin, DJ Moore, Cooper Kupp, Keenan Allen?! That's four WR1/WR2 caliber guys just sitting there!

Areas that need some attention:
- George Kittle on IR - That hurts, but Hunter Henry's a solid fill-in for now
- J.J. McCarthy at OP - Kid's got potential but he's still unproven. Might want to consider streaming that spot based on matchups
- Marvin Harrison Jr. - Rookie receivers can be boom-or-bust, but the talent's there

The Bottom Line:
This roster is LOADED, especially at RB and WR. You've got championship potential written all over it. The depth is ridiculous - you could probably trade some of that bench talent for upgrades at TE or find a more consistent OP play.

You're sitting pretty, but don't get comfortable! Keep grinding, keep looking for those edges. That's how you win championships!

What specific position are you thinking about upgrading, or you want me to take a look at some waiver wire options?
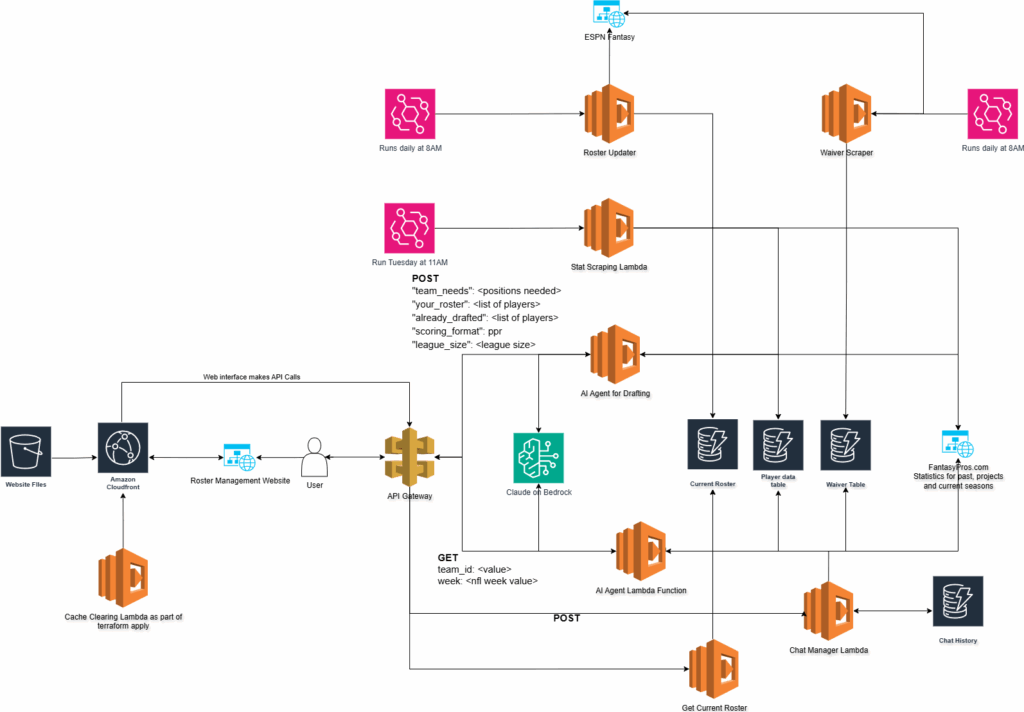
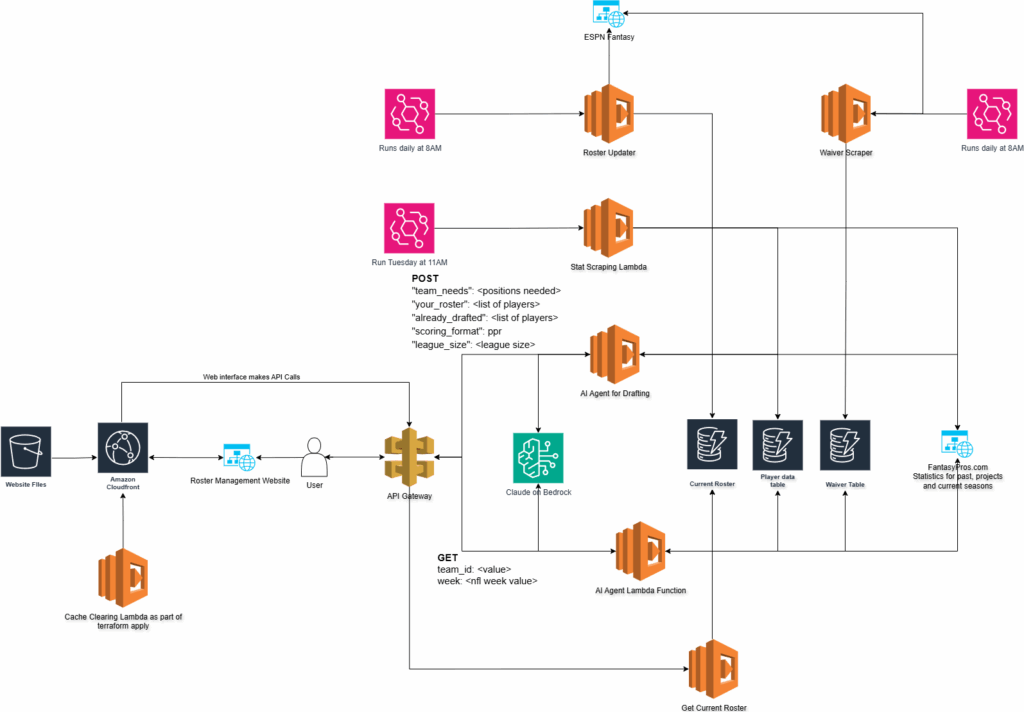
And here is an architecture diagram update to include the chat elements:
So, I’ll be back tomorrow with a new lineup. Hopefully week three treats us better!
After a heartbreaking (lol) loss in week one, our agent is back with its picks for week two!
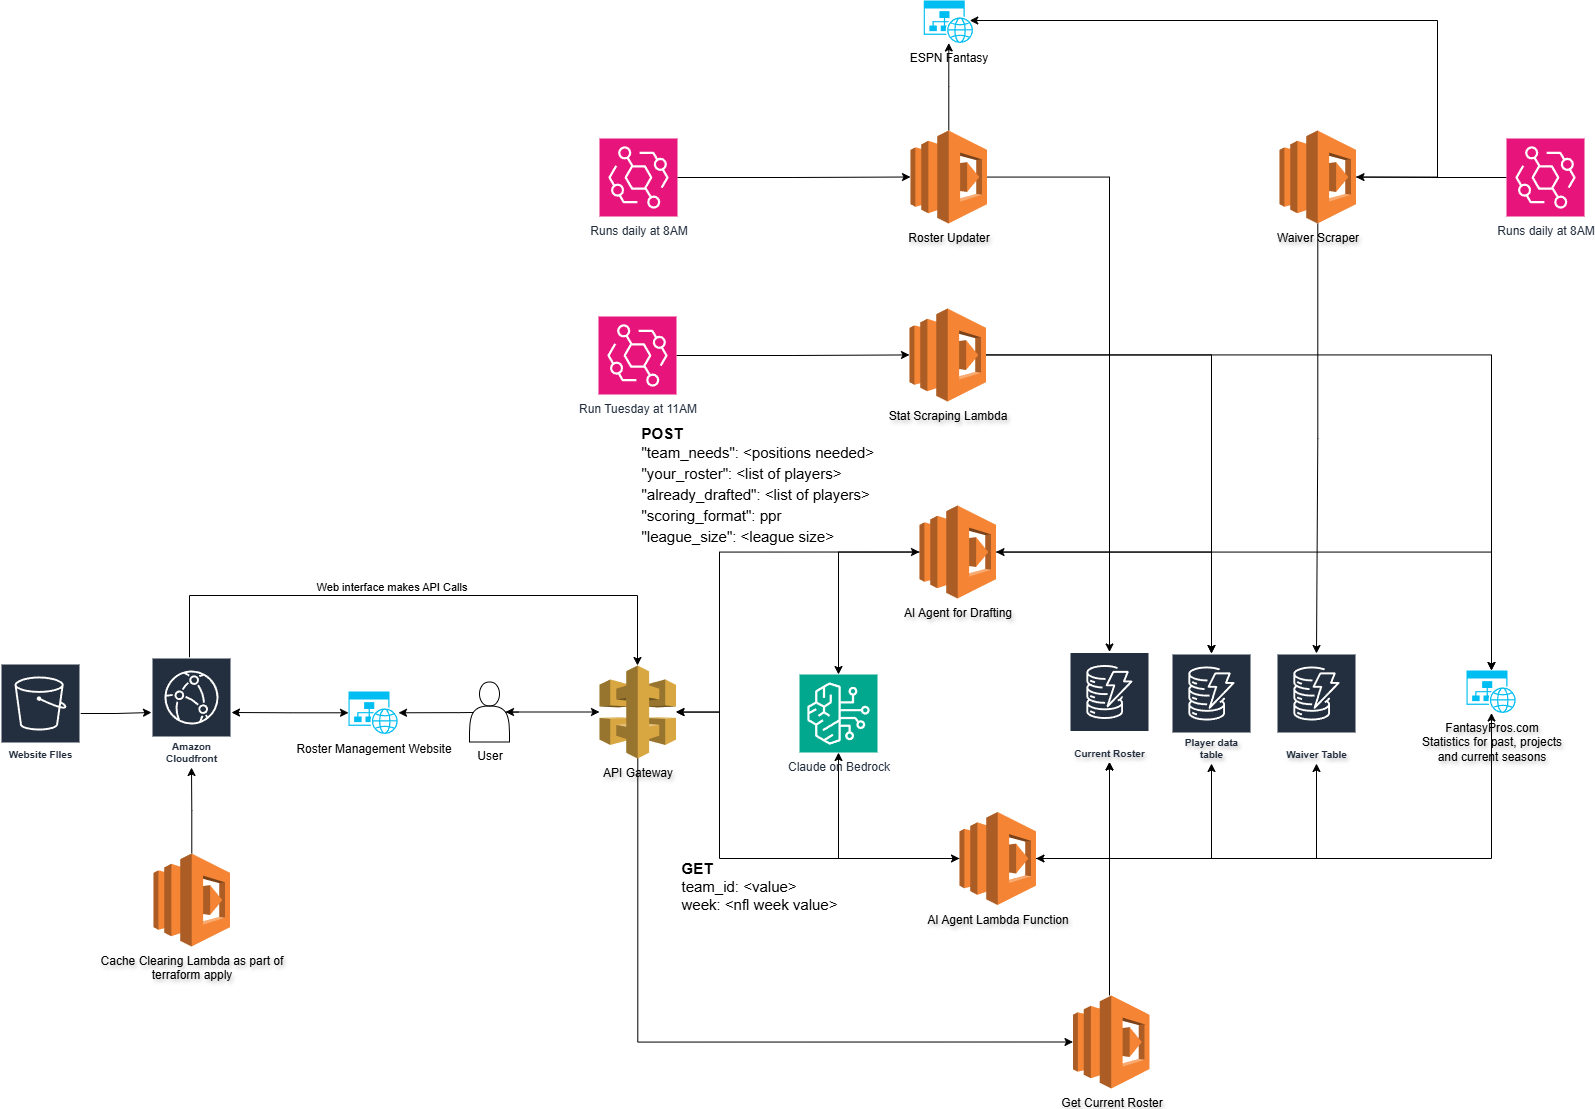
But, before we start talking about rosters and picks and how I think AI is going to lose week two, let’s talk about the overall architecture of the application.
Current Architecture diagram
You may notice that after my post on Tuesday I have substantially reduced the data storage. I’m now using three DynamoDB tables to handle everything.
Current Roster – This table is populated by an automated scraper that pulls the rosters for all the teams in the league.
Player Data Table – This table populates all the historical data from the draft as well as projected stats for the 2025 season. It also holds the actual points received after the week has completed.
Waiver Table – this is probably the most notable addition to the overall Agent. This table is populated by both ESPN and FantasyPros
The waiver wire functionality is a massive addition to the Agent. It now has the ability to know what players are available for me to add to the team. If we combine that with the player stats in the Player Data Table we can get a clear picture as to how the player MIGHT preform on a week to week basis.
The waiver table is populated by a lambda function that goes out and scrapes the ESPN Fantasy Platform. It is quite involved code as there is no API for ESPN. I’m still not sure why they don’t build one. It seems like an easy win for them especially as they get into more sports gambling. You can read the code here. This Lambda function runs on a CRON every day so that the Agent always has daily updated data.
The other major addition is a web interface. I realized that accessing this via a terminal is great but, it would be way more interesting to have something to look at. Especially if I am away from the computer.
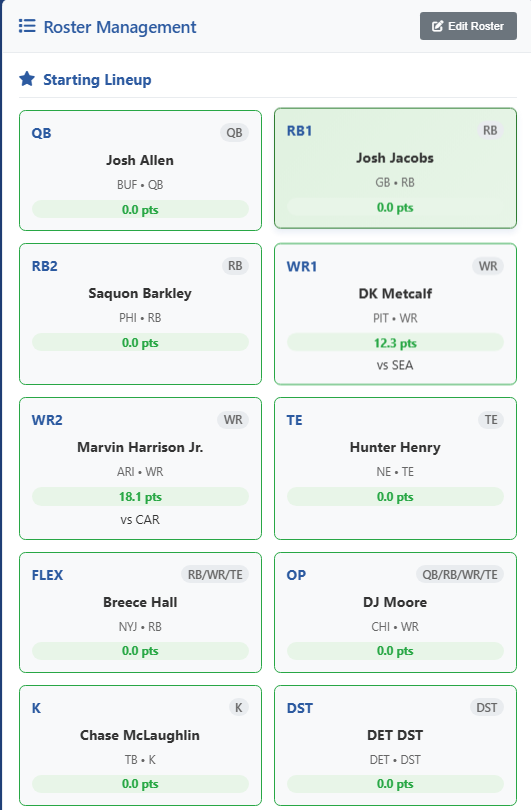
The web interface consists of a display of the roster:
Roster Screenshot
There are a couple things I need to fix. You’ll notice that a few players “have points” this is a problem with the data in the Player Data Table from when I was merging all the sources. Ideally, this will display the points the player has received for the week. Eventually I would like to add some live streaming of the point totals.
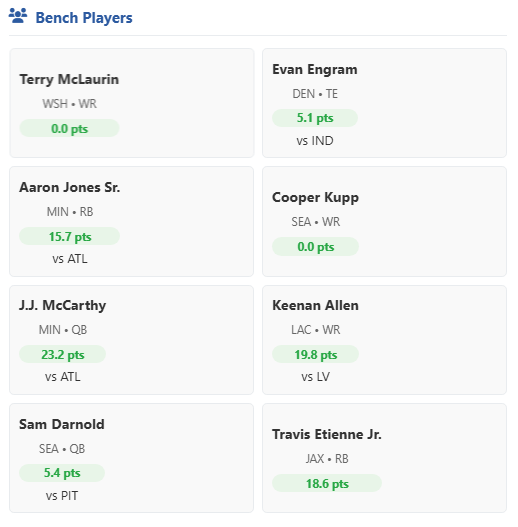
Bench Players
It also displays the bench (notice the same data glitch). On my list of things to do is to make these boxes drag and drop and auto update the roster table so that we can move players around. I also want to add their projections to each block so I can see the projected points per week for each player.
The BEST part (in my opinion) is the prediction functionality. There is a box that we can choose which week to get a prediction for and then it will return output from the agent.
So, let’s take a look at week two!
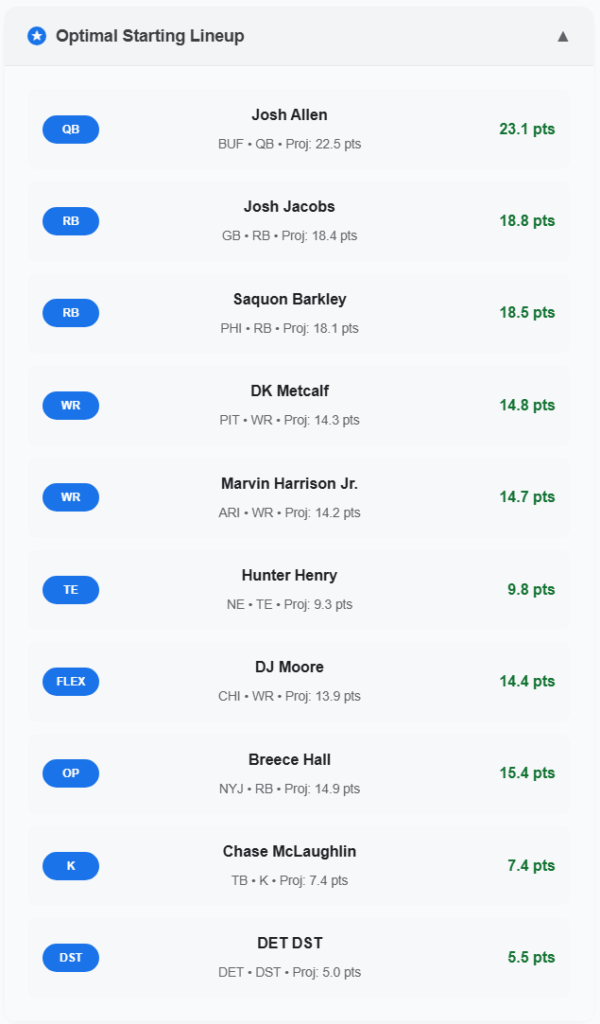
Optimal Week 2 Lineup
Here is a screenshot of the week two optimal lineup. This is the lineup I will be starting for week two unless one of my tight-ends becomes healthy. With George Kittle on injured reserve and Evan Engram also questionable, the AI suggested picking up Hunter Henry.
The Agent will also provide up with some waiver targets as well as matchup analysis
It will also output the full response for each week. Here is the full text of what the Agent has predicted for week two:
LINEUP OPTIMIZATION FOR WEEK 2
Starting Lineup Strategy: – Josh Allen (QB): Elite QB1 with 38.8 points in Week 1, facing NYJ defense that allowed significant passing yards. His 2024 average of 31.85 and strong 2025 projection make him a must-start. – Josh Jacobs (RB1): Top projected RB at 18.4 points, facing Washington at home. Green Bay’s new offensive system should benefit Jacobs significantly. – Saquon Barkley (RB2): Projected 18.1 points against Kansas City. His 2024 average of 15.93 and strong 2025 projection of 273.2 season points make him a core play. – DK Metcalf (WR1): Highest projected WR at 14.3 points. Pittsburgh vs Seattle should be a competitive game with passing volume. – Marvin Harrison Jr. (WR2): Rookie with 14.2 projection facing Carolina. His 154.5 season projection suggests breakout potential. – Hunter Henry (TE): Best available TE option at 9.3 projected points with Kittle on IR and Engram questionable. – DJ Moore (FLEX): Solid 13.9 projection against Detroit. Chicago’s passing game should see volume in what could be a high-scoring affair. – Breece Hall (OP): Critical OP selection at 14.9 projected points. Hall offers RB1 upside against Buffalo, and using an RB in the OP slot provides higher floor than WR options.
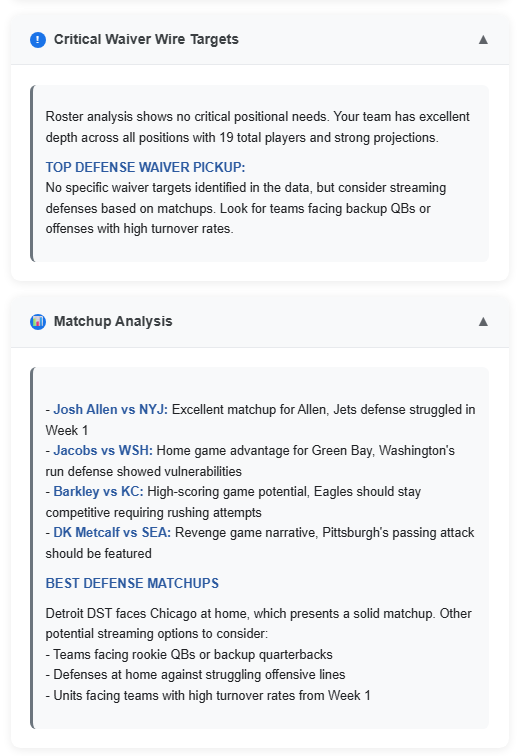
CRITICAL WAIVER WIRE TARGETS:
Roster analysis shows no critical positional needs. Your team has excellent depth across all positions with 19 total players and strong projections.
TOP DEFENSE WAIVER PICKUP: No specific waiver targets identified in the data, but consider streaming defenses based on matchups. Look for teams facing backup QBs or offenses with high turnover rates.
INJURY CONCERNS: – George Kittle: On Injury Reserve, unavailable for Week 2 – Evan Engram: Listed as Questionable, monitor his status throughout the week
MATCHUP ANALYSIS: – Josh Allen vs NYJ: Excellent matchup for Allen, Jets defense struggled in Week 1 – Jacobs vs WSH: Home game advantage for Green Bay, Washington’s run defense showed vulnerabilities – Barkley vs KC: High-scoring game potential, Eagles should stay competitive requiring rushing attempts – DK Metcalf vs SEA: Revenge game narrative, Pittsburgh’s passing attack should be featured
BEST DEFENSE MATCHUPS
Detroit DST faces Chicago at home, which presents a solid matchup. Other potential streaming options to consider: – Teams facing rookie QBs or backup quarterbacks – Defenses at home against struggling offensive lines – Units facing teams with high turnover rates from Week 1
WAIVER PRIORITY: 1. Streaming Defense: Look for defenses with favorable Week 3 matchups 2. Handcuff RBs: Target backup RBs for your elite runners (Jacobs, Barkley, Hall) 3. High-Upside WRs: Monitor snap counts and target shares from Week 2 for emerging receivers
Final Comments: Your roster is exceptionally deep and well-constructed. The OP position selection of Breece Hall provides excellent upside, as RBs typically offer higher floors than WRs in flex positions. Focus on matchup-based streaming for defense and monitor the waiver wire for breakout players rather than addressing positional needs. Your core lineup projects for strong Week 2 performance with multiple players having 15+ point upside.
What’s Next?
So we have a pretty solid week two prediction. Josh Allen and Saquon Barkley I have faith in. The rest of the team is hit or miss. Chicago faces Detroit at Ford Field (Go Lions!) and both teams lost week one. But Ben Johnson facing his old team for the first time has me nervous.
This brings up a few of my to-dos for the overall program.
Defensive matchups – I need to get data for the Defenses to find the best matchups week to week. Having a good defense play is an easy way to get an advantage every week.
Add authentication – I added a really simple authentication method to the code just for the time being. But, it would be nice to have a Single Sign On or something a little bit more secure.
Drag-n-drop interface – I need to add functionality to be able to modify the roster on the web interface. It would be nice if this could also update ESPN.
Slow Output – I’m always looking for ways to optimize the Agent’s output. Currently it takes about 45 seconds to a minute to return the output.
Thoughts? I hope this series is entertaining. If you have ideas for the Agent please comment below or shoot me a message somewhere!