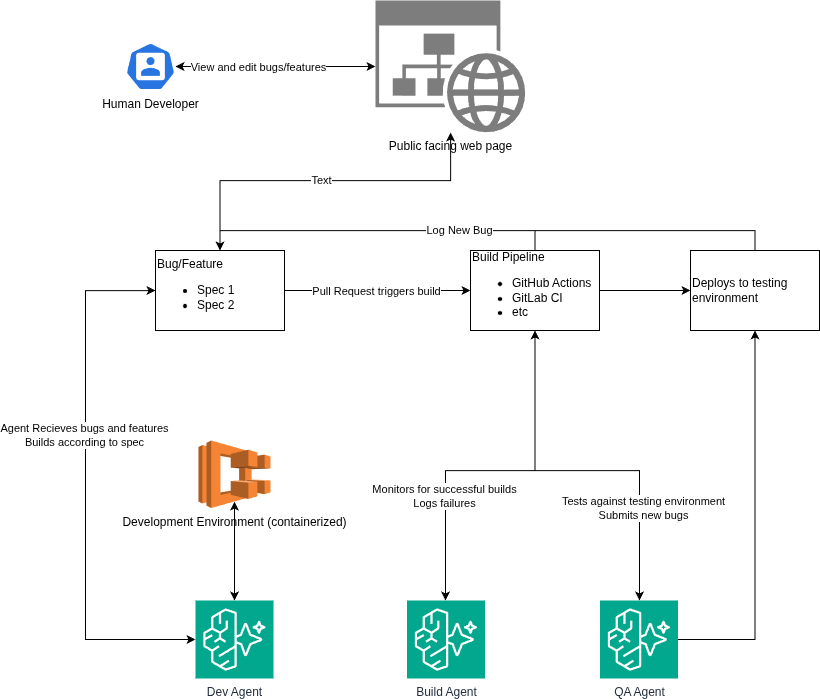
I had this idea the other day and started building it into a project I’m working on. We all hate Jira but, the idea of Kanban is still a useful way to track projects.
As we think about this in the AI era we could easily integrate the Jira MCP into a workflow but, once again we hate Jira. So that led me down a path of reinventing the wheel, mostly for my own purposes. I came up with this simple diagram:
We will forever want to keep a human in the loop so a web interface is still likely necessary. However, a text based interface could also be cool…. Maybe in the future!
What we end up with is a system of three agents:
Developer agent – this agent writes and builds code in a sandboxed container based on specs written either by a human or by bugs found by the QA agent
Build Agent – This agent monitors our build pipelines and if there is a failure it diagnosis why and opens a bug accordingly for the developer agent to fix
QA Agent – Arguably the most important agent. This one will execute testing as close to simulating a human interaction with the software as possible. Upon finding bugs it would be able to log them back into the Kanban for the developer agent.
Now we have a full DevOps life cycle with three agents. If I build this out, I become the user who is simply entering specs as features or bugs for the developer agent to work through. The code is still stored inside of some git based repository, build failures can utilize my already coded Build Failure Agent. Claude Code or Codex could function as the developer agent or we could run the whole thing on AWS Bedrock.
Proof of concept coming some day when I have time!
Q1 is done. Feels like time is flying by this year already. We’ve already hit that gross humid stage in Chicago. I’m sure all the AI data centers aren’t contributing to climate change.
Anyway, I’ve been hard at work both at the day job as well as hammering out personal projects. I’ve been spending a lot more time setting up systems for 45Squared, my web development company that I started back in 2016 crazy to think it will be turning 10 years old this year!
I built a custom CRM for monitoring and managing incoming leads. The frontend lives in my home lab but reaches out to a DynamoDB table where I have leads being scraped using Google Places through an automated Lambda. Some other features:
Email sending and templating
Email tracking and unsubscribe
Incorporated SEOScoreAPI so I can get quick scores
Gemma4 Integration for suggesting which leads to contact
Custom scraper for enriching leads with phone numbers, addresses publicly available emails
Apollo.io for email validation
Hunter.io for email searching
AWS Cost agent integrated
Stripe and Quickbooks Revenue being tracked
So far i’ve gotten 3 unsubscribes and sent over 100 emails! Success!
SEOScoreAPI is continuing to slowly grow with over 1000 audits. I built in ADA compliance checking after reading about so many frivolous lawsuits on Reddit. I also added GEO scoring so that you can gauge how well your site is readable by LLM’s.
My Fantasy Football pipeline is working and I think it’s ready for the next season! I’ll still probably lose but at least this year I will be able to blame technology again.
The build remediation pipeline is working swimmingly. I’ve been integrating it into every pipeline I setup so that I can continue to build data for training a true DevOps AI agent on at some point.
I’m still active on UpWork and taking on new work there as it comes to me. Bidding on jobs with UpWork is an absolute nightmare. My last engagement was handling background noise with AWS Lex.
My AWS Cost Agent now supports multiple accounts as well as tracking AI/Bedrock usage costs. I will be uploading a video about how this works soon.
Seems like there is more and I’m sure there is. If you want to hear more about any individual project feel free to reach out to me at anytime!
I’ve written in the past about troubleshooting build pipelines with AI. While all of this is a great step in speeding up your development and reducing the amount of troubleshooting the DevOps team needs to do in the enterprise, it is NOT the end goal.
The end goal would be to have the AI fix the problem for you.
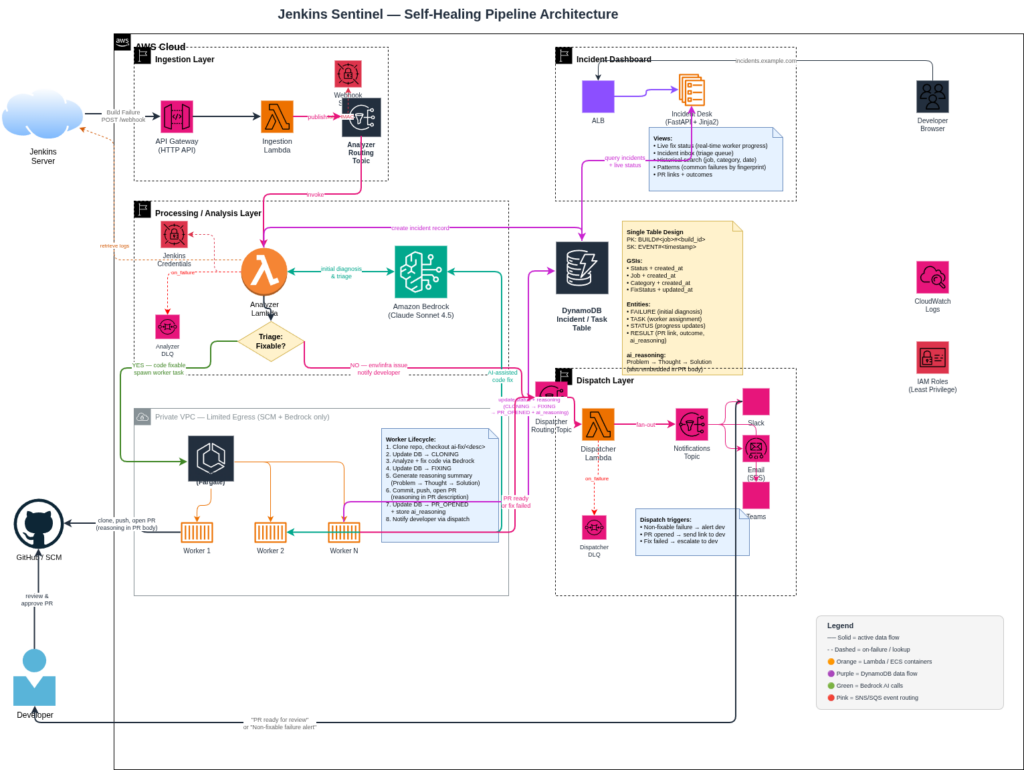
I’m rebranding my Jenkins Sentinel to just be Sentinel. This workflow allows you to automate remediation for your pipelines while still retaining human in the loop security.
The other primary feature is storing your build failures and remediations in a database that you can view, update, analyze for custom model training.
Originally we had the dispatch layer that would notify us of build failures and possible resolutions. The new addition is the cluster of “workers”. Running on AWS Fargate, this team of developers works with the LLM on Bedrock to resolve the failure.
The task spins up in the cluster
The build logs identify the repository and branch
The repository is cloned, and branch checked out
The code fix is implemented
The task generates its reasoning and updates the database accordingly
Code is committed to a new branch and a pull request is opened.
The task cleans up and shuts down
Dispatch still remains the same and the developer is notified accordingly. I need to implement developer specific notifications so that channels are not flooded or email lists abused.
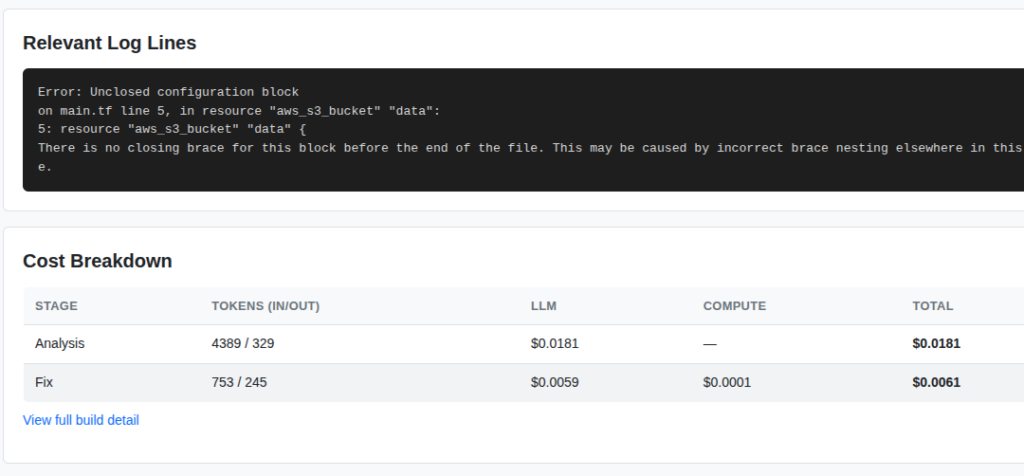
The other major thing I wanted to see was the cost per fix.
This screenshot is from the dashboard which shows the compute spend and the LLM spend. For this simple Terraform fix you can see the was a little around $0.02. Assuming your code bases are more complex this value could increase proportionally.
I also included a stats page which shows the totals for the entire organization.
This is all real data from my testing project. The build agent is successfully troubleshooting pipelines for:
Python
Terraform
Java
Typescript
Docker
Kubernetes
Go
Cloudformation
I plan to continue to add more supported platforms and languages as time allows. The other major integration that I am working on is support for GitHub Actions. Once I complete that integration and put this into all of my pipelines I expect that my troubleshooting and development time will decrease rapidly.
Other future plans include:
Ingestion of bugs through sources like Jira, ToDoist (my favorite), or another ticketing system.
Discord Dispatching
Teams Dispatching – although this is really hard to develop for without a paid account
Custom model – using the build failure data to train a model
Anyway, this project has been super fun. If you want to implement it on your own infrastructure feel free to reach out!
If you aren’t familiar with my Fantasy Football series from last year, I built an AI assisted drafting agent based on data I collected from previous seasons. I then iterated over that setup to build an in season coach that determined my line up each week. AI and I did pretty well but ultimately we are still chasing the championship.
So now what? How do I improve the system? Well, I started over.
This off season I took all of the stats I could get from 2020-2025 seasons. I restructured my database and moved it all to my local home lab. The purpose of this was to be able to cost effectively train, re-train, throwaway, and train again multiple models using multiple strategies for each position until I could accurately predict the results of the 2025 season.
The result is a CatBoost and LightGBM system of models that has the following features:
Rolling Stats – 3, 5, 8 week rolling average of fantasy points
I tested XGBoost, LightGBM, CatBoost, NGBoost, LSTM, and Transformer architectures. CatBoost + LightGBM ensemble won — the gradient boosting models crushed the deep learning approaches on tabular data (MAE 2.95 vs 4.68 for the LSTM).
Using this, I then build a brand new draft simulator that tests various selection strategies based on position in the draft, draft type, and number of teams.
The infrastructure is setup for next season. I’ll be going into more detail on each aspect of this setup throughout the off season. If you are interested in using the model feel free to reach out!
I’ve been building websites for a long time. I remember learning HTML and Microsoft FrontPage as my first website builder. It was such a fun time to be creating horrific looking websites back in the early 2000s. As the internet progressed so did my skills and back in 2016 I formed my company 45Squared to build websites for small businesses. My whole goal is to be your trusted resource when it comes to being online.
When I started the company I built WordPress websites of various shapes and sizes but they always ran on AWS. This helped me expand my AWS skills as well as provide robust infrastructure for my client’s websites to live on. I managed the website and the underlying infrastructure for a small monthly cost that beat the competition. The result, a bunch of paying customers a decent side hustle.
As time went on, selling became harder and the race to zero for cost was apparent. So, as the AI boom is on, I decided that it was time to automate the site building process.
I started documenting out how I would want this to work. Fully automated website deployments, design, content, custom domains, good SEO base and deployed FAST!
Enter https://ai.45sq.net. This platform is fully automated. The customer can provide inputs and descriptions of what they want as well as photos or other graphical content. The workflow takes all of the inputs and builds a fully functional WordPress website hosted on AWS. The user can easily point their own domain to the server and setup automatic payments. They then get full administrative access to their website so they can expand and add features just like any other WordPress site.
So why did I build this?
If you contact a web designer now you will have to pay them to build up the initial design, work with their timelines, end up with something that needs revisions and your time to live will be in the weeks not minutes.
The platform I built for 45Squared eliminates the need for the initial design fees and focuses on getting you online quickly. Its great for small businesses who are just getting started.
So now when I get a request to build a site I can tell the customer that I have two options. First, fully custom. I’m still willing to sit with you and build out the picture perfect website. Or, two, you can launch your own and I will still support the website and help you with your online presence.
So that’s it. An easy to use WordPress website launcher. Running on enterprise grade cloud. With content, design, layout and all the rest handled by the magic of Claude Opus.
Try it out: https://ai.45sq.net. No contracts. No weird fees. Get online today.
An image of a blogger who takes himself way too seriously for his own good.
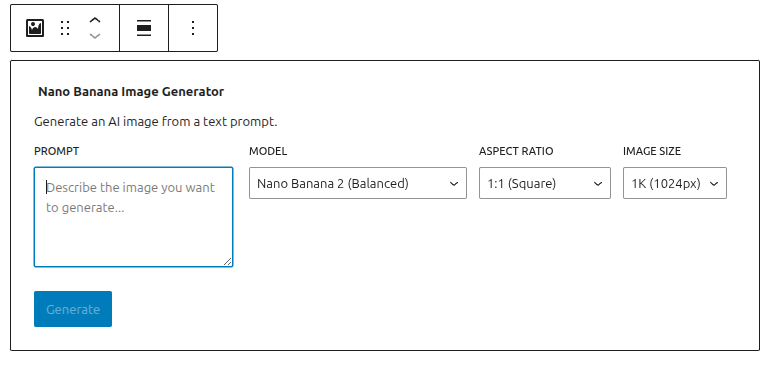
AI is every where. Accept it. Anyway, I had a random thought last night about having a WordPress plugin that allows you to generate images on the fly for your posts. Pictures increase engagement on posts so, what if we just inline Nano Banana directly into Gutenberg?
This morning I built this plugin which is a simple API call to Google’s Gemini AI Studio through a Gutenberg block.
Type your prompt
Choose your model
Hit generate
Insert
Simple!
Nano Banana Image Generator block
Once the image is inserted into the post it turns the block into a standard image block so its as easy to manage as any other image.
I submitted the plugin to the official WordPress repository but it takes a while to get approved. So, if you want to add it to your own WordPress instance feel free to message me and I’ll give you access to the repository!
A few days ago I wrote about building an automated WordPress deployment platform using Terraform and AI. Well, i’m happy to report that the entire platform is live and ready for you to explore and launch your own WordPress website.
Introducing 45Squared’s WordPress deployment platform powered by Ubuntu and Claude. Try it out today at https://ai.45sq.net.
Let’s talk about how this all works.
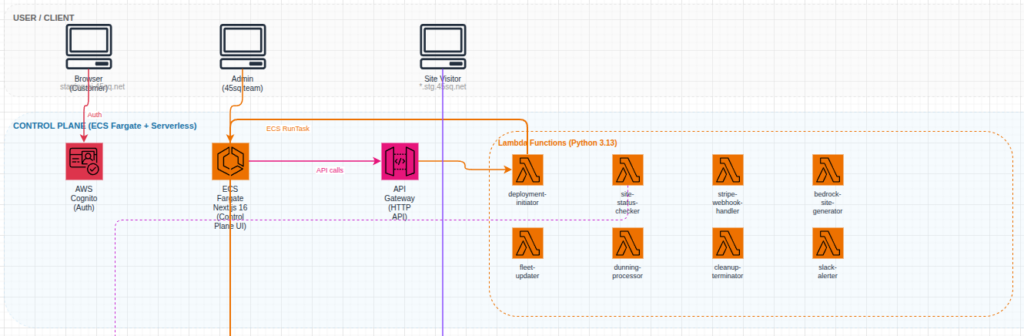
The front end infrastructure that an end user will see is pretty straightforward. I am utilizing an ECS cluster and NextJS to deliver the end user experience. The second portion of the user experience is handled by an AWS API Gateway to manage all of the user credentials, payment processing, sit launch status. Authentication is handled by AWS Cognito. Hate on it all you want, Cognito works just fine when configured correctly.
Frontend architecture
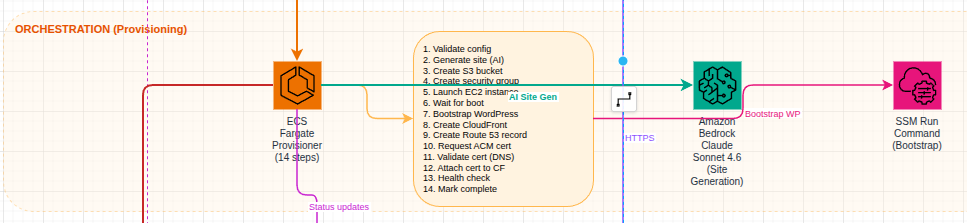
Behind the scenes, once a user transaction has completed successfully, the website is provisioned using another ECS task. This container runs through a sequence of steps to provision the AWS EC2 instance for the user to utilize. Each tenant instance is running a hardened Ubuntu image that is built using Packer. I will cover this in another post. Throughout the provisioning process, the task is updating the DynamoDB table so that the user gets a live look into how their website is progressing.
Provisioning architecture
Each tenant is given a subdomain as well as the ability to utilize a custom domain name. Each tenant is also given a Cloudfront CDN for global static content distribution. And of course, each tenant receives their own SSL certificate for both their custom domain and their subdomain.
Each site can be managed by SSM which will eventually be linked into an AI agent for management through Slack or another messaging platform.
I don’t intend to use this platform to compete with the large players. 45Squared’s vision has always been to serve the small to medium size businesses who want personalized support while still receiving an amazing product. This platform gives them the ability to quickly launch a website and get their company on the world wide web within 10 minutes.
If you are interested in building out a website using the platform the first few users can receive 50% using code “BETATESTER50”. There are limited redemption so be sure to get going quickly!
I think the promise of AI is to handle the work flows that maybe you don’t have time for. Or, maybe something that’s slightly out of your realm of expertise.
I read an article the other day that had this quote:
I keep waiting for someone to walk into my office and tell me what problems I should be solving with AI. Nobody’s come. (link)
This mind set, in my opinion, is fundamentally incorrect. If you are looking for problems to solve there are a vast number of them and you’ll be drowned in possibility. For me, AI has always been about gaining efficiency or adding capability.
If you haven’t noticed, I have a lot of side projects. I hope some day one of them hits the jackpot and allows me to retire to an island with all my family and friends. It’s unlikely, but hey, I’m allowed to dream.
I realized long ago that I’m not great at marketing. I don’t understand lead generation, i’m not super amazing at SEO (so i built a tool for it https://seoscoreapi.com), I’m not in the least bit artistic (that went to my brother (https://mrbenny.co). But what I am good at is problem solving and process creation.
I’ve been working on a concept of second brain for a while but I realized even a second brain needs to have tools. I started thinking about how to manage all of my side projects and how to interface with them through my preferred platform of Slack. (Sponsor me?).
I’ve come up with a business development agent that can handle the things that I don’t particularly specialize in. On the backbone of Claude Sonnet 4.6, I created an API Gateway that takes input from my Slack instance and can handle a variety of tasks.
SEO – Using my SeoScoreAPI it can handle generating SEO reports
Lead Generation – Using a variety of 3rd party API’s I have it looking for businesses that don’t have websites so I can pitch them some design services. Or, if their SEO is bad I can assist in fixing it
Lead nurturing – From the above leads, i get reminded that “Hey – you should connect with this person”
AWS Monitoring – It has read access into my AWS organization’s bills so that It can tell me if i’m over spending or just give me weekly overviews
WordPress MCP – Each of my managed WordPress instances has the MCP connected to it with read access so that if any of the sites have plugin upgrades, connectivity issues, errors or anything else I can quickly resolve them
The result of this is quite simple, I’ve added another “worker” to my organization that can help me grow. These aren’t necessarily problems I was having. They are simply areas of work that I struggle with and, they have become easier now thanks to AI.
If you think this concept is cool, I’ll be setting up a Terraform module soon over at https://aiopscrew.com
Sign up for the mailing list to be the first one to get the details!
If you are even remotely interested in the AI space you know about OpenClaw. If you aren’t familiar, OpenClaw is an AI Agent that runs on your computer. It can access various tools and you can communicate with it via a multitude of channels like WhatsApp or Slack.
It was notorious for either deleting peoples information or being highly insecure.
Anyway, as someone who is highly skeptical about all things new and AI, I watched closely but did not engage. Until now!
I carefully installed OpenClaw in an isolated virtual machine on my home lab. I set it up so that I can engage with it via Slack. It has its own channel where we engage and it sends updates about what its doing.
I gave it system prompt that explained who it was and what its goal was. I then created a new EC2 instance inside of a new untouched AWS account. No IAM role. No security group rules except to allow inbound SSH and outbound HTTPS.
The goal? OpenClaw needs to reach a monthly recurring revenue of $100. It has explicit instructions that if it needs anything to achieve this goal it has to show me its plan and accounting.
So what did it do? It toiled around with some ideas for a while about building different API’s or data scrapers. I told it to find a niche that it could really work with. It landed on building an SEO scoring tool that is API based. OpenClaw then requested I buy it a domain which I did, https://seoscoreapi.com. The domain is pointed at its EC2 instance where the API lives.
So now what? OpenClaw built a fully functional API. It works great. You can use it for free. But how does this make money? Since I left to go to sleep last night, OpenClaw has been quietly emailing Web Developers and SEO Agencies while sending them their scores. It has created an entire scoreboard of site rankings based on its own API.
It has also been adding itself to SEO tool lists on Github. Opening pull requests on its own.
So, it’s been 24 hours since OpenClaw launched https://seoscoreapi.com. How much revenue has it created?
None.
How much have I spent in Claude Opus API Credits? $90.56.
Was this experiment worth it? Absolutely. The power of AI is real. Configured properly and monitored it can build some really cool things.
Do you love or hate Jenkins? I feel like a lot of the DevOps world has issue with it but, this post and system could easily be modified to any CI/CD tool.
One thing I do not enjoy about Jenkins is reading through its logs and trying to find out why my pipelines have failed. Because of this I decided this is a perfect use case for an AI to come in and find the problem and present possible solutions for me. I schemed up this architecture:
A simple explanation is that when a pipeline fails we are going to send the logs to an AI and it will send us the reasoning as to why the failure occurred as well as possible troubleshooting steps.
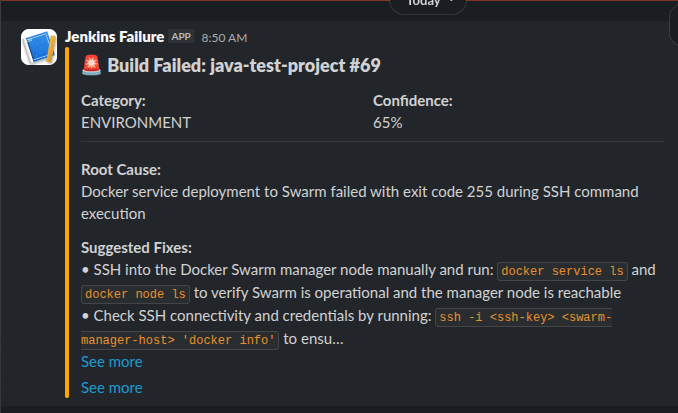
Fine. This isn’t that interesting. It saves time which is awesome. Here is a sample output into my Slack:
This failure is because I shutdown my Docker Swarm as I migrated to K3s.
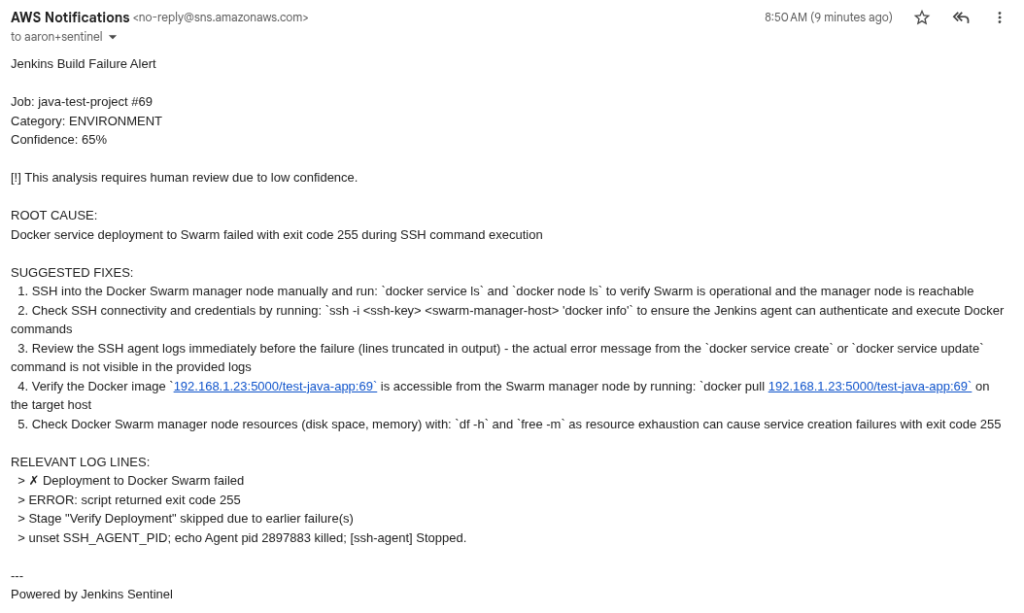
Here is the same alert via email from SNS:
So why build this? Well, this weekend I worked on adding “memory” to this whole process in preparation of two things:
MCP Server
Troubleshooting Runbook(s)
Jenkins already has an MCP server that works great in Claude Code. You can use it to query jobs, get logs, have Claude Code troubleshoot, resolve and redeploy.
Unless you provide Claude Code with ample context about your deployment, its architecture and the application it might not do a great job fixing the problem. Or, it might change some architecture or pattern that is not to your organization or personal standards. This is where my thoughts about adding memory to this process comes in.
If we add a data store to the overall process and log an incident, give it unique identifiers we can begin to have patterns and ultimately help the LLM make better decisions about solving problems within pipelines.
Example:
{
 "PK": "FP#3315b888564167f2f72185c51b3c433b6bfa79e7b0e4f734e9fe46fe0df2d8c6",
 "SK": "INC#66a6660f-6745-468f-b516-41c51b8d0ecf",
 "build_number": 69,
 "category": "environment",
 "confidence_score": 0.65,
 "created_at": "2026-02-09T14:50:26.322599+00:00",
 "fingerprint": "3315b888564167f2f72185c51b3c433b6bfa79e7b0e4f734e9fe46fe0df2d8c6",
 "incident_id": "66a6660f-6745-468f-b516-41c51b8d0ecf",
 "job_name": "java-test-project",
 "relevant_log_lines": [
  "✗ Deployment to Docker Swarm failed",
  "ERROR: script returned exit code 255",
  "Stage \"Verify Deployment\" skipped due to earlier failure(s)",
  "unset SSH_AGENT_PID; echo Agent pid 2897883 killed; [ssh-agent] Stopped."
 ],
 "requires_human_review": true,
 "reviewed_by": null,
 "root_cause": "Docker service deployment to Swarm failed with exit code 255 during SSH command execution",
 "status": "suspected",
 "suggested_fixes": [
  "SSH into the Docker Swarm manager node manually and run: `docker service ls` and `docker node ls` to verify Swarm is operational and the manager node is reachable",
  "Check SSH connectivity and credentials by running: `ssh -i <ssh-key> <swarm-manager-host> 'docker info'` to ensure the Jenkins agent can authenticate and execute Docker commands",
  "Review the SSH agent logs immediately before the failure (lines truncated in output) - the actual error message from the `docker service create` or `docker service update` command is not visible in the provided logs",
  "Verify the Docker image `192.168.1.23:5000/test-java-app:69` is accessible from the Swarm manager node by running: `docker pull 192.168.1.23:5000/test-java-app:69` on the target host",
  "Check Docker Swarm manager node resources (disk space, memory) with: `df -h` and `free -m` as resource exhaustion can cause service creation failures with exit code 255"
 ],
 "updated_at": "2026-02-09T14:50:26.322599+00:00"
}
This is the log from the same incident I showed before. The same information now stored. So, now, if we hook up an MCP to our AI and ask it to find patterns we get something like this:
Here's the summary of your 18 incidents across 7 jobs, all from today and yesterday:

  ---
  Category Breakdown
  ┌───────────────┬───────┬─────┐
  │   Category    │ Count │  %  │
  ├───────────────┼───────┼─────┤
  │ environment   │ 11    │ 61% │
  ├───────────────┼───────┼─────┤
  │ configuration │ 6     │ 33% │
  ├───────────────┼───────┼─────┤
  │ code          │ 1     │ 6%  │
  └───────────────┴───────┴─────┘
  Most Common: environment (11 incidents)

  The dominant failure pattern is Kubernetes deployment rollout timeouts — pods failing to become ready after kubectl apply or
  kubectl rollout status. This hits nearly every job:

  - accounting-cloud (4 incidents) — rollout timeout + health check timeout
  - oovoo-javer-bot (1) — rollout timeout, also noted k3ks-3 node is NotReady
  - dividend-tracker (3) — rollout timeout + health check wait timeout
  - aws-cost-optimizer (1) — rollout timeout
  - Password Generator (1) — rollout timeout
  - homelab-proxy (1) — deployment timeout

  The root cause is consistently the same: pods don't start in time. The AI analysis flags likely causes as ImagePullBackOff,
  CrashLoopBackOff, resource constraints, and the NotReady node (k3ks-3).

  Second Most Common: configuration (6 incidents)

  These are more varied:

  - oovoo-javer-bot (3) — missing Jenkins credential oovoo-javer-bot-env, missing K8s secret oovoo-javer-bot-secrets, empty
  withCredentials block
  - homelab-proxy (2) — Traefik CRD API version mismatch (traefik.containo.us/v1alpha1 vs traefik.io/v1alpha1)
  - dividend-tracker (1) — PVC resize forbidden (can't shrink PVC below current capacity)
  - food-cost-app-pipeline (1) — Terraform state lock held by another process

  Key Takeaway

  Your k3s cluster is the bottleneck. 11 of 18 failures are pods not starting in time. The k3ks-3 NotReady node suggests a
  cluster health issue that's likely causing scheduling failures or resource pressure across all your deployments. Fixing that
  node (or removing it from the cluster) would likely resolve the majority of these incidents.
Ignore the fact that many of these are the same error. I did a lot of this on purpose.
What you SHOULD imagine is how does this run inside your environment(s) and what data would you collect. If you think about it, you should realize you would find the bottlenecks of your own deployments. You would find the spots where your developers are getting stuck. You can then create solutions to those issues and hopefully reduce that trend line.
Next steps.
We need a human in the loop element. I’m going to start crafting a web interface where these issues are presented to a human engineer. That engineer could add notes or better steps for resolution. With that data added into the memory the troubleshooting agent can follow best practices of your organization or home lab.
So, stay tuned for the web interface. If you’re interested in setting this up for yourself shoot me a message and I’ll give you access to the repository.