In a continuation of my Discord Bot feature deployment, I found a need to convert Spotify links to YouTube links. I use Youtube music for my music streaming needs and the rest of the Discord uses Spotify.
With the help of ChatGPT, I created a script that converts Spotify links to Youtube links! This utilizes both the Spotify API and Youtube APIs to grab track information and format search queries to return a relevant Youtube link.
The code consists of two primary functions which I have shared below. One to get the artist and track names and another to query YouTube. Combined, we can return a YouTube link to a multitude of applications.
I took this code and incorporated it into my Discord bot so that anytime a user posts a Spotify link it will automatically convert it to a Youtube link. Here is an example:
If you want to utilize this code check out the Github link below. As always, if you found this article helpful please share it across your social media.
Look, I know there are a bunch of test frameworks that you could use for your Lambda functions. But what if you wanted something simple? I spent an afternoon putting together what I would want in a testing pipeline that returns a simple “Success/Fail” type response to me via Email.
An architecture diagram for your eyes:
The idea is to create a JSON object with a key and value pair of the name of the Lambda function and the test event to pass to the lambda. Once the file is uploaded to the S3 bucket the pipeline can be triggered where a Codebuild job will iterate through the Lambdas and their events. The Lambdas will be tested with the event and return whether or not they are successful. The results are then sent to an SNS topic to be distributed to the developers.
Going forward, I hope to automate adding new Lambda functions to the JSON file so that testing can also be scheduled.
I spent time packaging this solution up with all the appropriate Terraform files and code. If you are interested in this solution feel free to reach out and I can deliver the packaged application to you!
I love AWS. But one thing they don’t do is build complete tools. SES is one of them. I recently started getting emails about high usage for one of the identities that I have set up for SES. I would assume that there was a way to track usage within CloudWatch but for the life of me I couldn’t find one. So I guess that means I need to build something.
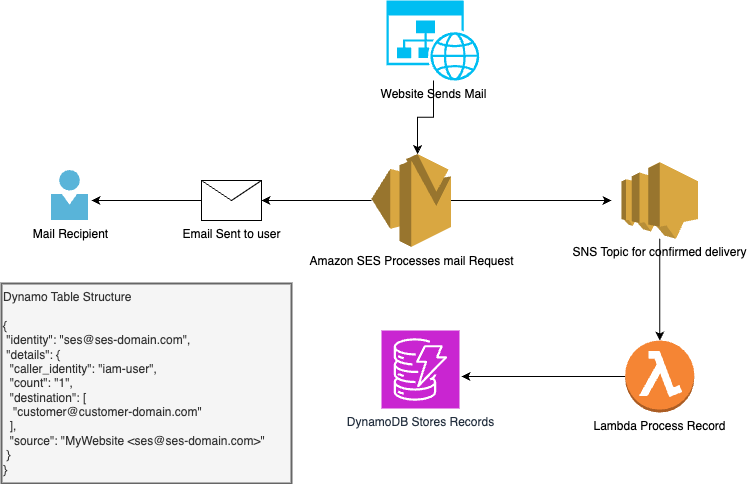
The idea here is pretty simple, within SES identities you can set up a notification. So, I created an SNS topic and subscribed all delivery notifications to the topic. Then, subscribe a Lambda function to the topic. The lambda function acts as the processor for the records then formats them in a usable way and puts them into DynamoDB. I used the identity as the primary key. The result is a simple application architecture like the below image.
Every time an email is delivered the lambda function processes the event and checks the DynamoDB table to see if we have an existing record. If the identity is already present in the table it returns the “count” value so that we can increment the value. The “destination” value appends the destination of the email being sent. Below is a sample of the code I used to put the object into the DynamoDB Table.
def put_dynamo_object(dynamo_object):
    count = str(dynamo_get_item(dynamo_object))
    if count == None or count == 0:
        count = str(1)
    else:
        count = int(count) + 1
    # get email address from the long string
    source_string = dynamo_object['source']
    email_match = match = re.search(r'[\w.+-]+@[\w-]+\.[\w.-]+', source_string)
    email = match.group(0)
    try:
        table.update_item(
            Key={
                    'identity': email

                },
            AttributeUpdates={
                'details': {
                    'Value': {
                            'caller_identity': dynamo_object['caller_identity'],
                            'source': dynamo_object['source'],
                            'destination': dynamo_object['destination'],
                            'count': str(count)
                    }

                }
            }
        )
        return True
    except ClientError as e:
        print("Failed to put record")
        print(e)
        return False
If you want to use this code feel free to reach out to me and I will share with you the Terraform to deploy the application and as always, reach out with questions or feedback!
I’m a member of a lot of Discord servers. The one I participate in most is one with my brothers and our friends. In this server, we joke around a lot about people posting off-topic messages in the various text channels and we give them fake “warnings”. I decided to take this a step further and create a bot where we could track the warnings and then present them in a leaderboard.
The Discord bot API documentation is great and allowed me to quickly get a proof of concept up and running. I then relied on my Python, Terraform, and AWS skills to get the bot up and running quickly. Below is a simple architecture diagram that I started and will most likely be adding to as the members of the server request more features.
We have three current commands, !warning, !feature, !leaderboard. The !warning command takes input of a tagged user. It then uses the Boto3 library for Python and adds the attribute to the user in the table. Here is the code:
# Adds an attribute to a user
    def add_warning_to_user(username, attribute):
        client = boto3.resource("dynamodb", region_name="us-west-2",
                                aws_access_key_id=os.getenv('AWS_KEY'),
                                aws_secret_access_key=os.getenv('AWS_SECRET'))
        table = client.Table(table_name)
        print("adding", attribute, "to", str(username))

        try:
            response = table.update_item(
                Key={'username': str(username)},
                AttributeUpdates={attribute: {
                    'Value': str(dynamodb.get_warning_count_of_user(username, attribute) + 1)
                    }
                }
            )
            print(response)
        except ClientError as e:
            print("Failed to update count")
            print(e)
            return False
        return True
I have another function within this code that will call out to the DynamoDB table and gets the user’s current value so that we can increment the count.
The !leaderboard command takes input of an “attribute” I built it this way so that we can have future attributes added to users without having to rebuild everything from scratch. To get the data I used the DynamoDB scan function to retrieve all of the data for all the users and then filter within the Python application on just the attribute that we are requesting the leaderboard for. I then have a function that formats the leaderboard into something that the bot can publish back to the server.
    def create_table(data, attribute):
        if attribute == "warning_count":
            attribute = "Warnings"
        table = ""
        rows = []
        rows.append("``` ")
        rows.append(f"{attribute}: Leaderboard")
        for key, value in data.items():
            rows.append(f"{key}: {str(value)}")
        rows.append("``` ")
        for row in rows:
            table += " " + row + "\n "
        return table
This code I want to revisit to make the formatting cleaner as the list gets longer. But for now it works as intended.
The last function I created so that the users could submit feature requests. The code is very simple and the command !feature takes the input of all text following the command and passes it to an SNS function I wrote which sends an email to me containing the user’s feature request. I have hopes that I can transition this to create some sort of Jira task or other workflow. Below is the bot’s code to handle this interaction:
@client.command(name="feature", help="sends a feature request")
async def send_feature_request(ctx, *, args):
    print("THIS IS THE FEATURE REQUEST", args)
    if sns.send_message(args) == True:
        await ctx.send("Your request has been sent")
    else:
        await ctx.send("Failed to send your request. Plz try again later.")
Right now the bot is running inside a Docker container within my homelab. I need to create better logging and implement some sort of logging server so that I can better handle errors as well as monitoring in case of any outages.
If you have questions about building Discord bots or AWS and its various components feel free to reach out to me at any time. This was a great project that I worked on over a few days and it was great to see it come together quickly!
I recently came across a challenge where I wanted to purge old Lambda Function versions. Some of the functions had over 65 versions!
The code below will iterate through a text file with a Lambda function defined on each line. It will get a list of all the versions and delete any version that is not the highest version or any versions that are attached to an alias.
import boto3
from botocore.exceptions import ClientError

client = boto3.client("lambda", region_name='us-west-2')
def delete_function_version(function_name, version):

    try:
       response = client.delete_function(
           FunctionName=function_name,
           Qualifier=str(version)
       )
    except ClientError as e:
        print("Failed to delete version of", function_name, "version number", str(version))
        print(e)
def get_layer_versions(function_name):
    try:
        response = client.list_versions_by_function(
            FunctionName=function_name
        )
        return response['Versions']
    except ClientError as e:
        print('failed to get info for', function_name)
        print(e)

if __name__ == "__main__":
    print("Starting lambda update")
    with open("lambda_list.txt", "r") as text:
        lambda_list = text.read().splitlines()
        text.close()
    version_info_results = {}
    for lambda_function in lambda_list:
        print("Working with lambda", lambda_function)
        lambda_versions = get_layer_versions(lambda_function)
        lambda_version_list = []
        for version in lambda_versions:
            version_number = version['Version']
            if version_number == "$LATEST":
                pass
            else:
                lambda_version_list.append(int(version_number))
        for lambda_version in lambda_version_list:
            if lambda_version == max(lambda_version_list):
                print("This is the latest version skipping", str(lambda_version))
                pass
            else:
                print("Deleting version", lambda_version, "of", lambda_function)
                delete_function_version(lambda_function, lambda_version)
To use this function you first need to populate the text file with any Lambda function(s) that you want to evaluate and then execute the Python script.
I hope that this helps you or a coworker!
EDIT: Thanks to Alex Iliev for testing and finding some bugs in this code!
I think its pretty obvious that I love DynamoDB. It has become one of my favorite AWS Services and I use it almost every day at work and am getting better at using it for my personal projects as well.
I had a client approach me about getting logs from a Cloudfront Distribution. Cloudfront has a native logging function that spits out .GZ files to an S3 bucket. My client doesn’t have any sort of log ingestion service so rather than build one I decided we could parse the .GZ files and store the data into a DynamoDB table. To accomplish this I created a simple lambda:
import boto3
import gzip
import uuid
from datetime import datetime
from datetime import timedelta
import time
from botocore.exceptions import ClientError

#Creates a time to live value
def ttl_time():
    now = datetime.now()
    ttl_date = now + timedelta(90)
    final = str(time.mktime(ttl_date.timetuple()))
    return final

#Puts the log json into dynamodb:
def put_to_dynamo(record):
    client = boto3.resource('dynamodb', region_name='us-west-2')
    table = client.Table('YOUR_TABLE_NAME')
    try:
        response = table.put_item(
            Item=record
        )
        print(response)
    except ClientError as e:
        print("Failed to put record")
        print(e)
        return False

    return True
def lambda_handler(event, context):
    print(event)
    s3_key = event['Records'][0]['s3']['object']['key']
    s3 = boto3.resource("s3")
    obj = s3.Object("YOUR_BUCKET", s3_key)
    with gzip.GzipFile(fileobj=obj.get()["Body"]) as gzipfile:
        content = gzipfile.read()
    #print(content)
    my_json = content.decode('utf8').splitlines()

    my_dict = {}
    for x in my_json:
        if x.startswith("#Fields:"):
            keys = x.split(" ")
        else:
            values = x.split("\t")

    for key in keys:
        if key == "#Fields:":
            pass
        else:
            for value in values:
                my_dict[key] = value
    x = 0
    for item in keys:
        if item == "#Fields:":
            pass
        else:
            my_dict[item] = values[x]
            x +=1


    print('- ' * 20)
    myuuid = str(uuid.uuid4())
    print(myuuid)
    my_dict["uuid"] = myuuid
    my_dict['ttl'] = ttl_time()

    print(my_dict)
    if put_to_dynamo(my_dict) == True:
        print("Successfully imported item")
        return True
    else:
        print("Failed to put record")
        return False
This lambda runs every time there is an S3 object created. It takes grabs the .GZ file and parses it into a dictionary that can be imported into DynamoDB. One other thing to note is that I append a UUID so that I can help track down errors.
I wrote a simple front end for the client to grab records based on date input which writes the logs to a CSV so they can parse them on their local machines. I have a feeling we will be implementing a log aggregation server soon!
If this code helps you please share it with your friends and co-workers!
I was working with a customer the other day trying to come up with a way to import a bunch of IP addresses into a white list on AWS. We came up with the approach of using Managed Prefix Lists in VPC. I wrote some Python in order to grab some code from an API and then automatically put it into a prefix list.
The code takes input from an API that is managed by a 3rd party. We first use that and parse the returned values into meaningful lists. After that, we pass the IPs to the function which it will check if the entry exists or not. If it does, it will pass the IP. If it doesn’t exist it will automatically add it.
import requests
import json
import os
import boto3
from botocore.exceptions import ClientError
import ipaddress

def check_for_existing(list_id, ip):
    client = boto3.client("ec2", region_name="us-west-2")
    try:
        response = client.get_managed_prefix_list_entries(
            PrefixListId=list_id,
            MaxResults=100,
        )
        for entry in response['Entries']:
            if entry['Cidr'] == ip:
                return True
            else:
                pass
        return False
    except ClientError as e:
        print(e)


def get_prefix_list_id(list_name):
    client = boto3.client("ec2", region_name="us-west-2")
    response = client.describe_managed_prefix_lists(
        MaxResults=100,
        Filters=[
            {
                "Name": "prefix-list-name",
                "Values": [list_name]
            }
        ]
    )
    for p_list in response['PrefixLists']:
        return {"ID": p_list['PrefixListId'], "VERSION": p_list['Version']}

def update_managed_prefix_list(list_name, ip):
    client = boto3.client("ec2", region_name="us-west-2")
    if check_for_existing(get_prefix_list_id(list_name)['ID'], ip) == True:
        print("Rule already exists")
        return False
    else:
        try:
            response = client.modify_managed_prefix_list(
                        DryRun=False,
                        PrefixListId=get_prefix_list_id(list_name)['ID'],
                        CurrentVersion=get_prefix_list_id(list_name)['VERSION'],
                        AddEntries=[
                            {
                                "Cidr": ip
                            }
                        ]
                    )
            return True
        except ClientError as e:
            print(e)
            print("Failed to update list")

if __name__ == "__main__":
    url = "https://<my IP address URL>"
    headers = {}
    r = requests.get(url, headers=headers)
    json_ips = json.loads(r.content)
    ip = ""
    list_name = ""
    result = update_managed_prefix_list(list_name, ip)
    if result == True:
        print("Successfully Updates lists")
    else:
        print("Failed to update lists")
If you are going to use this code it will need some modifications. I ultimately did not deploy this code but I had plans to run it as a Lambda function on a schedule so the lists would always be up to date.
If this code is helpful to you please share it with your friends!
I’m using an Amazon Web Services Security Group as a way to allow traffic into an EC2 instance for the instance’s users. The users can give themselves access through a web interface that I wrote for them. Maybe I’ll cover that in a different post.
I found recently that the Security Group was nearing its maximum rule list. So I decided to start purging rules which would ultimately force them to re-add their IP addresses to the group.
Going in and manually removing rules is rather time-consuming. I figured I could write a script that would handle it for me. The first step was to update my previous script that inserts the rule to add a tag to the rule. The function below takes input of Security Group Id’s as a list and returns all of the rules.
The script below iterates through each of the rules returned and will append the tag of “dateAdded” and a stringified date code.
for sg_rule in get_sg_rules(sg_list)['SecurityGroupRules']:
        try:
            client = boto3.client('ec2')
            response = client.create_tags(
            DryRun=False,
            Resources=[
                sg_rule['SecurityGroupRuleId'],
            ],
            Tags=[
                {
                    'Key': 'dateAdded',
                    'Value': '2022-11-05'
                },
            ]
        )
        except ClientError as e:
            print(e)
I then wrote the following Lambda function that runs every day and checks for any expired rules. The schedule is set up by a Cloudwatch Event’s rule.
import boto3
from datetime import datetime, timedelta
from botocore.exceptions import ClientError
def return_today():
    now = datetime.now()
    return now
def get_sg_rules(sg_id, old_date):
    client = boto3.client('ec2')
    response = client.describe_security_group_rules(
    Filters=[
        {
            'Name': 'group-id',
            'Values': sg_id
        },
        {
            'Name': 'tag:dateAdded',
            'Values': [old_date]
        }
    ],
    )

    return response

def lambda_handler(event, context):
    sg_list = ["xxxx", "xxx"]
    old_date = datetime.strftime(return_today() - timedelta(days=30), "%Y-%m-%d")
    print(old_date)
    for sg_rule in get_sg_rules(sg_list, old_date)['SecurityGroupRules']:
        try:
            client = boto3.client("ec2")
            response = client.revoke_security_group_ingress(
                GroupId=sg_rule['GroupId'],
                SecurityGroupRuleIds=[sg_rule['SecurityGroupRuleId']]
                )
            print(response)
            print("Successfully deleted the rule")
        except ClientError as e:
            print(e)
            print("Failed to delete rule")
You’ll see that the code has a list of Security Groups to check. It compares the current date to that of 30 days previous. If the tag of “dateAdded” matches that previous date then we will go ahead and remove the rule.
I hope this helps you automate your AWS Accounts. Below are links to the code repository so you can edit the code as needed. Please share it with your friends if this helps you!
I realized today that I haven’t updated my EC2 reservations recently. Wondering why I never did this I came to understand that there was no way that I was getting notified that the reservations were expiring. I spent the day putting together a script that would look through my reservations, assess the time of their expiration, and then notify me if it was nearing my threshold of 3 weeks.
I put this together as a local script but it can also be adapted to run as a lambda function which is what I have it set up to do. As always, you can view my code below and on GitHub.
import boto3
from datetime import datetime, timezone, timedelta
from botocore.exceptions import ClientError
import os
import json
ec2_client = boto3.client("ec2", region_name="us-west-2")

def get_reserved_instances():
    response = ec2_client.describe_reserved_instances()
    reserved_instances = {}
    for reservedInstances in response['ReservedInstances']:
        reserved_instances.update({
            reservedInstances['ReservedInstancesId']: {
                "ExpireDate": reservedInstances['End'],
                "Type": reservedInstances['InstanceType']
            }
        })
    return reserved_instances
def determine_expirery(expirery_date):
    now = datetime.now(timezone.utc)
    delta_min = timedelta(days=21)
    delta_max = timedelta(days=22)
    if expirery_date - now >= delta_min and expirery_date - now < delta_max:
        return True
    else:
        return False
#Send Result to SNS
def sendToSNS(messages):
    sns = boto3.client('sns')
    try:
        send_message = sns.publish(
            TargetArn=os.environ['SNS_TOPIC'],
            Subject='EC2-Reservation',
            Message=messages,
            )
        return send_message
    except ClientError as e:
        print("Failed to send message to SNS")
        print(e)


if __name__ == "__main__":

    for reservation, res_details in get_reserved_instances().items():
        if determine_expirery(res_details['ExpireDate']) == True:
            sns_message = {"reservation": reservation, "expires": res_details['ExpireDate'].strftime("%m/%d/%Y, %H:%M:%S")}
            sendToSNS(json.dumps(sns_message))
#
I have an SNS topic setup that is set to send messages to a Lambda function in the backend so I can format my messages and send them to a Slack channel for notifications.
If you have any questions, feel free to comment or message me on Twitter!
I have been working on deploying resources to a lot of AWS accounts lately where each account has the same network infrastructure. When deploying Lambdas, I had the common name of the security group but not the ID. I wrote this utility to get the security group ID for me quickly.
import boto3
import sys

def get_security_group_id(common_name):
    ec2 = boto3.client("ec2", region_name="us-west-2")

    response = ec2.describe_security_groups()
    for security_group in response['SecurityGroups']:
        if security_group['GroupName'] == common_name:
            return security_group['GroupId']

if __name__ == '__main__':
    if sys.argv[1] == "help" or sys.argv[1] == "--help" or sys.argv[1] == "usage" or sys.argv[1] == "--usage":
        print("USAGE: python3 main.py <security group name>")
    else:
        sg_id = get_security_group_id(sys.argv[1])
        if sg_id == None:
            print("Security Group Not found")
        else:
            print(sg_id)
This is a simple tool that can be used on your command line by doing:
python3 main.py <security group name>
I hope this helps speed up your deployments. Feel free to share the code with your friends and team!