Sigh… another week another loss. It was a close one. It turns out people just didn’t really show up to play.
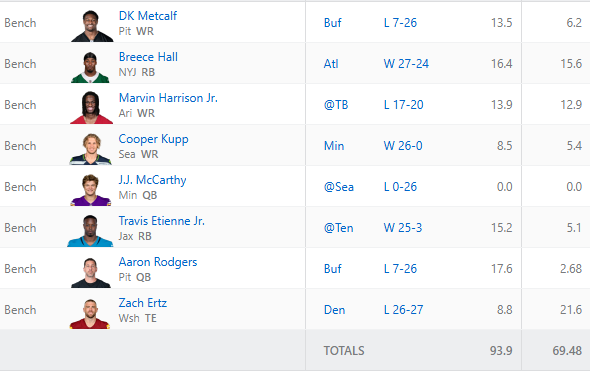
Its hard to win a game when your high scorer is a defense. There was some light at the end of the Patriots game when Henderson was running down the field. Unfortunately they took him out and then the drive stalled. Had he been able to get a touch down we could have won. We left some points on the bench as well:
Zach Ertz had a monster game and many of the other players would have been better than Saquon.
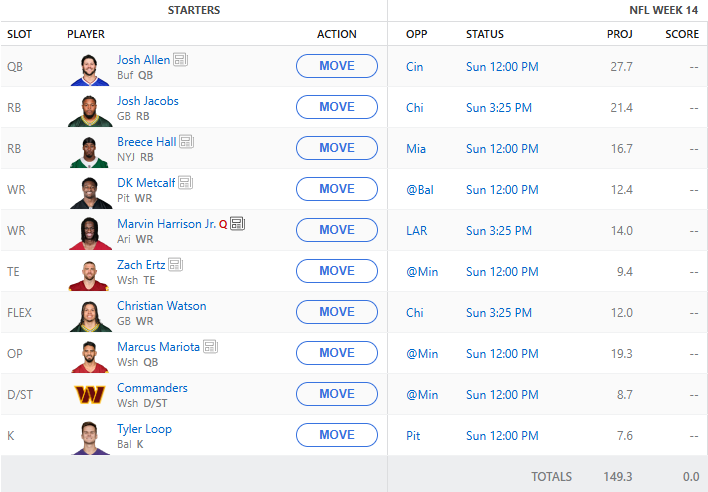
On to week 14. This is the last week before our playoff run. Here is the current proposed roster:
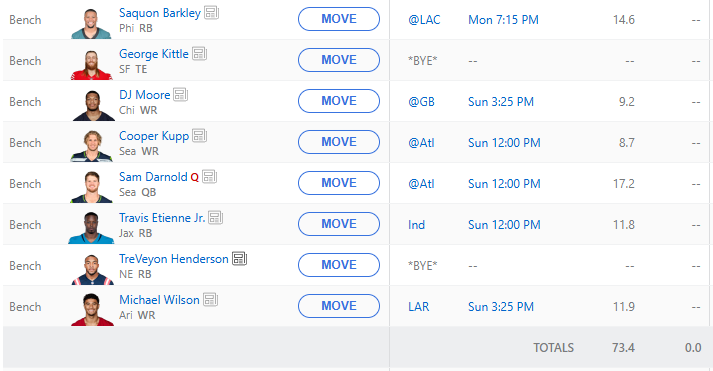
Its hard to not start Saquon Barkley. But he’s trending down and I think I agree with the AI here in not selecting him. Marvin Harrison Jr. is questionable again due to his surgery but is expected to play. We grabbed Christian Watson, Marcus Mariota and the Commanders defense for week 14. We dropped J.J. McCarthy due to poor performance and injury. Henderson is on bye this week. Our current bench looks like this:
What do you think? Do you agree with the AI’s selections for the week?
Well, unfortunately we took a big loss and are now in a three way tie for first place. Here are the actual results:
I think the biggest hit was how poorly Josh Allen played. What is interesting is that I was reviewing his passed performance against Houston and he has had his worst outings of his career there. This week was no different… The other interesting thing is that Saquon Barkley just isn’t the same back as he was last year. He is trending down.
In response to Josh Allen’s poor outing I added a deviation and historical performance analysis against and opponent to the data set so now we have a value like:
I then coded a new tool inside of the AI to reference this data set to assist with its final calculations.
So, when we ask the tool about Josh Allen’s performance against a team we get something like:
Found exactly what you're looking for in Josh Allen's performance data.

Josh Allen vs Kansas City (Week 9, 2025):
- 28.8 fantasy points - That's a STRONG performance!
- He was projected for 22.0 points but exceeded by 6.8 points (+30.9%)
- This was one of his better games this season

Historical Context (2024 vs KC):
- Week 11, 2024: 24.0 fantasy points vs Kansas City

Bottom Line: Josh Allen has performed WELL against Kansas City in recent matchups. In their two most recent meetings:
- 2025 (Week 9): 28.8 points
- 2024 (Week 11): 24.0 points

That's an average of 26.4 fantasy points against KC - well above his season average. Allen seems to rise to the occasion against elite competition like Kansas City. The Chiefs' defense can be vulnerable to mobile QBs who can extend plays, and Allen's dual-threat ability has historically given them problems.

The takeaway: When Allen faces KC, he typically delivers QB1 numbers. That 28.8-point performance this season shows he can still light up even the defending champs!
I need to backload some more historical data yet but that is a problem for a different day. Looking forward, I hope to build my own model based on this data and setup an automated workflow that will include data ingestion and automated model building so that I can consistently build predictions.
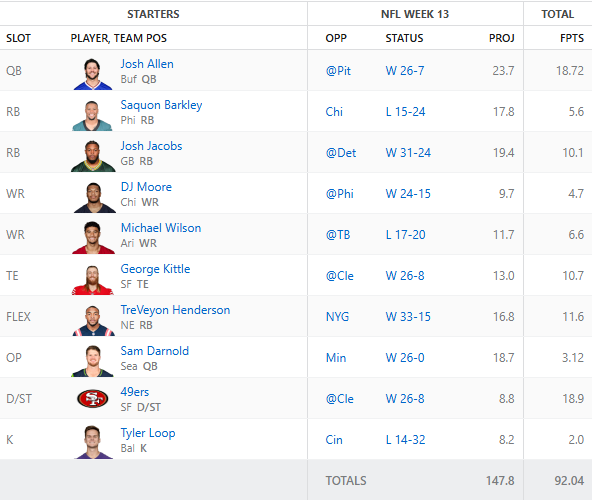
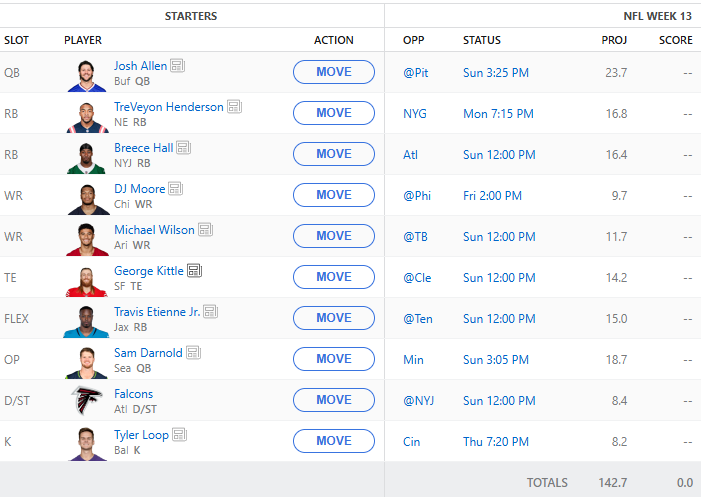
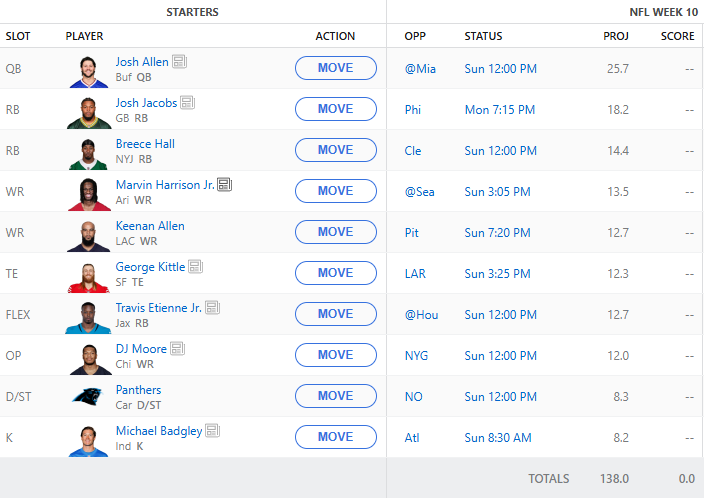
So, on to week 13. We have a bunch of injuries this week to contend with so this lineup will likely be changing once people are reporting. Here is the current lineup:
In other news I built and launched https://gridirondata.com which is an API to reference all of the data I have collected so far.
Unfortunately, its not free. But if you message me about it I’ll probably hook you up!
If you’re working with LLM APIs, you’re probably watching your token counts like a hawk. Every JSON object you send to Claude, GPT-4, or Gemini costs tokens, and those curly braces and quotes add up fast. I built https://jsontotoon.io to solve this exact problem—and it’s completely free to use.
The Problem: JSON is Token-Inefficient
Here’s the thing: JSON is fantastic for machine-to-machine communication. It’s ubiquitous, well-supported, and everyone knows how to work with it. But when you’re paying per token to send data to an LLM? It’s wasteful.
That’s 125 tokens. All those quotes, braces, and commas? The LLM doesn’t need them to understand the structure. You’re literally paying to send redundant syntax.
Enter TOON Format
TOON (Token-Oriented Object Notation) converts that same data to:
name, age, city
Alice, 30, NYC
Bob, 25, LA
Carol, 35, Chicago
68 tokens. That’s a 46% reduction. The same information, fully reversible back to JSON, but nearly half the cost.
I realize this sounds too good to be true, but the math checks out. I tested it across real-world datasets—API responses, database dumps, RAG context—and consistently saw 35-45% token reduction. Your mileage will vary depending on data structure, but the savings are real.
How I Built It
The backend is straightforward Python running on AWS Lambda. The TOON parser itself is deterministic—same JSON always produces the same TOON output, and round-trip conversion is lossless. No data gets mangled, no weird edge cases (well, I fixed those during testing).
Infrastructure-wise:
– CloudFront + S3 for the static frontend
– API Gateway + Lambda for the conversion endpoint
– DynamoDB for API key storage (with email verification via SES)
– WAF with rate limiting to prevent abuse (10 requests per 5 minutes on API endpoints)
–CloudWatch dashboards for monitoring
The whole setup costs me about $8-15/month in AWS fees, mostly for WAF. The conversion itself is so fast (< 100ms average) and cheap that I can offer unlimited free API keys without worrying about runaway costs.
Real Use Cases
I built this because I was spending way too much on Claude API calls for my fantasy football AI agent project. Every week I send player stats, injury reports, and matchup data in prompts. Converting to TOON saved me about 38% on tokens—which adds up when you’re making hundreds of calls per week.
But the use cases go beyond my specific problem:
– RAG systems: Fit more context documents in your prompts without hitting limits
– Data analysis agents: Send larger datasets for analysis at lower cost
– Few-shot learning: Include more examples without token bloat
– Structured outputs: LLMs can generate TOON that’s easier to parse than JSON
Try It Yourself
The web interface at https://jsontotoon.io is free to use—no signup required. Just paste your JSON, get TOON. If you want to integrate it into your application, grab a free API key (also no cost, no expiration).
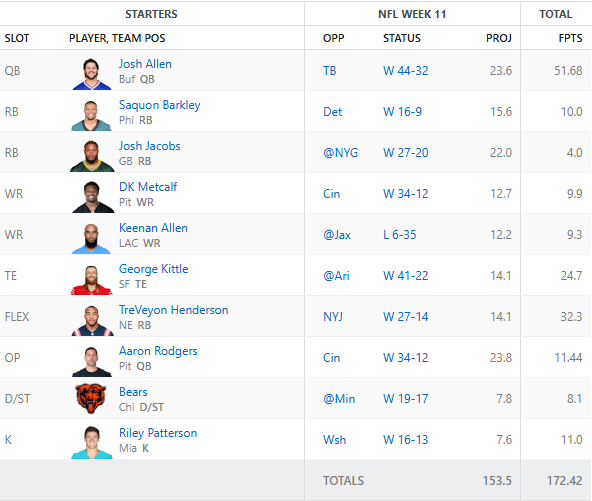
Wow. Week 11 was filled with injuries. Josh Jacobs went down early with a knee injury. Aaron Rogers went out with a wrist injury but it all started off with an epic performance by TreVeyon Henderson putting up 32.3 points. The end result of week 11? ANOTHER VICTORY FOR AI! The team is now in 1st place. With all those injuries you might be wondering how we pulled off another victory. Well, here is the final scores for the week:
Josh Allen came through massively with a 51 point game. Riley Patterson put up a few good kicks over in Madrid and George Kittle had a great game as well.
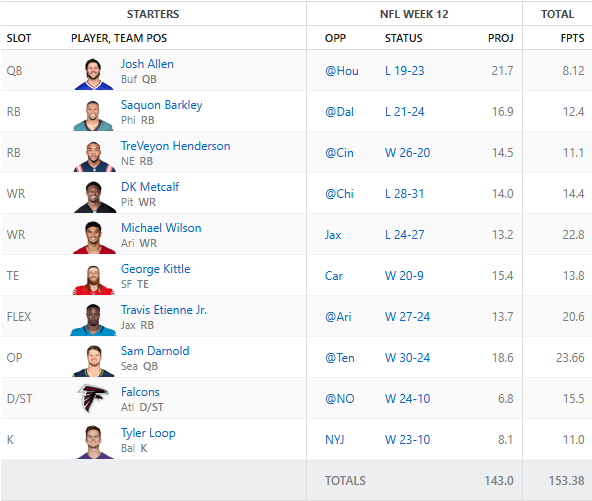
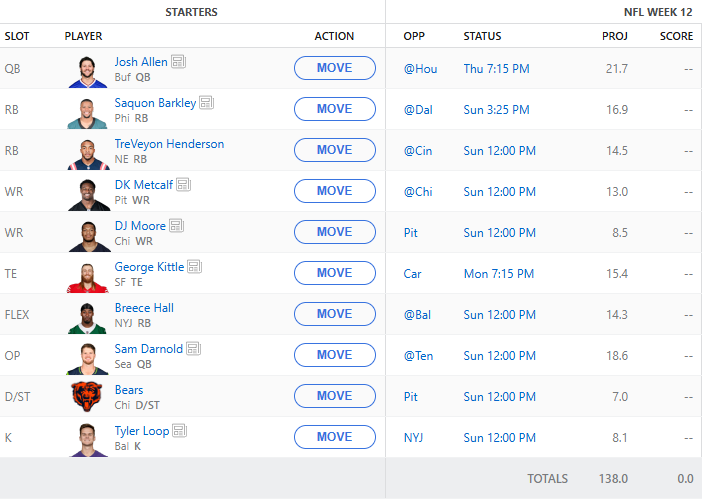
Looking forward to week 12, we will have to battle some injuries but I think the depth chart should be able to sustain the blows. Here is the current proposed lineup:
So, tech and data stuff. I added deviations into the data set. So now we can see the difference between what a player’s projection was and their actual. This will help the AI determine how a player is preforming. This is being structured on a per season per week basis as well as historically against an opponent. Next year this data will be valuable when looking at future matchups and draft choices.
Next, I’m also working on launching an API for this entire project so that you can access the data and utilize it for your own applications. I hope to have a working beta of this by the end of the week! If you are interested in utilizing it feel free to message me. I’m sure a few of you can receive some free keys once its ready! I’ll have a separate post about the API once its ready.
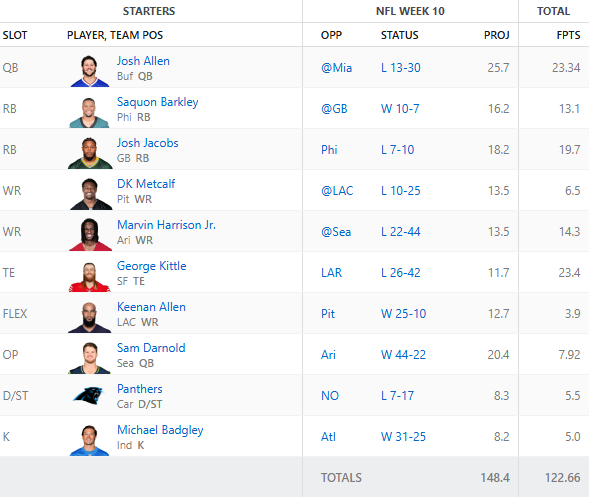
Well, week 10 has completed. And, WE WON AGAIN! It was a close one that came down to Monday Night Football. I had to buy a day pass to SlingTV so that I could watch the game due to the Youtube TV and Disney dispute. But, Josh Jacobs squared off against Saquon Barkley in the most BORING of football games. At any point in time, if AJ Brown had scored a touchdown I think we would have lost the matchup. Here are the final results.
For week 11 we dropped the Panther’s defense. Honestly, im not sure why the AI recommend them. I know the Saint’s are bad, but I think the Panther’s defense is worse. Anyway, we picked up the Bear’s for week 11. Badgley and the Colts have a bye this week so anyone playing against Jonathan Taylor can breathe a sigh of relief. The AI also suggested grabbing Riley Patterson and Zach Ertz. Here is our current lineup for week 11:
Marvin Harrison Jr. Is out with appendicitis which is a big bummer for his divisional matchup.
From a technical standpoint, I added in a data source and tool for the AI to check depth charts in order to assist in picking up players. This way it won’t suggest lower players. We can also research picks based on injury. In Marvin Harrison Jr.’s case we can see this:
Cardinals WR Depth Chart:
1. Marvin Harrison Jr. - OUT (your guy who's hurting)
2. Zay Jones - This cat becomes the clear WR1 with Harrison out. He's got experience and should see a big target bump
3. Simi Fehoko - Depth piece, might see some snaps but not a fantasy factor
4. Michael Wilson - Could be interesting as a deeper option, might get more looks
5. Greg Dortch - Slot guy who could see increased usage in 3-WR sets
6. Xavier Weaver - Rookie, probably not fantasy relevant yet
One thing to note is that it doesn’t know about other injury statuses yet. So I will be looking to add that in shortly.
Tied for 1st. Playoffs start soon. Here comes the big push to finish out this season!
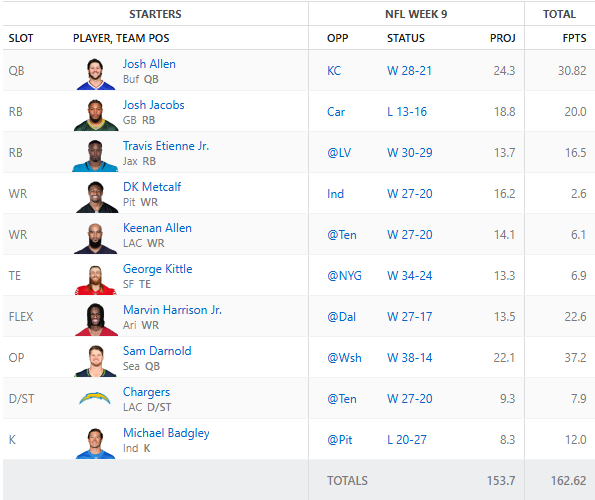
A BIG win in week 9! Our team is now tied for 1st place with 6 wins and 3 losses. We currently have 1318.66 total fantasy points on the season. It was looking pretty grim going into the afternoon games on Sunday. The receivers AI selected were not preforming and other players were barely hitting their projects. Josh Allen sparked some life into the team with his 30 points and then Sam Darnold showed everyone how to play quarter back with a 37.2 point performance! Check out the full results below.
So, now we’re off to week 10. Currently, as I write this, Saquon Barkley is questionable to play. I would expect that he does play but the AI will not put him in the starting lineup. We picked up the Panther’s defense upon request from the AI. I would expect this is because they are playing the Saints who just traded away Rasheed Shaheed. The addition of DJ Moore into the OP slot is going to be a rough choice over playing a quarterback in that position. I’ll be monitoring the roster throughout the week to see if there are any other suggestions we can make. Here is what we are currently fielding into week 10:
Tune in next week for the results! Hopefully AI can get to 7-3!
BIG WIN this week. All but two of the players that the AI picked this week were at or exceeded their projections. We scored 190 points for week 8. Here are the results:
Unfortunately I haven’t had any time to put into building out an MCP server but the data cleanup has definitely improved the overall application and I think I am in a good place to have this setup for future use (next year!). Currently the team is in 3rd place of 8. All the teams in the league make it to the playoffs so we still have a long way to go!
For week 9 we have some big players on BYE this week so the AI will have to handle that. Here is the current tentative lineup:
I definitely think it will need step up some waiver finds for running back! Tune in next week for results!
Well, our win streak was too good to be true. Unfortunately we lost a close one in week 6. It came down to the Monday night games and Sam Darnold just wasn’t able to get it going over the Texans even though the Seahawks still pulled out the win.
Our running back group also did not preform well outside of Josh Jacobs. The loss was by a difference of about 7 points so if anyone had put up another touchdown we could have won.
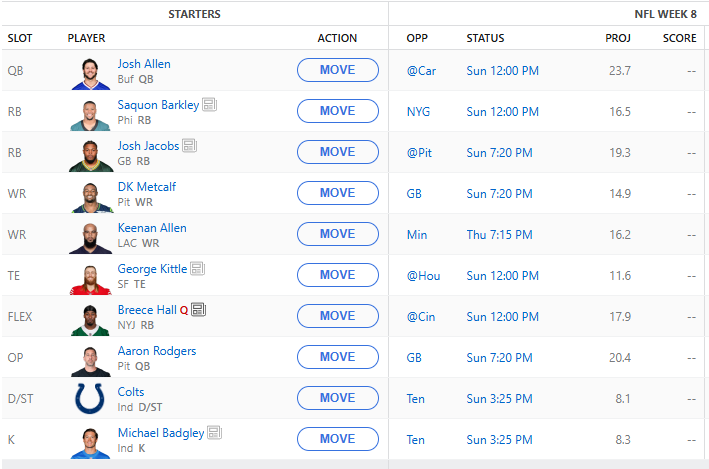
Anyway, on to week week 8. A few byes to contend with but otherwise most of are starts will be playing. The AI suggested grabbing the Colts defense and kicker as they are playing Tennessee. Breece Hall is currently questionable to play so we will have to keep an eye on that but he has a favorable matchup against the Bengals. The current roster is below.
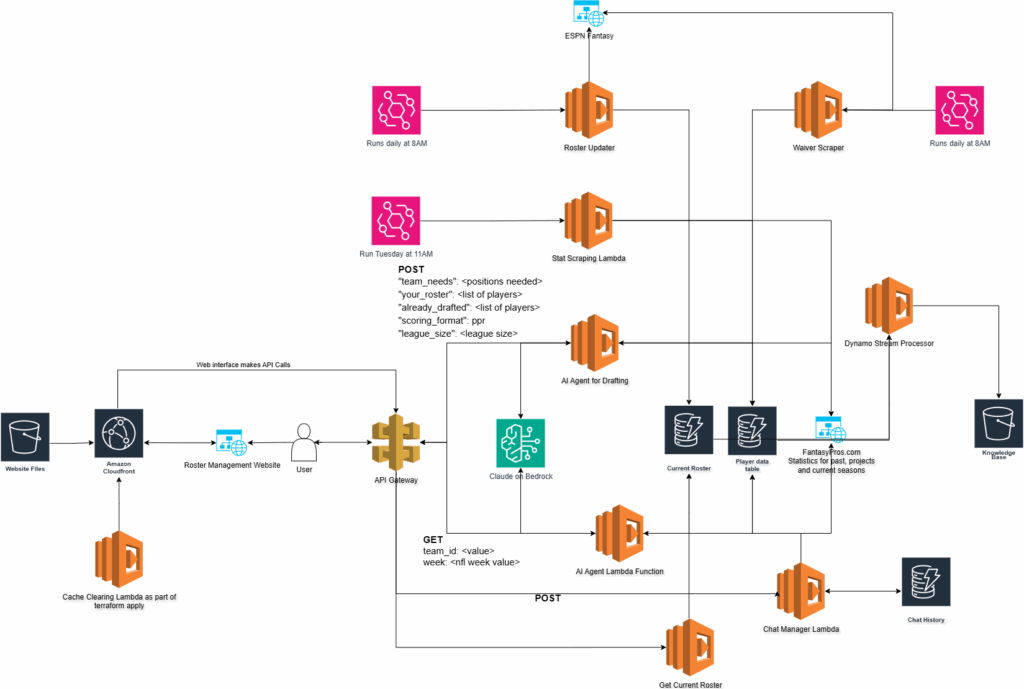
I promised to work on MCP this week but have only made a little bit of progress. I’ve been doing a lot of research on doing it in a cost effective manner as this project makes ZERO dollars and so I can’t afford to setup a bunch of expensive infrastructure. SO – this week I worked on combining the waiver table and the stats table into one table so that we can minimize DynamoDB calls throughout the application. The other thing I did was setup DynamoDB streams which are then converted into text files for each player and placed into an S3 bucket. This is what I think will be the first step in setting up a RAG pipeline so that a model can begin to be more “aware” of current NFL and Fantasy Football landscape.
Here is an updated architecture diagram. You’ll notice the S3 bucket on the right side. This is the eventual start of our knowledgebase.
You’ll also notice the waiver table removed. The new player structure looks like this:
{
 "player_id": "George Kittle#TE",
 "espn_player_id": 3040151,
 "player_name": "George Kittle",
 "position": "TE",
 "seasons": {
  "2024": {
   "season_totals": {
    "MISC_FL": 0,
    "MISC_FPTS": 158.6,
    "MISC_FPTS/G": 10.6,
    "MISC_G": 15,
    "MISC_ROST": "99.4%",
    "Player": "George Kittle",
    "Rank": 1,
    "RECEIVING_20+": 21,
    "RECEIVING_LG": 43,
    "RECEIVING_REC": 78,
    "RECEIVING_TD": 8,
    "RECEIVING_TGT": 94,
    "RECEIVING_Y/R": 14.2,
    "RECEIVING_YDS": 1106,
    "RUSHING_ATT": 0,
    "RUSHING_TD": 0,
    "RUSHING_YDS": 0
   },
   "weekly_stats": {
    "1": {
     "fantasy_points": 4,
     "opponent": "NYJ"
    },
    "2": {
     "fantasy_points": 13.6,
     "opponent": "MIN"
    },
    "4": {
     "fantasy_points": 10.5,
     "opponent": "NE"
    },
    "5": {
     "fantasy_points": 12.4,
     "opponent": "ARI"
    },
    "6": {
     "fantasy_points": 17.8,
     "opponent": "SEA"
    },
    "7": {
     "fantasy_points": 9.2,
     "opponent": "KC"
    },
    "8": {
     "fantasy_points": 18.8,
     "opponent": "DAL"
    },
    "10": {
     "fantasy_points": 11.7,
     "opponent": "TB"
    },
    "12": {
     "fantasy_points": 14.2,
     "opponent": "GB"
    },
    "13": {
     "fantasy_points": 0.7,
     "opponent": "BUF"
    },
    "14": {
     "fantasy_points": 15.1,
     "opponent": "CHI"
    },
    "15": {
     "fantasy_points": 6.1,
     "opponent": "LA"
    },
    "16": {
     "fantasy_points": 10.6,
     "opponent": "MIA"
    },
    "17": {
     "fantasy_points": 11.2,
     "opponent": "DET"
    },
    "18": {
     "fantasy_points": 2.7,
     "opponent": "ARI"
    }
   }
  },
  "2025": {
   "injury_status": "ACTIVE",
   "jersey_number": "85",
   "percent_owned": 98.97,
   "pro_team_id": 25,
   "season_projections": {
    "MISC_FL": 0.5,
    "MISC_FPTS": 147.6,
    "RECEIVING_REC": 76,
    "RECEIVING_TD": 7.5,
    "RECEIVING_YDS": 1036.9
   },
   "team": "SF",
   "weekly_outlooks": {
    "1": "George Kittle is healthy and wealthy for the 49ers' Week 1 matchup against Seattle after signing a big four-year contract extension in the offseason. Kittle's role as a pass catcher should be intensified early on with WR Brandon Aiyuk (ACL) on the PUP list to begin the campaign and Jauan Jennings (calf, contract) uncertain to suit up against the Seahawks. Kittle is coming off a 78-catch, 1,106-yard, eight-TD 2024 campaign, further cementing his place as one of the NFL's elite producers at tight end. The Seahawks were middle-of-the-pack against the position last year, giving up an average of 51.5 receiving yards per game.",
    "2": "George Kittle won't play in San Francisco's Week 2 matchup against New Orleans due to a hamstring injury that landed him on IR. Luke Farrell and Jake Tonges, who caught a TD in Kittle's absence last week against the Seahawks, will be asked to step in at tight end for the 49ers.",
    "3": "George Kittle will miss his second straight game for the 49ers in Week 3 against the Cardinals while he remains on IR due to a hamstring injury. Jake Tonges and Luke Farrell should continue to hold down the fort at TE for Kittle until the latter is able to return. Kittle won't be eligible to suit up again until Week 6."
   },
   "weekly_projections": {
    "5": 12.7,
    "6": 13.1,
    "7": 13.4,
    "8": 11.7,
    "10": 14.6,
    "12": 11.6,
    "13": 13.2,
    "14": 13.4,
    "15": 14.1,
    "16": 14.1,
    "17": 14.5
   },
   "weekly_stats": {
    "1": {
     "fantasy_points": 12.5,
     "opponent": "SEA",
     "team": "SF",
     "updated_at": "2025-10-15T17:40:58.625370"
    },
    "2": {
     "fantasy_points": 12.5,
     "opponent": "NO",
     "team": "SF",
     "updated_at": "2025-09-16T17:08:05.179797"
    },
    "3": {
     "fantasy_points": 12.5,
     "opponent": "ARI",
     "team": "SF",
     "updated_at": "2025-09-23T15:00:13.907272"
    },
    "4": {
     "fantasy_points": 12.5,
     "opponent": "JAX",
     "team": "SF",
     "updated_at": "2025-09-30T15:00:14.035733"
    },
    "5": {
     "fantasy_points": 12.5,
     "opponent": "LAR",
     "team": "SF",
     "updated_at": "2025-10-07T15:00:13.665217"
    },
    "6": {
     "fantasy_points": 12.5,
     "opponent": "TB",
     "team": "SF",
     "updated_at": "2025-10-14T15:00:14.748804"
    }
   }
  }
 },
 "updated_at": "2025-10-22T18:11:05.039158"
}
I hope to continue to refine this so that it can be used for future seasons. Then we can continue to use the bot into 2026’s season.
Anyway, hopefully I can figure out MCP and the knowledgebase this week. Winter is coming so its time to hunker down and build AWS Architectures!
We’re back with the week 6 AI managed fantasy football team and we got another win! The team’s record is now 4-2-0 and sits 3rd in the league.
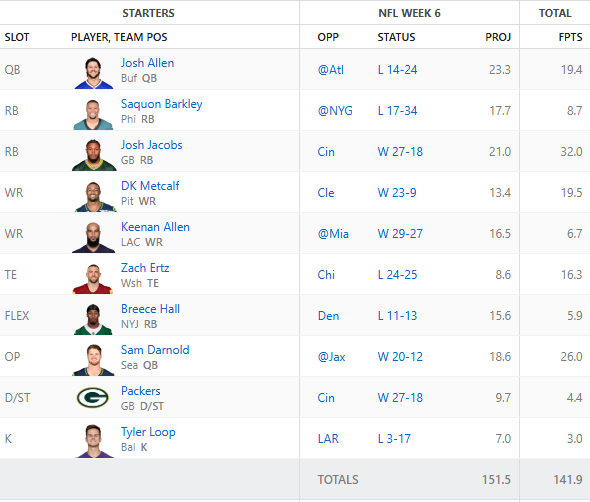
Here is the final lineup that was fielded for week 6 and the points
There were a couple players on the bench that did better. Keenan Allen and Breece Hall could have been swapped for pretty much anyone on the bench and we would have had a few more points. A win is a win. One thing to note is that we had a game time injury of Dalton Kincaid and I had to pull Zach Ertz in at the last minute to avoid getting a zero.
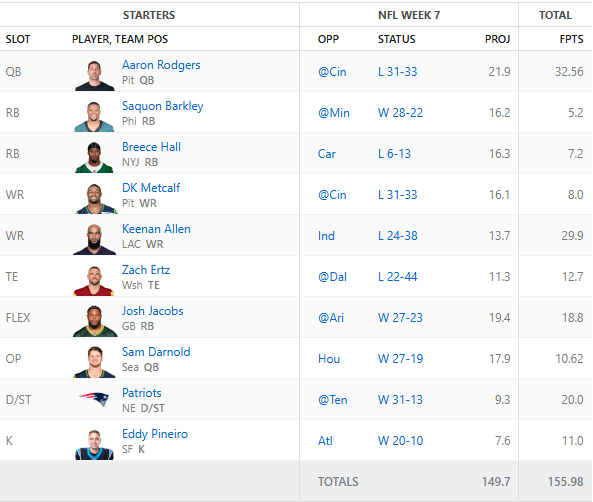
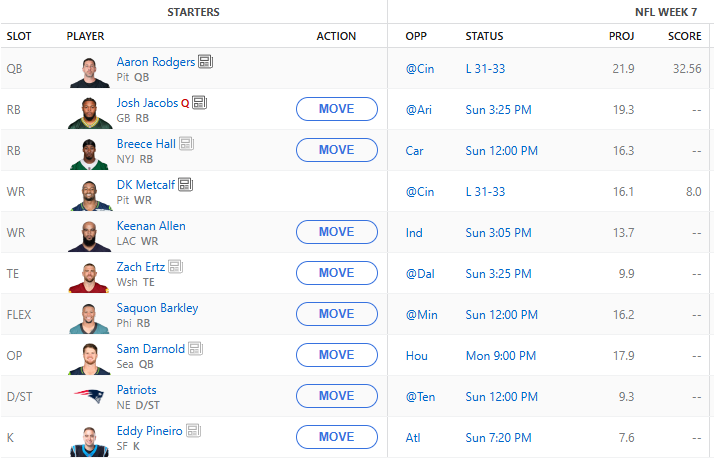
For week 7 we are starting to see both injury and bye weeks happening. The AI will have to make some pretty deep roster moves in order to fill the gaps. Here is the initial starting lineup:
Because of the BYE weeks we are picking up Aaron Rodgers who put up a good game against Cincinnati last night. DK did not have a great night last night. We picked up the Patriots defense as well as Eddy Pineiro to fill in some slots. I think the Patriots against Tennessee will be an interesting matchup given that the Titans fired their head coach. Mike Vrabel has the Patriots firing again and hopefully he can shut them out and we can put up some big points!
From a tech perspective, I’m slowly putting together an MCP server to help create some efficiencies when working with the DynamoDB tables. Hopefully, if we can handle that, the overall application response time will be faster. If I wasn’t traveling AGAIN this weekend I would have made it a hackathon. Hopefully for week 8!
Taking a break from Fantasy Football today to talk about a quick weekend project I put together.
A friend of mine was chatting about how their AWS costs are getting out of control and they aren’t sure where to start when it comes to cleaning up the account. This prompted me with an idea to utilize AI to build an Agent that can interact with your AWS account to review resources, provide cost analysis and give you clear CLI commands or console instructions to help clean up the account.
In order to do this, I wanted to incur as little cost as possible. So, I built a Docker image in order to run it locally. First, there is a shell script that will build an IAM User in your account that provides read-only access to the account, Cost Explorer access and access to Bedrock (to communicate with an AI model).
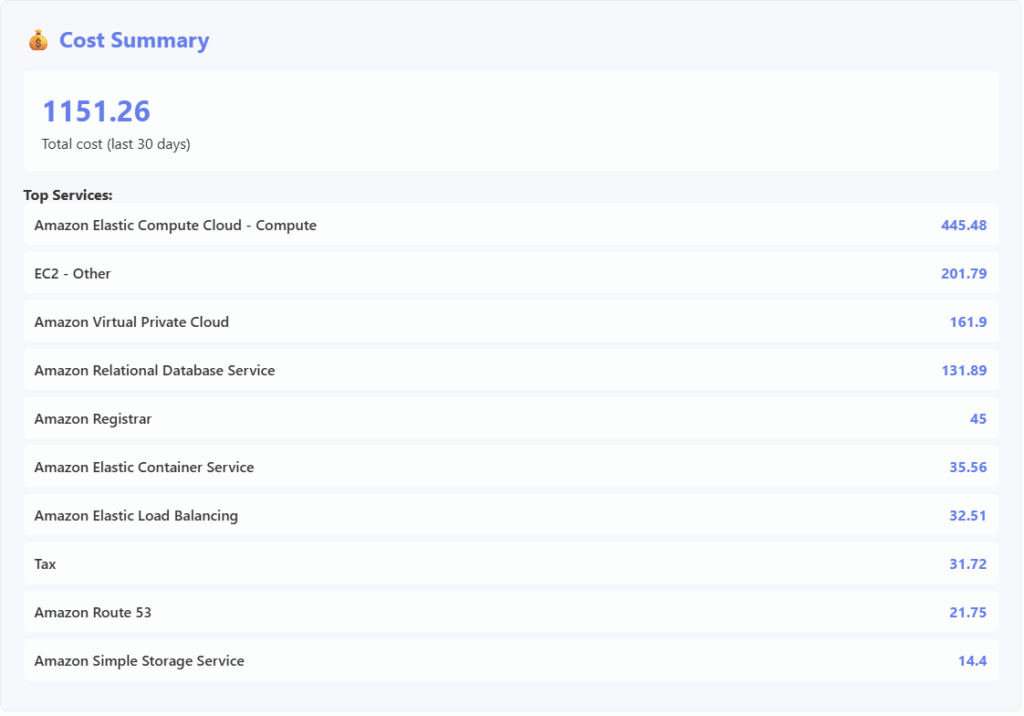
The Docker image runs and builds an Agent that interacts with whichever model you want to utilize. I picked Amazon’s Nova model just to keep the costs down. The container then presents a web interface where the account’s bill break down will be displayed:
It will also display some common costly resources and their counts:
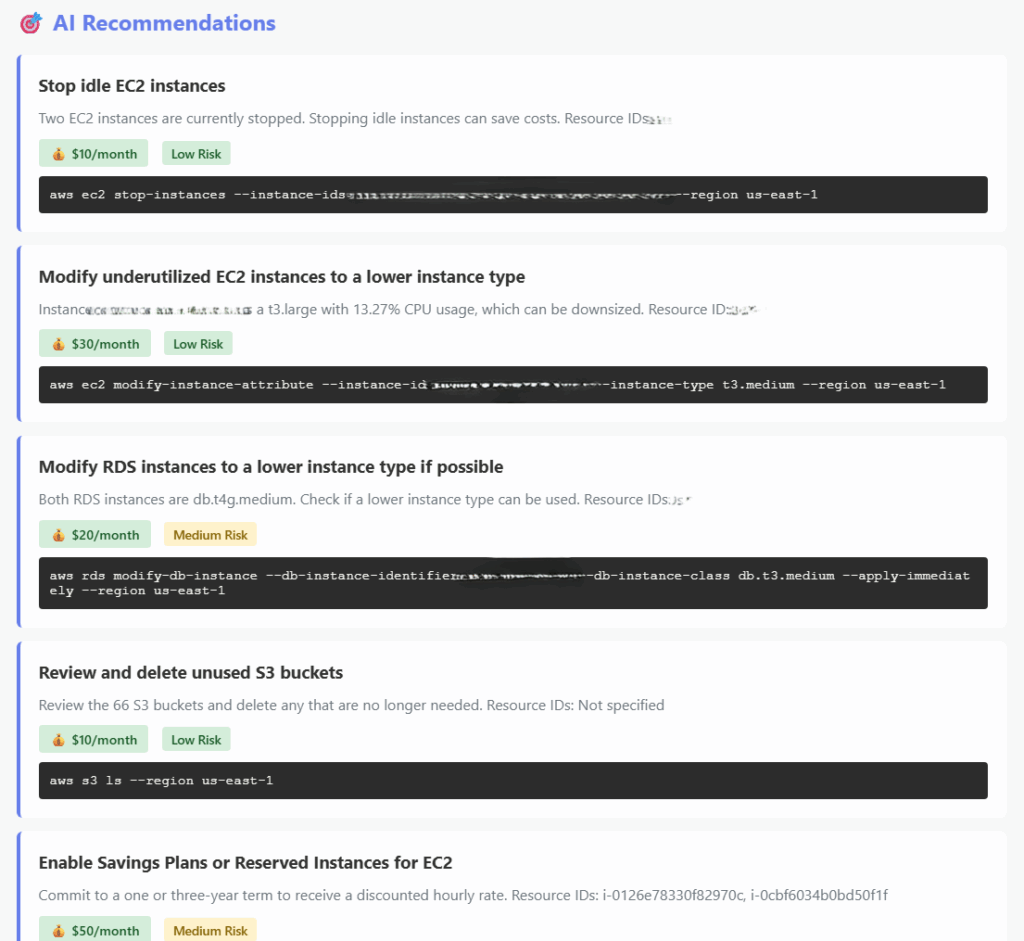
The next block is where things get very helpful. The AI will present to you suggestions as to how to save some money as well as some risk calculations. Because I ran this against my real account I had to blur out some information but you get the idea:
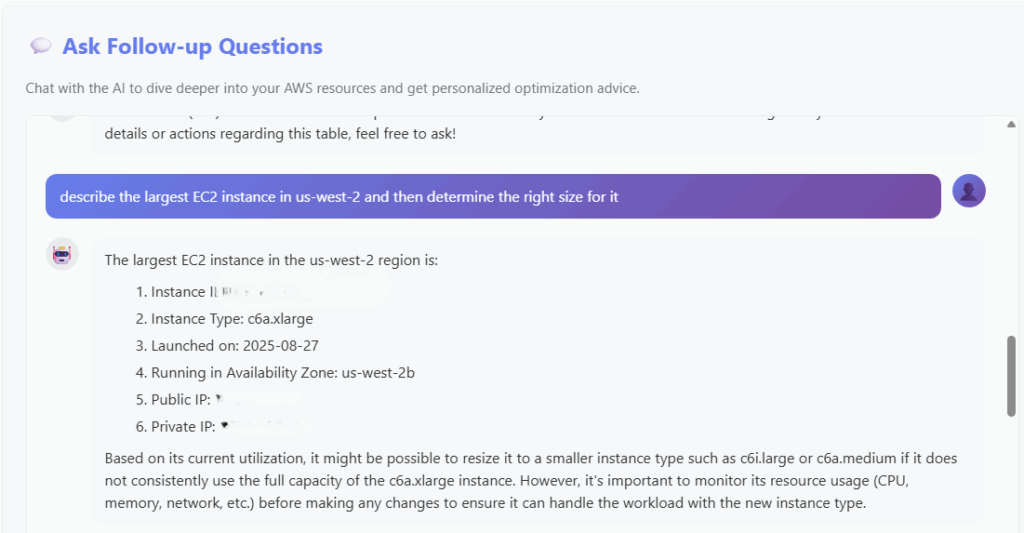
So, now you have some actionable activities to work through to help you save money on your AWS bill. But what if you have more questions? I also included a simple chat box to help you work with the bot to come up with other explanations or find other ways to save cost.
So I asked the AI to find the largest instance in my account and then determine the right size for it. Here is the response:
Why would this be important? Well, if you had the AI review all of the instances in your account you could identify EC2 instances that are oversized and have them be changed accordingly. After I implemented a few of the changes that the AI recommended (and verified they didn’t break anything), my account billing decreased by about $100.
If this is something you are interested in running on your own account feel free to reach out! I’d be happy to help you setup up the container on your machine and make suggestions as to how to save some money!