BIG WIN this week. All but two of the players that the AI picked this week were at or exceeded their projections. We scored 190 points for week 8. Here are the results:
Unfortunately I haven’t had any time to put into building out an MCP server but the data cleanup has definitely improved the overall application and I think I am in a good place to have this setup for future use (next year!). Currently the team is in 3rd place of 8. All the teams in the league make it to the playoffs so we still have a long way to go!
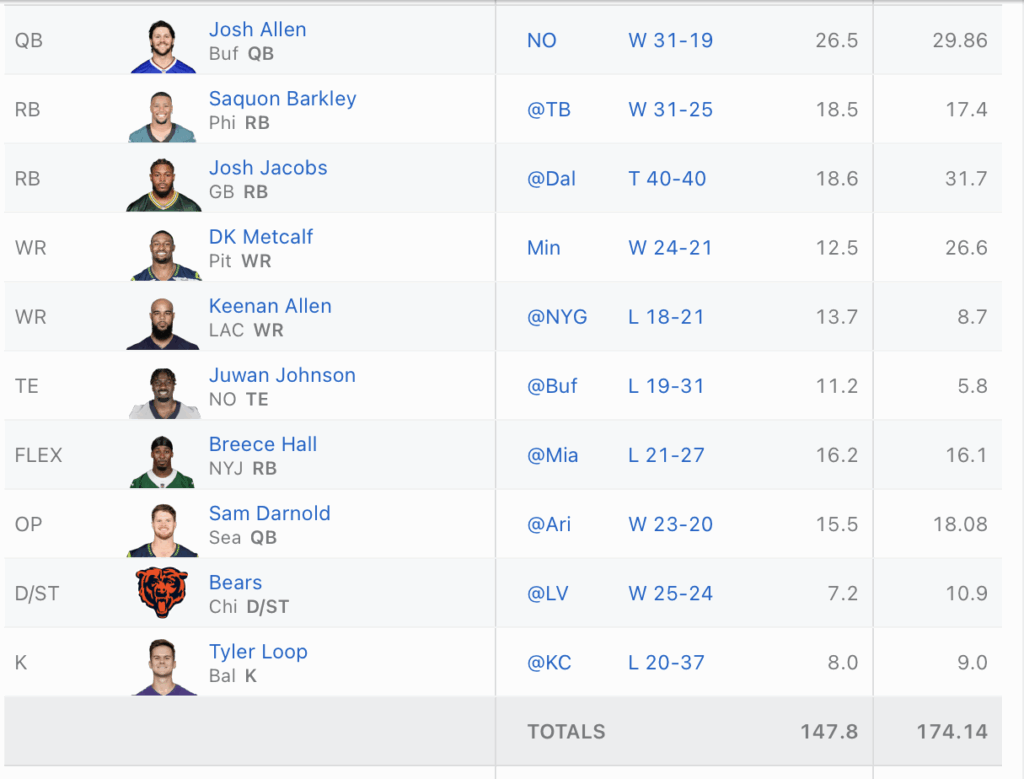
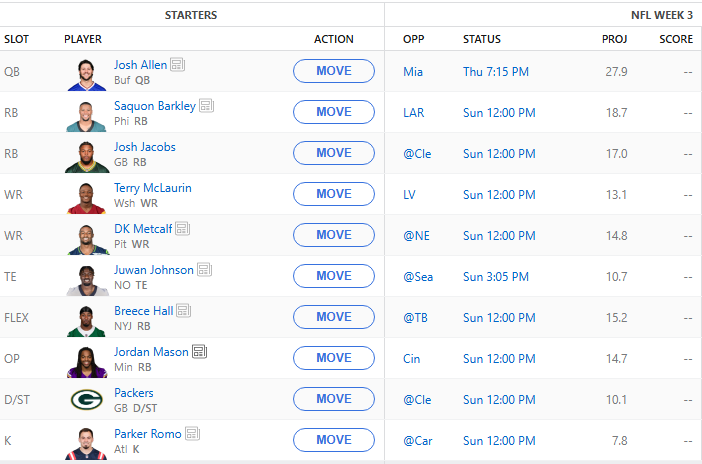
For week 9 we have some big players on BYE this week so the AI will have to handle that. Here is the current tentative lineup:
I definitely think it will need step up some waiver finds for running back! Tune in next week for results!
Well, our win streak was too good to be true. Unfortunately we lost a close one in week 6. It came down to the Monday night games and Sam Darnold just wasn’t able to get it going over the Texans even though the Seahawks still pulled out the win.
Our running back group also did not preform well outside of Josh Jacobs. The loss was by a difference of about 7 points so if anyone had put up another touchdown we could have won.
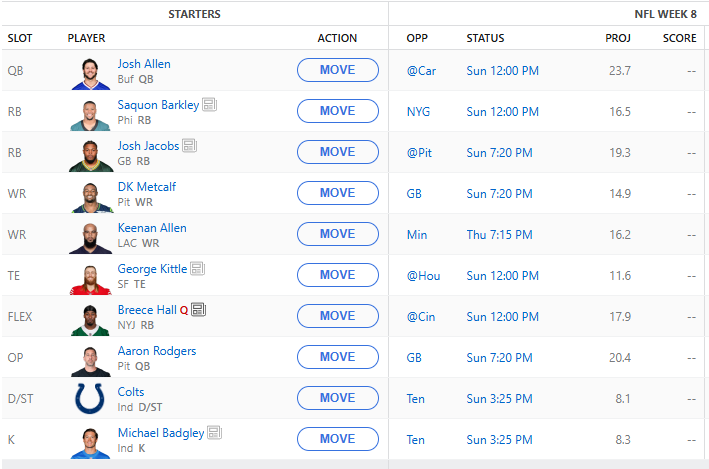
Anyway, on to week week 8. A few byes to contend with but otherwise most of are starts will be playing. The AI suggested grabbing the Colts defense and kicker as they are playing Tennessee. Breece Hall is currently questionable to play so we will have to keep an eye on that but he has a favorable matchup against the Bengals. The current roster is below.
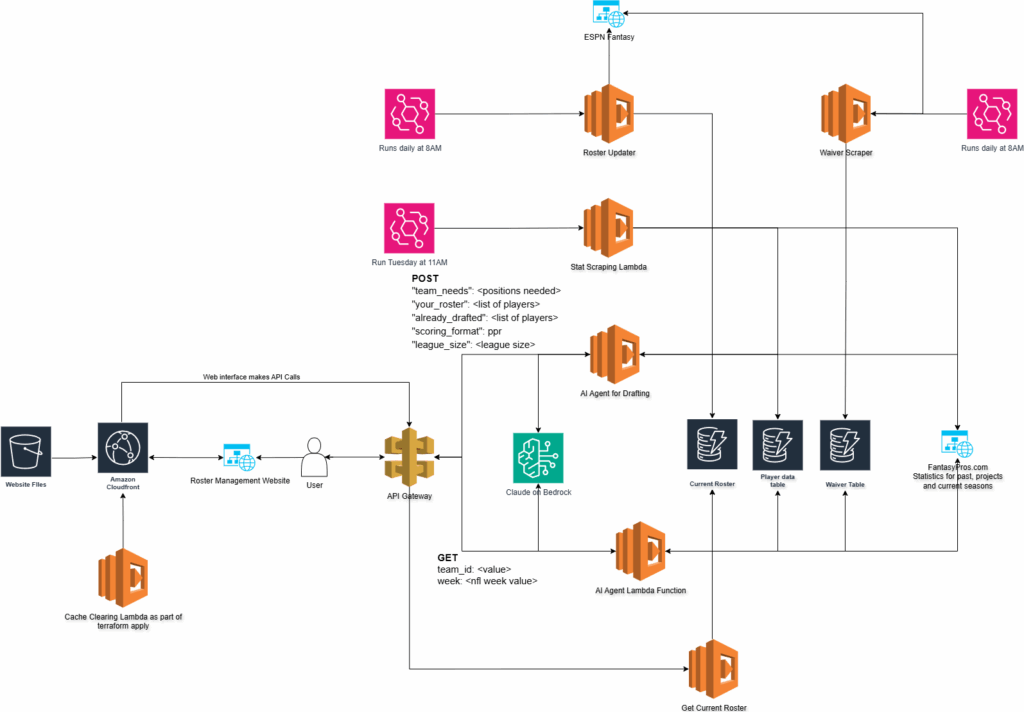
I promised to work on MCP this week but have only made a little bit of progress. I’ve been doing a lot of research on doing it in a cost effective manner as this project makes ZERO dollars and so I can’t afford to setup a bunch of expensive infrastructure. SO – this week I worked on combining the waiver table and the stats table into one table so that we can minimize DynamoDB calls throughout the application. The other thing I did was setup DynamoDB streams which are then converted into text files for each player and placed into an S3 bucket. This is what I think will be the first step in setting up a RAG pipeline so that a model can begin to be more “aware” of current NFL and Fantasy Football landscape.
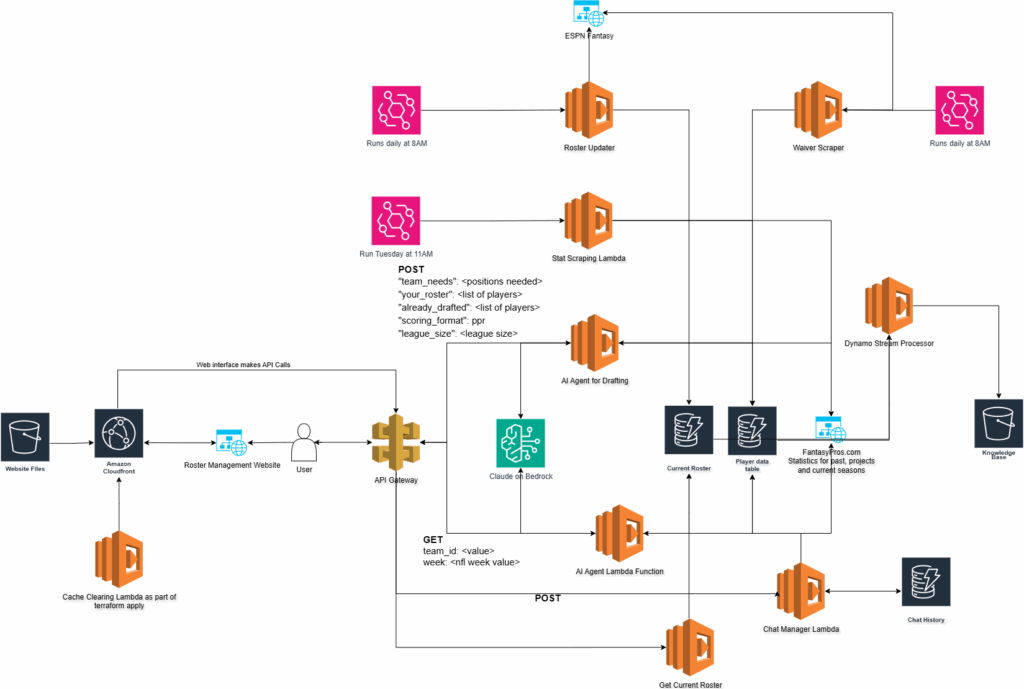
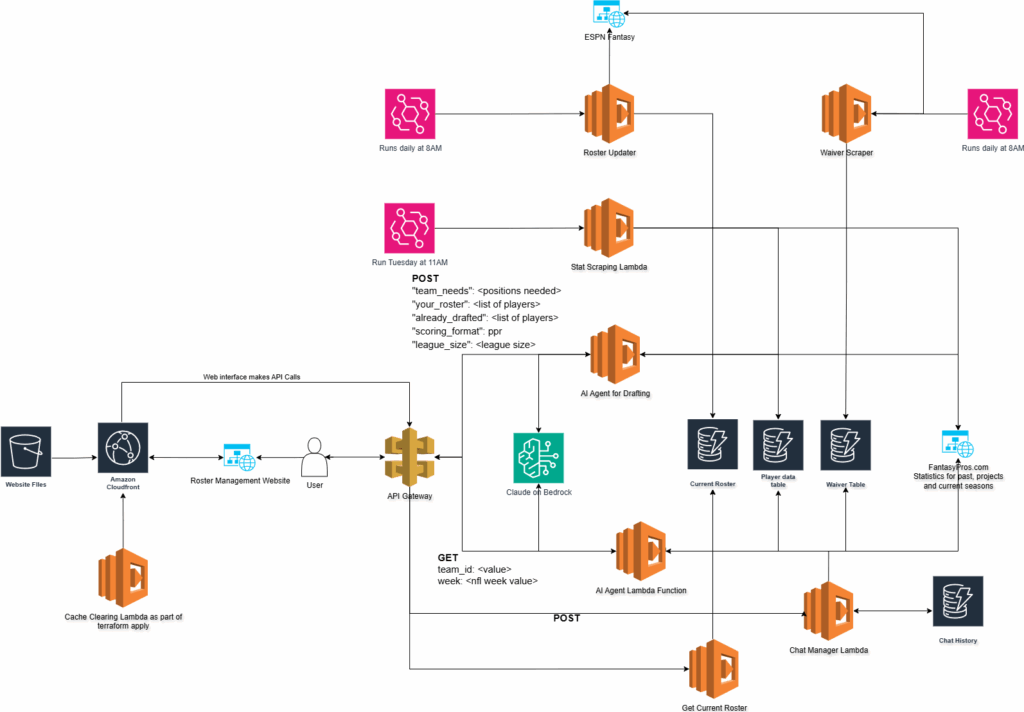
Here is an updated architecture diagram. You’ll notice the S3 bucket on the right side. This is the eventual start of our knowledgebase.
You’ll also notice the waiver table removed. The new player structure looks like this:
{
 "player_id": "George Kittle#TE",
 "espn_player_id": 3040151,
 "player_name": "George Kittle",
 "position": "TE",
 "seasons": {
  "2024": {
   "season_totals": {
    "MISC_FL": 0,
    "MISC_FPTS": 158.6,
    "MISC_FPTS/G": 10.6,
    "MISC_G": 15,
    "MISC_ROST": "99.4%",
    "Player": "George Kittle",
    "Rank": 1,
    "RECEIVING_20+": 21,
    "RECEIVING_LG": 43,
    "RECEIVING_REC": 78,
    "RECEIVING_TD": 8,
    "RECEIVING_TGT": 94,
    "RECEIVING_Y/R": 14.2,
    "RECEIVING_YDS": 1106,
    "RUSHING_ATT": 0,
    "RUSHING_TD": 0,
    "RUSHING_YDS": 0
   },
   "weekly_stats": {
    "1": {
     "fantasy_points": 4,
     "opponent": "NYJ"
    },
    "2": {
     "fantasy_points": 13.6,
     "opponent": "MIN"
    },
    "4": {
     "fantasy_points": 10.5,
     "opponent": "NE"
    },
    "5": {
     "fantasy_points": 12.4,
     "opponent": "ARI"
    },
    "6": {
     "fantasy_points": 17.8,
     "opponent": "SEA"
    },
    "7": {
     "fantasy_points": 9.2,
     "opponent": "KC"
    },
    "8": {
     "fantasy_points": 18.8,
     "opponent": "DAL"
    },
    "10": {
     "fantasy_points": 11.7,
     "opponent": "TB"
    },
    "12": {
     "fantasy_points": 14.2,
     "opponent": "GB"
    },
    "13": {
     "fantasy_points": 0.7,
     "opponent": "BUF"
    },
    "14": {
     "fantasy_points": 15.1,
     "opponent": "CHI"
    },
    "15": {
     "fantasy_points": 6.1,
     "opponent": "LA"
    },
    "16": {
     "fantasy_points": 10.6,
     "opponent": "MIA"
    },
    "17": {
     "fantasy_points": 11.2,
     "opponent": "DET"
    },
    "18": {
     "fantasy_points": 2.7,
     "opponent": "ARI"
    }
   }
  },
  "2025": {
   "injury_status": "ACTIVE",
   "jersey_number": "85",
   "percent_owned": 98.97,
   "pro_team_id": 25,
   "season_projections": {
    "MISC_FL": 0.5,
    "MISC_FPTS": 147.6,
    "RECEIVING_REC": 76,
    "RECEIVING_TD": 7.5,
    "RECEIVING_YDS": 1036.9
   },
   "team": "SF",
   "weekly_outlooks": {
    "1": "George Kittle is healthy and wealthy for the 49ers' Week 1 matchup against Seattle after signing a big four-year contract extension in the offseason. Kittle's role as a pass catcher should be intensified early on with WR Brandon Aiyuk (ACL) on the PUP list to begin the campaign and Jauan Jennings (calf, contract) uncertain to suit up against the Seahawks. Kittle is coming off a 78-catch, 1,106-yard, eight-TD 2024 campaign, further cementing his place as one of the NFL's elite producers at tight end. The Seahawks were middle-of-the-pack against the position last year, giving up an average of 51.5 receiving yards per game.",
    "2": "George Kittle won't play in San Francisco's Week 2 matchup against New Orleans due to a hamstring injury that landed him on IR. Luke Farrell and Jake Tonges, who caught a TD in Kittle's absence last week against the Seahawks, will be asked to step in at tight end for the 49ers.",
    "3": "George Kittle will miss his second straight game for the 49ers in Week 3 against the Cardinals while he remains on IR due to a hamstring injury. Jake Tonges and Luke Farrell should continue to hold down the fort at TE for Kittle until the latter is able to return. Kittle won't be eligible to suit up again until Week 6."
   },
   "weekly_projections": {
    "5": 12.7,
    "6": 13.1,
    "7": 13.4,
    "8": 11.7,
    "10": 14.6,
    "12": 11.6,
    "13": 13.2,
    "14": 13.4,
    "15": 14.1,
    "16": 14.1,
    "17": 14.5
   },
   "weekly_stats": {
    "1": {
     "fantasy_points": 12.5,
     "opponent": "SEA",
     "team": "SF",
     "updated_at": "2025-10-15T17:40:58.625370"
    },
    "2": {
     "fantasy_points": 12.5,
     "opponent": "NO",
     "team": "SF",
     "updated_at": "2025-09-16T17:08:05.179797"
    },
    "3": {
     "fantasy_points": 12.5,
     "opponent": "ARI",
     "team": "SF",
     "updated_at": "2025-09-23T15:00:13.907272"
    },
    "4": {
     "fantasy_points": 12.5,
     "opponent": "JAX",
     "team": "SF",
     "updated_at": "2025-09-30T15:00:14.035733"
    },
    "5": {
     "fantasy_points": 12.5,
     "opponent": "LAR",
     "team": "SF",
     "updated_at": "2025-10-07T15:00:13.665217"
    },
    "6": {
     "fantasy_points": 12.5,
     "opponent": "TB",
     "team": "SF",
     "updated_at": "2025-10-14T15:00:14.748804"
    }
   }
  }
 },
 "updated_at": "2025-10-22T18:11:05.039158"
}
I hope to continue to refine this so that it can be used for future seasons. Then we can continue to use the bot into 2026’s season.
Anyway, hopefully I can figure out MCP and the knowledgebase this week. Winter is coming so its time to hunker down and build AWS Architectures!
We’re back with the week 6 AI managed fantasy football team and we got another win! The team’s record is now 4-2-0 and sits 3rd in the league.
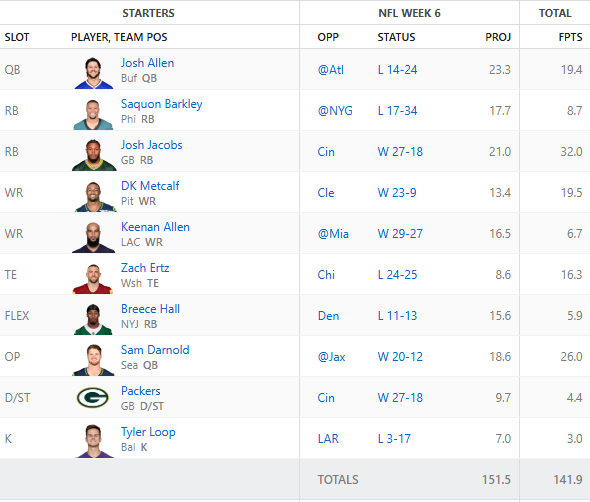
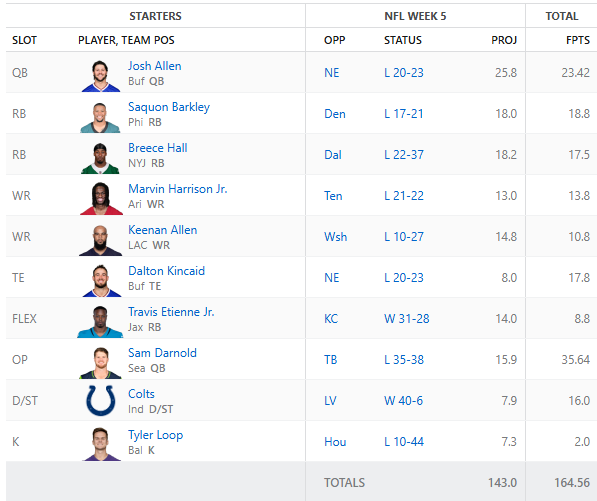
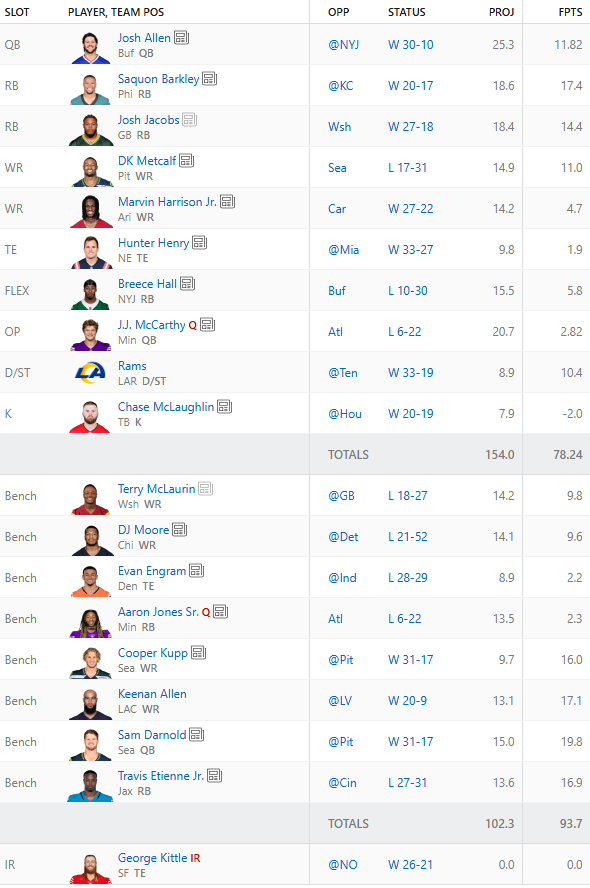
Here is the final lineup that was fielded for week 6 and the points
There were a couple players on the bench that did better. Keenan Allen and Breece Hall could have been swapped for pretty much anyone on the bench and we would have had a few more points. A win is a win. One thing to note is that we had a game time injury of Dalton Kincaid and I had to pull Zach Ertz in at the last minute to avoid getting a zero.
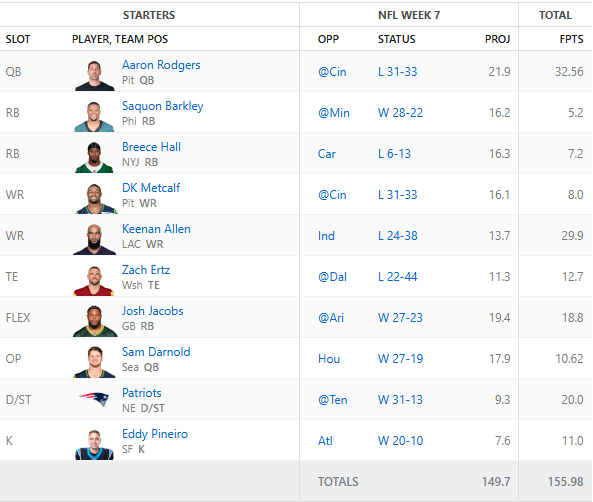
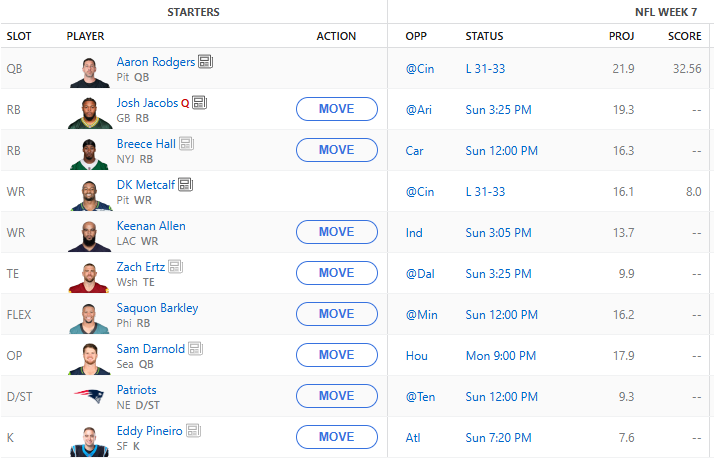
For week 7 we are starting to see both injury and bye weeks happening. The AI will have to make some pretty deep roster moves in order to fill the gaps. Here is the initial starting lineup:
Because of the BYE weeks we are picking up Aaron Rodgers who put up a good game against Cincinnati last night. DK did not have a great night last night. We picked up the Patriots defense as well as Eddy Pineiro to fill in some slots. I think the Patriots against Tennessee will be an interesting matchup given that the Titans fired their head coach. Mike Vrabel has the Patriots firing again and hopefully he can shut them out and we can put up some big points!
From a tech perspective, I’m slowly putting together an MCP server to help create some efficiencies when working with the DynamoDB tables. Hopefully, if we can handle that, the overall application response time will be faster. If I wasn’t traveling AGAIN this weekend I would have made it a hackathon. Hopefully for week 8!
Taking a break from Fantasy Football today to talk about a quick weekend project I put together.
A friend of mine was chatting about how their AWS costs are getting out of control and they aren’t sure where to start when it comes to cleaning up the account. This prompted me with an idea to utilize AI to build an Agent that can interact with your AWS account to review resources, provide cost analysis and give you clear CLI commands or console instructions to help clean up the account.
In order to do this, I wanted to incur as little cost as possible. So, I built a Docker image in order to run it locally. First, there is a shell script that will build an IAM User in your account that provides read-only access to the account, Cost Explorer access and access to Bedrock (to communicate with an AI model).
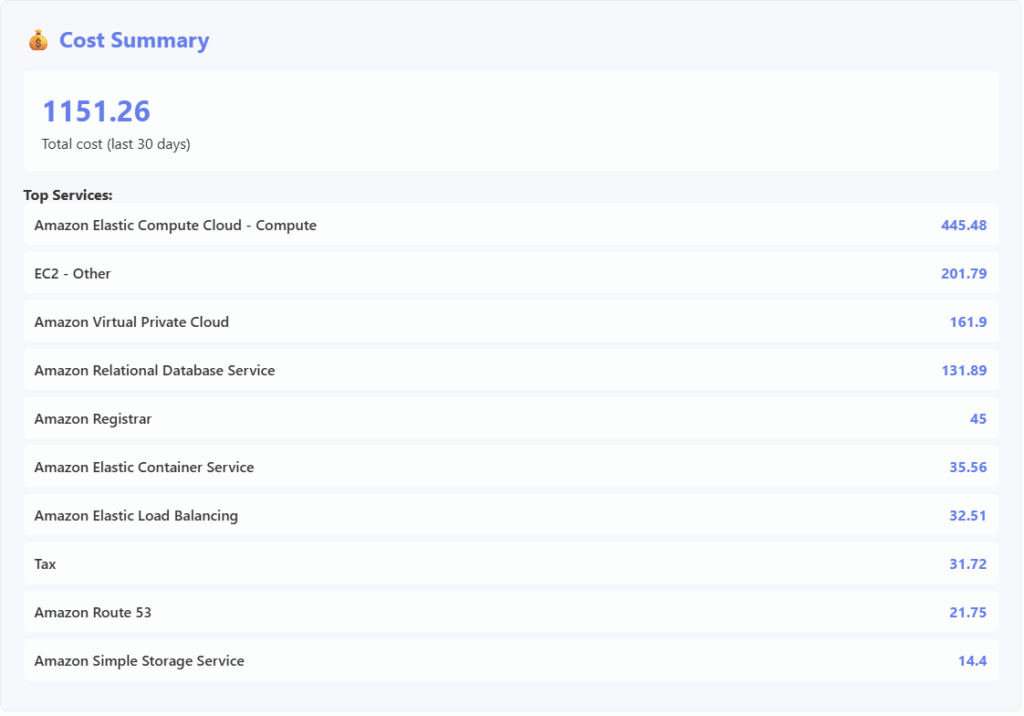
The Docker image runs and builds an Agent that interacts with whichever model you want to utilize. I picked Amazon’s Nova model just to keep the costs down. The container then presents a web interface where the account’s bill break down will be displayed:
It will also display some common costly resources and their counts:
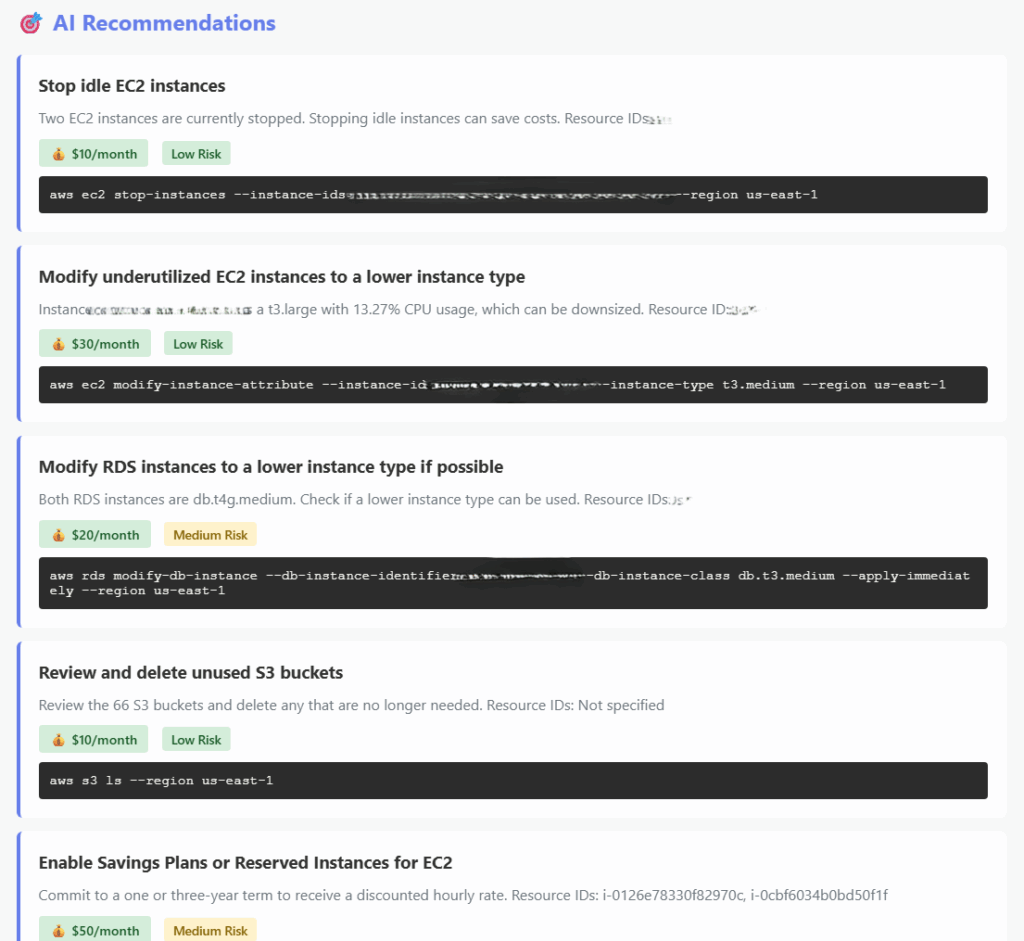
The next block is where things get very helpful. The AI will present to you suggestions as to how to save some money as well as some risk calculations. Because I ran this against my real account I had to blur out some information but you get the idea:
So, now you have some actionable activities to work through to help you save money on your AWS bill. But what if you have more questions? I also included a simple chat box to help you work with the bot to come up with other explanations or find other ways to save cost.
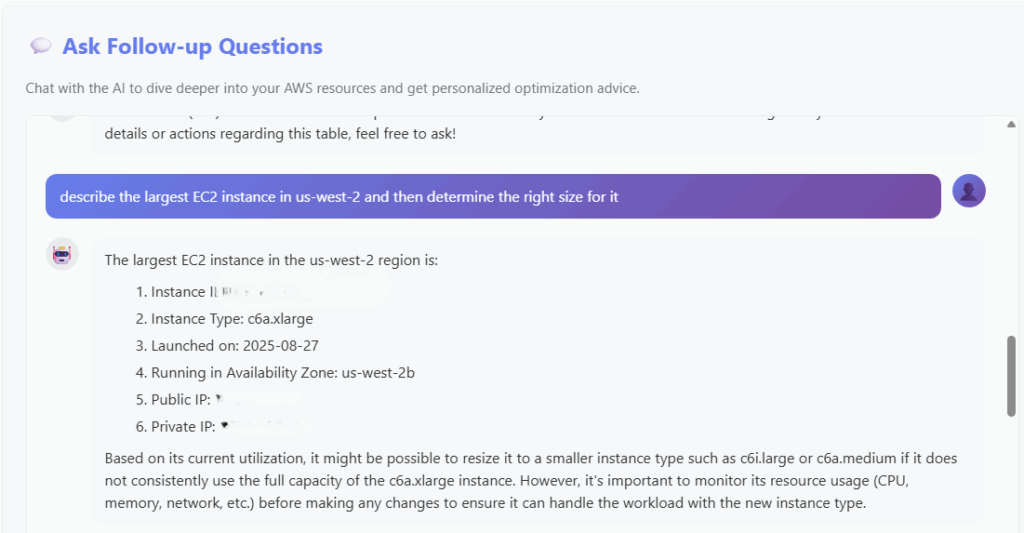
So I asked the AI to find the largest instance in my account and then determine the right size for it. Here is the response:
Why would this be important? Well, if you had the AI review all of the instances in your account you could identify EC2 instances that are oversized and have them be changed accordingly. After I implemented a few of the changes that the AI recommended (and verified they didn’t break anything), my account billing decreased by about $100.
If this is something you are interested in running on your own account feel free to reach out! I’d be happy to help you setup up the container on your machine and make suggestions as to how to save some money!
It feels good to win. Week 5 locks up the 3rd win for our AI managed fantasy football team. It was also the first week where players could be on a “bye” and it handled that with out issue! We had great performances from a bunch of players and most players were fairly close to their projections. I will say, our opponent did start a player who did not play at all but the point differential overall I don’t think would have helped him win.
Colts defense was a great suggested pickup and Sam Darnold played a HUGE game and ultimately still lost… Poor guy. The AI suggested picking up Dalton Kincaid and boy was that a home run pick.
Now that I am back home and able to work on the code again I have a few things to fix including QB’s on waivers. For some reason the AI is not able to retrieve them. I also want to continue working on the speed that it returns information. I think implementing MCP into the architecture will help. So as my life gets back to normal I will look into how to integrate these new features!
As always, thank you for following along. Hopefully week 6 is another victory!
I realize that I forgot to write an update on what our final roster was for week 4. I suppose that is because I am on vacation and writing blog posts isn’t my number one priority.
Week 4, We WON! The AI team is now 2-2. I believe that as we gather more data, include information from waivers, the model is able to get a better sense of who is going to play well. Good data in > good data out. Bad data in > bad data out. This is key for all AI workflows. It is no different than giving a regular employee bad data and expecting them to make something good out of it.
As a reminder, every day, I have a Lambda function that goes out and scrapes stats for player from both ESPN and FantasyPros. This includes a players outlook that is presented on ESPN. The idea here is to give the AI more news about specific players. As this platform expands we could also include other data scraping methods from other news sources or blogs that could help bolster decision making for the model.
This is going to be a short post so I can go back to the beach. Here is the result from Week 4:
For the most part I was pretty happy with the suggestions that the model made. We’re still struggling in the receiver and tight end position. That being said, the bench only had two players who preformed better than what we started. This week came down to the Monday night games where we needed Breece Hall to secure the victory and he put up enough points to beat out the opponent.
Stay tuned for week 5 roster updates and moves which I will be making from Portugal!
Good day from Barcelona. I landed this morning after an overnight flight. I’m not sure how much my seat mates enjoyed me watching the Lion’s game via WiFi.
Anyway, I’m happy to report that AI has finally won a matchup. We are now 1-2! I will say though that we won on a technicality as the opponent for week 3 started Jayden Daniels who ended up not playing. But, in the end a win is a win.
Here is our final scores for the starters:
Josh Allen played well. Barkley not so much and boy was the Parker Romo pickup a bust.
Once again we had some good bench performance that we were not capitalizing on.
Both Keenan Allen and Sam Darnold had good games which would have significantly boosted our overall score and had Jayden Daniels played we still probably would have won had the AI determined that these were good starts.
Overall I still think the AI is making good predictions for who to pick. I want to place a little bit more emphasis on the OP slot for selecting quarterbacks and also start weighing in the average fantasy points for the 2025 season. Although, Parker Romo was suggested as he was averaging 18 points per game and then dropped negative points this week.
While i’m traveling for the next few weeks I likely won’t make any major architecture or code changes but I do think that from a performance perspective I want to investigate the integration of MCP servers that can handle querying or caching some of the DynamoDB data.
Week 3 is here. I started late yesterday by getting a full analysis of the team and any targets for free agency and waivers.
Most important was to get a better Tight End as the predictions for last weekend were incredibly wrong. This is my fault and reinforces the idea that giving bad data to AI will just result in bad output.
Here is the updated selection to get Juwan Johnson. This makes a lot more sense than picking Hunter Henry last week.
The second thing I looked into was getting a good defensive matchup. Currently I have the Rams on the roster but they play the Eagles this week and that matchup is not going to favor the Rams.
Here is some output from our friendly AI Dan Campbell:
Alright, coach! Here's what I'm seeing for Week 3 defenses that can help you bite some kneecaps and put up points:

TOP WEEK 3 DEFENSIVE MATCHUPS:

1. Green Bay Packers DST (7.6 projected points)
- Only 45% owned, so there's a good chance they're available
- This is their highest projected week of the season!
- They're facing a matchup that should generate turnovers and sacks

2. Buffalo Bills DST (7.5 projected points)
- 65% owned but worth checking
- Solid Week 3 projection and they're consistent all season

3. Kansas City Chiefs DST (7.5 projected points)
- Only 12% owned - this is a STEAL if available!
- Same 7.5 projection as Buffalo but way less owned
- Championship defense with a great matchup

Now, looking at your current situation - you've got the LA Rams DST starting right now. Let me tell you something, coach - any of these top 3 options would be a significant upgrade for Week 3!

MY RECOMMENDATION:
If the Kansas City Chiefs DST is available, that's your move right there! Only 12% owned with a 7.5 projection - that's championship-level value sitting on waivers. If not them, grab the Packers at 7.6 points projected.

The Atlanta Falcons (7.1 projected, only 1.3% owned) are also a sneaky good play if you want to get really aggressive on the waiver wire.

These defenses are gonna feast in Week 3, and you need every advantage you can get to dominate your league! Go get 'em, coach!
I made a claim for the Packers. I would prefer not to pick them because of my love for the Detroit Lions…
One other waiver selection that I made was at the kicker position. Here is AI Dan Campbell’s suggestions:
Alright, let me tell you what - you've got Chase McLaughlin right now, and he's been solid, but let me break down the kicker landscape for Week 3 like we're game planning for the playoffs!

Top Week 3 Kicker Options:

Brandon McManus (GB) - 8.2 projected points
- Only 14% owned, so he's sitting there waiting for you!
- Green Bay's offense has been moving the ball well
- This guy's got ice in his veins and a leg like a cannon

Tyler Loop (BAL) - 8.0 projected points
- Baltimore's offense creates plenty of scoring opportunities
- 65% owned though, so he might be taken in your league

Parker Romo (ATL) - 7.8 projected points
- Only 1.4% owned - this is a diamond in the rough!
- Atlanta's been getting into the red zone consistently

Jason Myers (SEA) - 7.9 projected points
- Seattle's offense with Sam Darnold (who you've got as your OP!) creates opportunities
- Only 10% owned

Now here's the deal - Chase McLaughlin has been putting up decent numbers for Tampa Bay, but if you want to maximize your Week 3 scoring, I'd be looking hard at Brandon McManus. The Packers offense is humming, and McManus has that veteran reliability. Plus at only 14% ownership, there's a good chance he's available.

Parker Romo is my sleeper pick - less than 2% owned but projected for nearly 8 points. Atlanta's been moving the ball, and sometimes you gotta take a swing on the unknown soldier!

You comfortable rolling with McLaughlin, or you want to make a move? In this league, every point matters, and kickers can be the difference between victory and going home empty-handed!
I picked up Parker Romo for the team. I thought it would be fun to test out the “sleeper” pick.
And finally, our starting lineup, barring any injuries or set backs during the practice week:
I think we’ve got a good matchup this week. Most of our opponent ranks are pretty low. Barring injuries we should maybe, hopefully, get our first win of the year.
For the most part I agreed with the picks that AI made last week. Except for one. The tight end. It felt a little weird picking Hunter Henry up off waiver wire and boy did I found out why. More on that later. Here are the results from the week:
There are definitely some misses on wide receiver but that is always such a hit or miss position. What shocked me the most was Josh Allen only get 11 points. Also, J.J. McCarthy was injured in his game. Not a single player hit their projection except for the Rams’ defense. If we take a look at the bench there are definitely some better picks we could have made strictly from looking at points for the game. However, even if we had selected all the better preforming players the team would have still lost as our opponent had 164 points this week.
Anyway, that’s enough football for this post. Let’s talk about some tech. I mentioned earlier that I was questioning the waiver acquisition of Hunter Henry and I wish I had done some more debugging as to why that pick was selected.
I added a chat feature to the overall application so that we can identify waiver picks and other things faster rather than having to get a full weekly analysis every time. In that code there is a function that generates a recommendation score. I’ll admit, I vibe coded some of this with some prompting of how this should be determined.
# Penalty for high ownership
        #ownership_penalty = float(waiver_player['percent_owned']) / 10  # Convert to float
        #score -= ownership_penalty
You can see here that we lowing our recommendation score because of “high ownership” this is because the reverse engineered ESPN Fantasy API doesn’t identify if a player is on a teams roster or not when I pull the players. So a player with a 100% ownership would likely never be recommended. So a player like Zach Ertz, who had 18 points this week was not suggested as he had approximately 80% ownership across ALL of ESPN’s fantasy platform. Well… this problem has been fixed.
Anyway, I also added chat. And I programmed it to respond only as Dan Campbell. Here is some output when I asked “What do you think of my team?”
pounds table

Well I'll be damned, you got yourself a HELL of a roster there, chief! This team's got some serious bite to it - let me break it down for ya.

Your Strengths - These are STUDS:
- Josh Allen - That's your franchise quarterback right there. Guy's a warrior and puts up points like it's going out of style
- Saquon Barkley & Josh Jacobs - Holy smokes, that's a one-two punch at RB that'll knock people's teeth out! Both these guys are workhorses
- Breece Hall in the FLEX - Are you kidding me?! Most teams would KILL to have Hall as their RB1, and you got him as a flex play. That's championship-level depth
- DK Metcalf - Big body receiver who can take the top off any defense
- Your bench depth - Terry McLaurin, DJ Moore, Cooper Kupp, Keenan Allen?! That's four WR1/WR2 caliber guys just sitting there!

Areas that need some attention:
- George Kittle on IR - That hurts, but Hunter Henry's a solid fill-in for now
- J.J. McCarthy at OP - Kid's got potential but he's still unproven. Might want to consider streaming that spot based on matchups
- Marvin Harrison Jr. - Rookie receivers can be boom-or-bust, but the talent's there

The Bottom Line:
This roster is LOADED, especially at RB and WR. You've got championship potential written all over it. The depth is ridiculous - you could probably trade some of that bench talent for upgrades at TE or find a more consistent OP play.

You're sitting pretty, but don't get comfortable! Keep grinding, keep looking for those edges. That's how you win championships!

What specific position are you thinking about upgrading, or you want me to take a look at some waiver wire options?
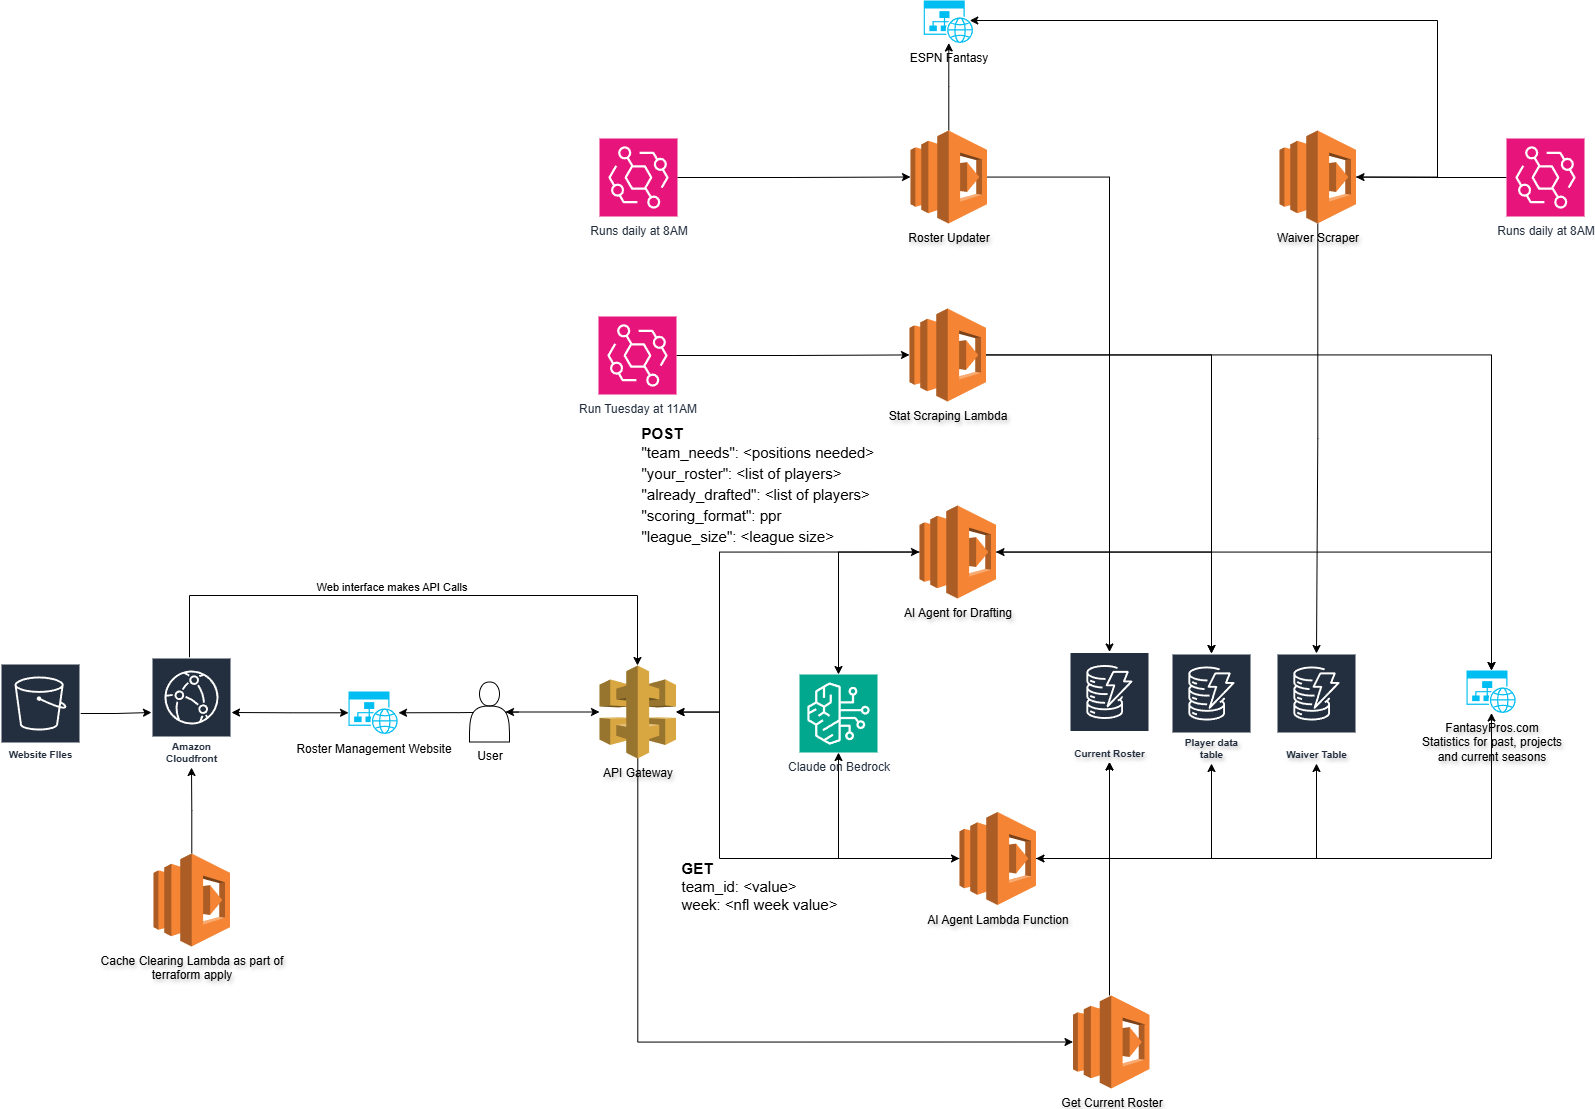
And here is an architecture diagram update to include the chat elements:
So, I’ll be back tomorrow with a new lineup. Hopefully week three treats us better!
After a heartbreaking (lol) loss in week one, our agent is back with its picks for week two!
But, before we start talking about rosters and picks and how I think AI is going to lose week two, let’s talk about the overall architecture of the application.
Current Architecture diagram
You may notice that after my post on Tuesday I have substantially reduced the data storage. I’m now using three DynamoDB tables to handle everything.
Current Roster – This table is populated by an automated scraper that pulls the rosters for all the teams in the league.
Player Data Table – This table populates all the historical data from the draft as well as projected stats for the 2025 season. It also holds the actual points received after the week has completed.
Waiver Table – this is probably the most notable addition to the overall Agent. This table is populated by both ESPN and FantasyPros
The waiver wire functionality is a massive addition to the Agent. It now has the ability to know what players are available for me to add to the team. If we combine that with the player stats in the Player Data Table we can get a clear picture as to how the player MIGHT preform on a week to week basis.
The waiver table is populated by a lambda function that goes out and scrapes the ESPN Fantasy Platform. It is quite involved code as there is no API for ESPN. I’m still not sure why they don’t build one. It seems like an easy win for them especially as they get into more sports gambling. You can read the code here. This Lambda function runs on a CRON every day so that the Agent always has daily updated data.
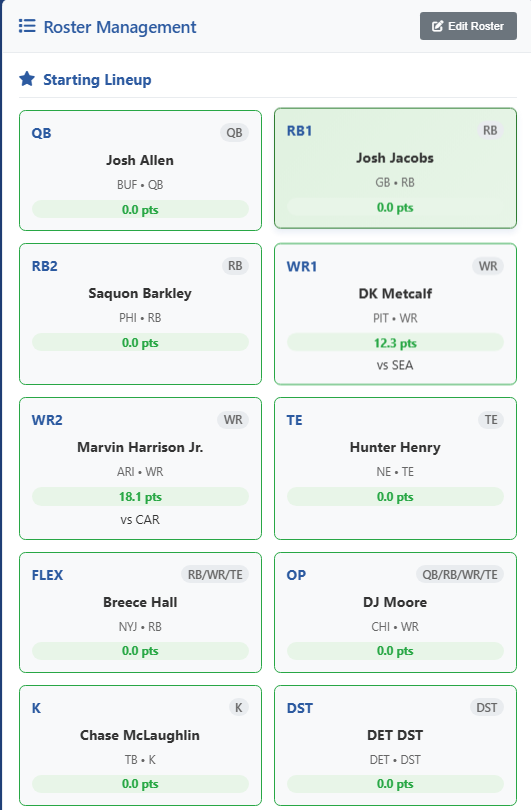
The other major addition is a web interface. I realized that accessing this via a terminal is great but, it would be way more interesting to have something to look at. Especially if I am away from the computer.
The web interface consists of a display of the roster:
Roster Screenshot
There are a couple things I need to fix. You’ll notice that a few players “have points” this is a problem with the data in the Player Data Table from when I was merging all the sources. Ideally, this will display the points the player has received for the week. Eventually I would like to add some live streaming of the point totals.
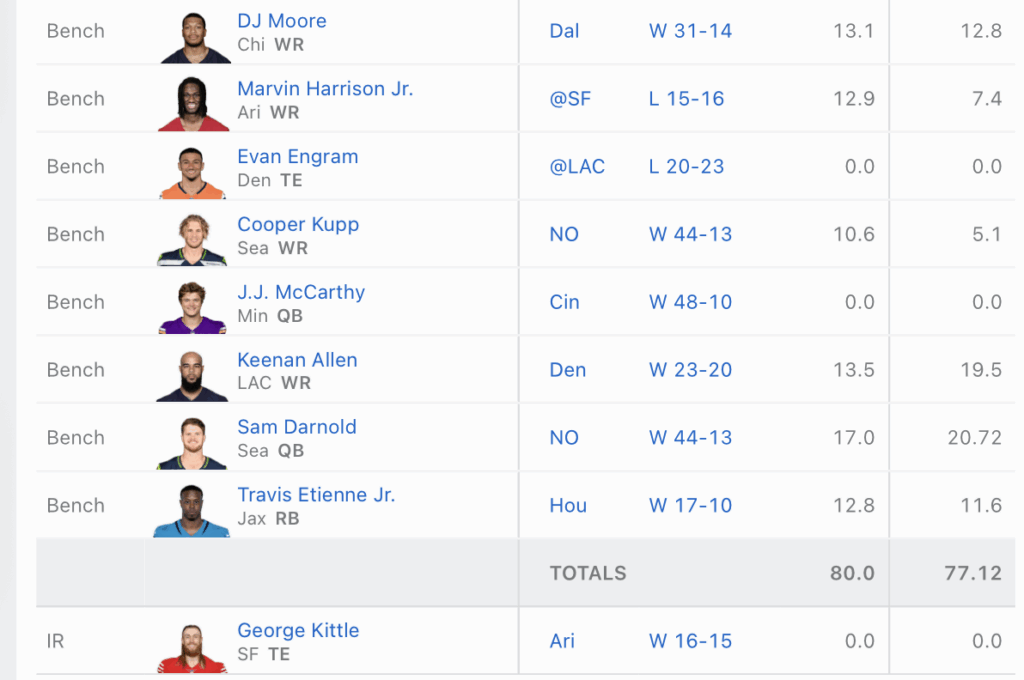
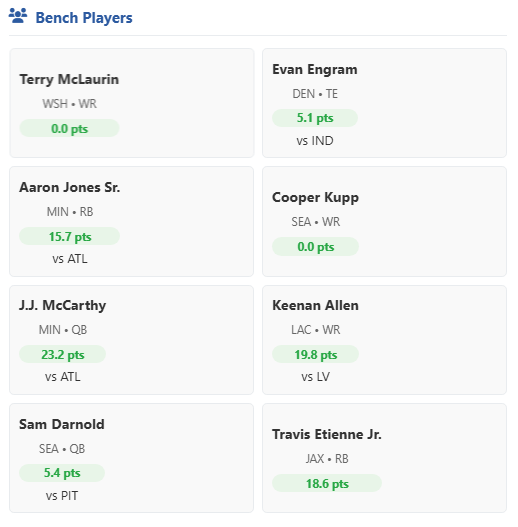
Bench Players
It also displays the bench (notice the same data glitch). On my list of things to do is to make these boxes drag and drop and auto update the roster table so that we can move players around. I also want to add their projections to each block so I can see the projected points per week for each player.
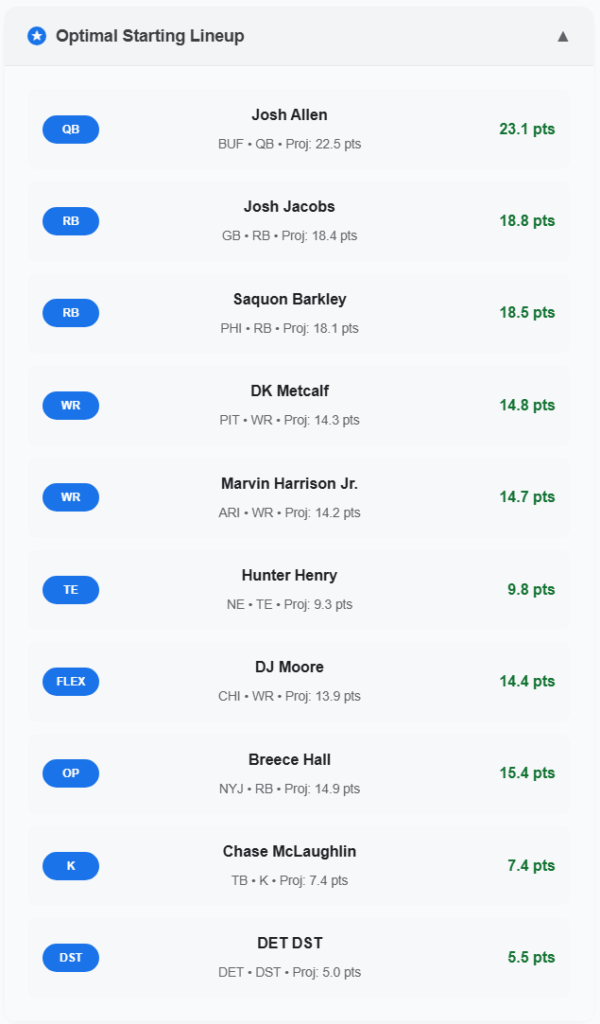
The BEST part (in my opinion) is the prediction functionality. There is a box that we can choose which week to get a prediction for and then it will return output from the agent.
So, let’s take a look at week two!
Optimal Week 2 Lineup
Here is a screenshot of the week two optimal lineup. This is the lineup I will be starting for week two unless one of my tight-ends becomes healthy. With George Kittle on injured reserve and Evan Engram also questionable, the AI suggested picking up Hunter Henry.
The Agent will also provide up with some waiver targets as well as matchup analysis
It will also output the full response for each week. Here is the full text of what the Agent has predicted for week two:
LINEUP OPTIMIZATION FOR WEEK 2
Starting Lineup Strategy: – Josh Allen (QB): Elite QB1 with 38.8 points in Week 1, facing NYJ defense that allowed significant passing yards. His 2024 average of 31.85 and strong 2025 projection make him a must-start. – Josh Jacobs (RB1): Top projected RB at 18.4 points, facing Washington at home. Green Bay’s new offensive system should benefit Jacobs significantly. – Saquon Barkley (RB2): Projected 18.1 points against Kansas City. His 2024 average of 15.93 and strong 2025 projection of 273.2 season points make him a core play. – DK Metcalf (WR1): Highest projected WR at 14.3 points. Pittsburgh vs Seattle should be a competitive game with passing volume. – Marvin Harrison Jr. (WR2): Rookie with 14.2 projection facing Carolina. His 154.5 season projection suggests breakout potential. – Hunter Henry (TE): Best available TE option at 9.3 projected points with Kittle on IR and Engram questionable. – DJ Moore (FLEX): Solid 13.9 projection against Detroit. Chicago’s passing game should see volume in what could be a high-scoring affair. – Breece Hall (OP): Critical OP selection at 14.9 projected points. Hall offers RB1 upside against Buffalo, and using an RB in the OP slot provides higher floor than WR options.
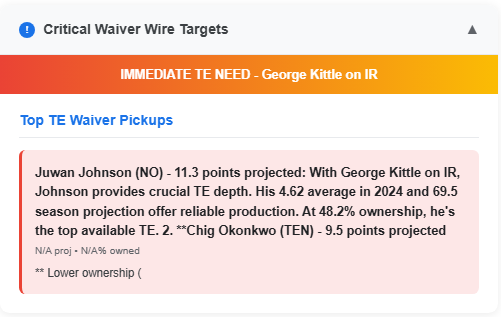
CRITICAL WAIVER WIRE TARGETS:
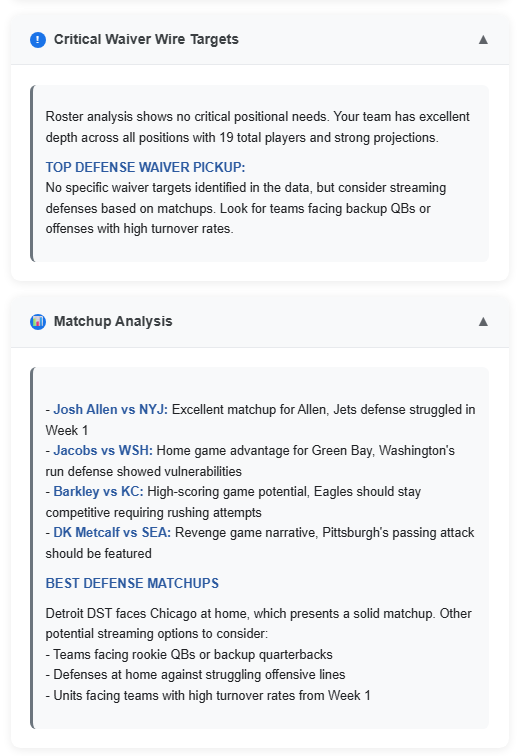
Roster analysis shows no critical positional needs. Your team has excellent depth across all positions with 19 total players and strong projections.
TOP DEFENSE WAIVER PICKUP: No specific waiver targets identified in the data, but consider streaming defenses based on matchups. Look for teams facing backup QBs or offenses with high turnover rates.
INJURY CONCERNS: – George Kittle: On Injury Reserve, unavailable for Week 2 – Evan Engram: Listed as Questionable, monitor his status throughout the week
MATCHUP ANALYSIS: – Josh Allen vs NYJ: Excellent matchup for Allen, Jets defense struggled in Week 1 – Jacobs vs WSH: Home game advantage for Green Bay, Washington’s run defense showed vulnerabilities – Barkley vs KC: High-scoring game potential, Eagles should stay competitive requiring rushing attempts – DK Metcalf vs SEA: Revenge game narrative, Pittsburgh’s passing attack should be featured
BEST DEFENSE MATCHUPS
Detroit DST faces Chicago at home, which presents a solid matchup. Other potential streaming options to consider: – Teams facing rookie QBs or backup quarterbacks – Defenses at home against struggling offensive lines – Units facing teams with high turnover rates from Week 1
WAIVER PRIORITY: 1. Streaming Defense: Look for defenses with favorable Week 3 matchups 2. Handcuff RBs: Target backup RBs for your elite runners (Jacobs, Barkley, Hall) 3. High-Upside WRs: Monitor snap counts and target shares from Week 2 for emerging receivers
Final Comments: Your roster is exceptionally deep and well-constructed. The OP position selection of Breece Hall provides excellent upside, as RBs typically offer higher floors than WRs in flex positions. Focus on matchup-based streaming for defense and monitor the waiver wire for breakout players rather than addressing positional needs. Your core lineup projects for strong Week 2 performance with multiple players having 15+ point upside.
What’s Next?
So we have a pretty solid week two prediction. Josh Allen and Saquon Barkley I have faith in. The rest of the team is hit or miss. Chicago faces Detroit at Ford Field (Go Lions!) and both teams lost week one. But Ben Johnson facing his old team for the first time has me nervous.
This brings up a few of my to-dos for the overall program.
Defensive matchups – I need to get data for the Defenses to find the best matchups week to week. Having a good defense play is an easy way to get an advantage every week.
Add authentication – I added a really simple authentication method to the code just for the time being. But, it would be nice to have a Single Sign On or something a little bit more secure.
Drag-n-drop interface – I need to add functionality to be able to modify the roster on the web interface. It would be nice if this could also update ESPN.
Slow Output – I’m always looking for ways to optimize the Agent’s output. Currently it takes about 45 seconds to a minute to return the output.
Thoughts? I hope this series is entertaining. If you have ideas for the Agent please comment below or shoot me a message somewhere!