This post is a continuation of my article: “A File Extraction Project”. This project has been a great learning experience for both frontend and backend application architecture and design. Below you will find a diagram and an explanation of all the pieces that make this work.

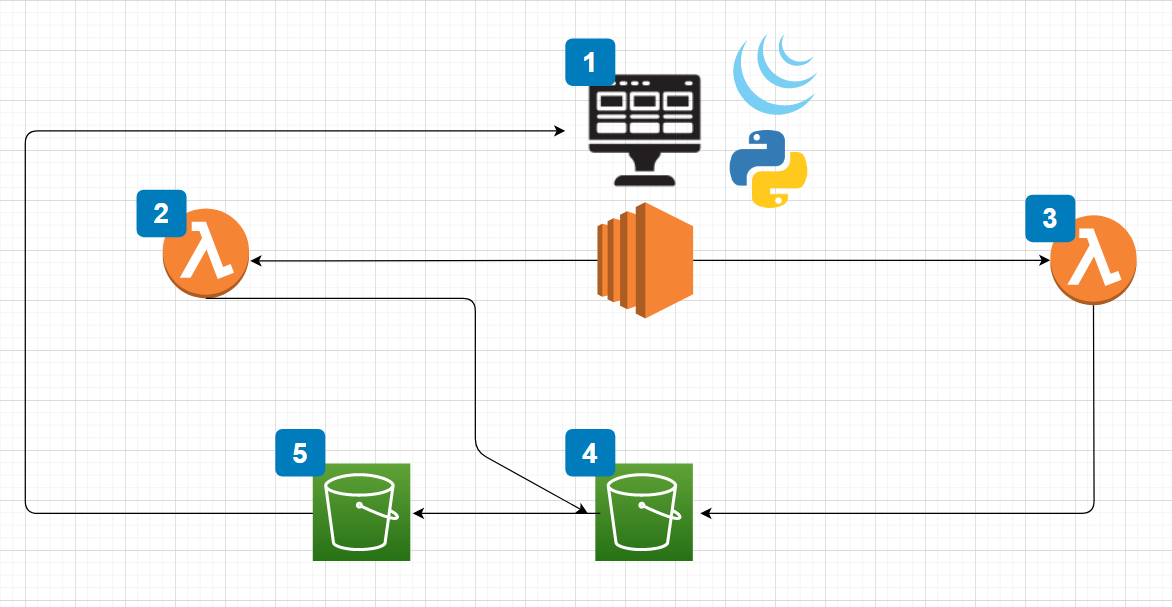
- The entire architecture is powered by Flask on an EC2 instance. When I move this project to production I intend to put an application load balancer in front to manage traffic. The frontend is also secured by Google Authentication. This provides authentication against the users existing GSuite deployment so that only individuals within the organization can access the application.
- The first Lambda function processes the upload functions. I am allowing for as many files as needed by the customer. The form also includes a single text field for specifying the value of the object tag. The function sends the objects into the first bucket which is object #4.
- The second Lambda function is the search functionality. This function allows the user to provide a tag value. The function queries all objects in bucket #4 and creates a list of objects that match the query. It then moves the objects to bucket #5 where it packages them up and presents them to the user in the form of a ZIP file.
- The first bucket is the storage for all of the objects. This is the bucket where all the objects are uploaded to from the first Lambda function. It is not publicly accessible.
- The second bucket is a temporary storage for files requested by the user. Objects are moved into this bucket from the first bucket. This bucket has a deletion policy that only allows objects to live inside it for 24 hours.
Lambda Function for File Uploading:
def upload():
    if request.method == 'POST':
        tag = request.form['tag']
        files = request.files.getlist('file')
        print(files)
        for file in files:

            print(file)
            if file:
                    filename = secure_filename(file.filename)
                    file.save(filename)
                    s3.upload_file(
                        Bucket = BUCKET_NAME,
                        Filename=filename,
                        Key = filename
                    )

                    s3.put_object_tagging(
                        Bucket=BUCKET_NAME,
                        Key=filename,
                        Tagging={
                            'TagSet': [
                                {
                                    'Key': 'Tag1',
                                    'Value': tag
                                },
                                {
                                    'Key': 'Tag2',
                                    'Value': 'Tag-value'
                                },
                            ]
                        },
                    )
        msg = "Upload Done ! "
The function lives within the Flask application. I have AWS permissions setup on my EC2 instance to allow the “put_object” function. You can assign tags as needed. The first tag references the $tag variable which is provided by the form submission.
For Google Authentication I utilized a project I found on Github here. In the “auth” route that is created I modified it to authenticate against the “hd” parameter passed by the processes. You can see how this works here:
@app.route('/auth')
def auth():
    token = oauth.google.authorize_access_token()
    user = oauth.google.parse_id_token(token)
    session['user'] = user
    if "hd" not in user:
        abort(403)
    elif user['hd'] != 'Your hosted domain':
        abort(403)
    else:
        return redirect('/')
If the “hd” parameter is not passed through the function it will abort with a “403” error.
If you are interested in this project and want more information feel free to reach out and I can provide more code examples or package up the project for you to deploy on your own!
If you found this article helpful please share it with your friends.
Leave a Reply