If you’re working with LLM APIs, you’re probably watching your token counts like a hawk. Every JSON object you send to Claude, GPT-4, or Gemini costs tokens, and those curly braces and quotes add up fast. I built https://jsontotoon.io to solve this exact problem—and it’s completely free to use.
The Problem: JSON is Token-Inefficient
Here’s the thing: JSON is fantastic for machine-to-machine communication. It’s ubiquitous, well-supported, and everyone knows how to work with it. But when you’re paying per token to send data to an LLM? It’s wasteful.
Look at a simple example:
[
  {"name": "Alice", "age": 30, "city": "NYC"},
  {"name": "Bob", "age": 25, "city": "LA"},
  {"name": "Carol", "age": 35, "city": "Chicago"}
]
That’s 125 tokens. All those quotes, braces, and commas? The LLM doesn’t need them to understand the structure. You’re literally paying to send redundant syntax.
Enter TOON Format
TOON (Token-Oriented Object Notation) converts that same data to:
name, age, city
Alice, 30, NYC
Bob, 25, LA
Carol, 35, Chicago
68 tokens. That’s a 46% reduction. The same information, fully reversible back to JSON, but nearly half the cost.
I realize this sounds too good to be true, but the math checks out. I tested it across real-world datasets—API responses, database dumps, RAG context—and consistently saw 35-45% token reduction. Your mileage will vary depending on data structure, but the savings are real.
How I Built It
The backend is straightforward Python running on AWS Lambda. The TOON parser itself is deterministic—same JSON always produces the same TOON output, and round-trip conversion is lossless. No data gets mangled, no weird edge cases (well, I fixed those during testing).
Infrastructure-wise:
– CloudFront + S3 for the static frontend
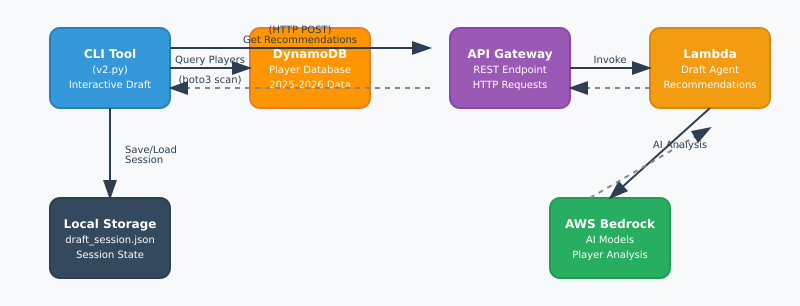
– API Gateway + Lambda for the conversion endpoint
– DynamoDB for API key storage (with email verification via SES)
– WAF with rate limiting to prevent abuse (10 requests per 5 minutes on API endpoints)
– CloudWatch dashboards for monitoring
The whole setup costs me about $8-15/month in AWS fees, mostly for WAF. The conversion itself is so fast (< 100ms average) and cheap that I can offer unlimited free API keys without worrying about runaway costs.
Real Use Cases
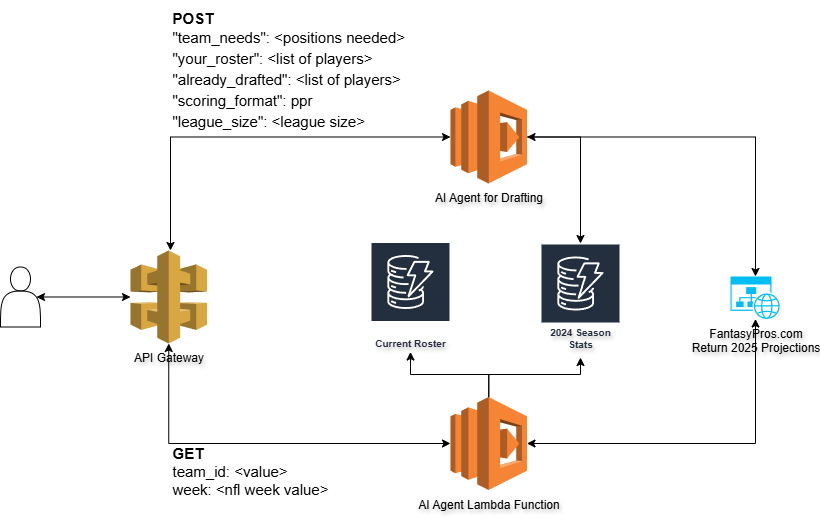
I built this because I was spending way too much on Claude API calls for my fantasy football AI agent project. Every week I send player stats, injury reports, and matchup data in prompts. Converting to TOON saved me about 38% on tokens—which adds up when you’re making hundreds of calls per week.
But the use cases go beyond my specific problem:
– RAG systems: Fit more context documents in your prompts without hitting limits
– Data analysis agents: Send larger datasets for analysis at lower cost
– Few-shot learning: Include more examples without token bloat
– Structured outputs: LLMs can generate TOON that’s easier to parse than JSON
Try It Yourself
The web interface at https://jsontotoon.io is free to use—no signup required. Just paste your JSON, get TOON. If you want to integrate it into your application, grab a free API key (also no cost, no expiration).
Full API docs are available at https://jsontotoon.io/docs.html, with code examples in Python, JavaScript, Go, and cURL.