I love AWS. But one thing they don’t do is build complete tools. SES is one of them. I recently started getting emails about high usage for one of the identities that I have set up for SES. I would assume that there was a way to track usage within CloudWatch but for the life of me I couldn’t find one. So I guess that means I need to build something.
The idea here is pretty simple, within SES identities you can set up a notification. So, I created an SNS topic and subscribed all delivery notifications to the topic. Then, subscribe a Lambda function to the topic. The lambda function acts as the processor for the records then formats them in a usable way and puts them into DynamoDB. I used the identity as the primary key. The result is a simple application architecture like the below image.
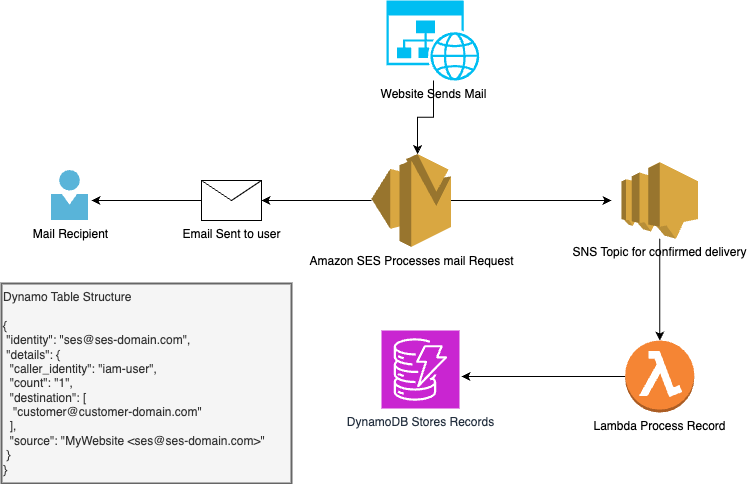
Every time an email is delivered the lambda function processes the event and checks the DynamoDB table to see if we have an existing record. If the identity is already present in the table it returns the “count” value so that we can increment the value. The “destination” value appends the destination of the email being sent. Below is a sample of the code I used to put the object into the DynamoDB Table.
def put_dynamo_object(dynamo_object):
    count = str(dynamo_get_item(dynamo_object))
    if count == None or count == 0:
        count = str(1)
    else:
        count = int(count) + 1
    # get email address from the long string
    source_string = dynamo_object['source']
    email_match = match = re.search(r'[\w.+-]+@[\w-]+\.[\w.-]+', source_string)
    email = match.group(0)
    try:
        table.update_item(
            Key={
                    'identity': email

                },
            AttributeUpdates={
                'details': {
                    'Value': {
                            'caller_identity': dynamo_object['caller_identity'],
                            'source': dynamo_object['source'],
                            'destination': dynamo_object['destination'],
                            'count': str(count)
                    }

                }
            }
        )
        return True
    except ClientError as e:
        print("Failed to put record")
        print(e)
        return False
If you want to use this code feel free to reach out to me and I will share with you the Terraform to deploy the application and as always, reach out with questions or feedback!