Well, my AWS bill me a bit larger than normal this month due to testing this script. I thoroughly enjoy utilizing Generative AI to do work for me and I had some spare time to tackle this problem this week.
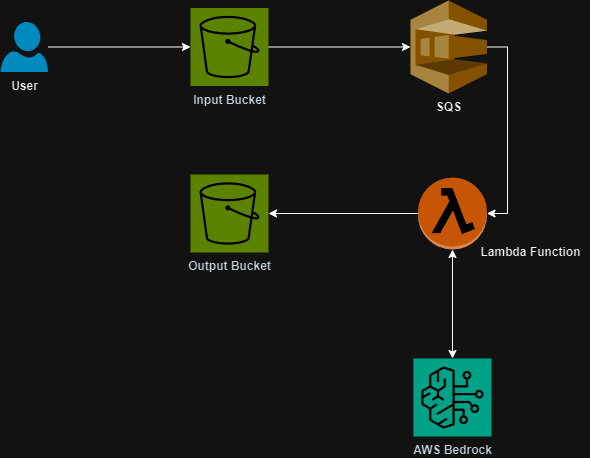
A client sent me a bunch of product images that were not named properly. All of the files were named something like “IMG_123.jpeg”. There was 63 total files so I decided rather than going through them one by one I would see if I could get one of Anthropic’s models to handle it for me and low and behold it was very successful!
I scripted out the workflow in Python and utilized AWS Bedrock’s platform to execute the interactions with the Claude 3 Haiku model. Take a look at the code below to see how this was executed.
if __name__ == "__main__":
    print("Processing images")
    files = os.listdir("photos")
    print(len(files))
    for file in files:
        if file.endswith(".jpeg"):
            print(f"Sending {file} to Bedrock")
            with open(f"photos/{file}", "rb") as photo:

                prompt = f"""
                    Looking at the image included, find and return the name of the product.
                    Rules:
                    1. Return only the product name that has been determined.
                    2. Do not include any other text in your response like "the product determined..."
                    """
                model_response = bedrock_actions.converse(
                    prompt,
                    image_format="jpeg",
                    encoded_image=photo.read(),
                    max_tokens="2000",
                    temperature=.01,
                    top_p=0.999
                    )
                print(model_response['output'])
                product_name = modify_product_name(model_response['output']['message']['content'][0]['text'])

                photo.close()
                if os.system(f"cp photos/{file} renamed_photos/{product_name}.jpeg") != 0:
                    print("failed to move file")
                else:
                    os.system(f"mv photos/{file} finished/{file}")
    sys.exit(0)
The code will loop through all the files in a folder called “photos” passing each one to Bedrock and getting a response. There was a lot of characters that were returned that would either break the script or that are just not needed so I also wrote a function to handle those.
Ultimately, the script will copy the photo to a file named after the product and then move the original file into a folder called “finished”.
I’ve uploaded the code to GitHub and you can utilize it however you want!