Your cart is currently empty!
Tag: python
-
API For Pre-signed URLs
Pre-signed URL’s are used for downloading objects from AWS S3 buckets. I’ve used them many times in the past for various reasons but this idea was a new one. A proof of concept for an API that would create the pre-signed URL and return it to the user.
This solution utilizes an API Gateway and an AWS Lambda function. The API Gateway takes two parameters “key” and “expiration”. Ultimately, you could add another parameter for “bucket” if you wanted the gateway to be able to get objects from multiple buckets.
I used Terraform to create the infrastructure and Python to program the Lambda.
Take a look at the Lambda code below:
import boto3 import json import os from botocore.exceptions import ClientError def lambda_handler(event, context): # Get the query parameters query_params = event.get('queryStringParameters', {}) if not query_params or 'key' not in query_params: return { 'statusCode': 400, 'body': json.dumps({'error': 'Missing required parameter: key'}) } object_key = query_params['key'] expiration = int(query_params.get('expiration', 3600)) # Default 1 hour # Initialize S3 client s3_client = boto3.client('s3') bucket_name = os.environ['BUCKET_NAME'] try: # Generate presigned URL url = s3_client.generate_presigned_url( 'get_object', Params={ 'Bucket': bucket_name, 'Key': object_key }, ExpiresIn=expiration ) return { 'statusCode': 200, 'headers': { 'Access-Control-Allow-Origin': '*', 'Content-Type': 'application/json' }, 'body': json.dumps({ 'url': url, 'expires_in': expiration }) } except ClientError as e: return { 'statusCode': 500, 'body': json.dumps({'error': str(e)}) }The Terraform will also output a Postman collection JSON file so that you can immediately import it for testing. If this code and pattern is useful for you check it out on my GitHub below.
-
Adding a reminder feature to Discord
As many of you know, I released my Discord Bot Framework the other week. This has prompted me to put sometime into developing new features for the bot’s I manage.
I’ve always been a fan of the “remind” functionality that many Reddit communities have. In my Discord, we are often sending media content that I want to watch but don’t want to forget about. Hence the need for the command “!remind”. Surprisingly this was pretty simple code. Take a look below for the functionality I created.
@client.command(name='remind') async def remind(ctx, duration: str): try: # Parse the duration (e.g., "10s" for 10 seconds, "5m" for 5 minutes, "1h" for 1 hour) time_units = {'s': 1, 'm': 60, 'h': 3600} time_value = int(duration[:-1]) time_unit = duration[-1] if time_unit not in time_units: await ctx.send("Invalid time format! Use s (seconds), m (minutes), or h (hours).") return delay = time_value * time_units[time_unit] # Check if the command is a reply to another message if ctx.message.reference and ctx.message.reference.resolved: # Get the replied message replied_message = ctx.message.reference.resolved message_link = f"https://discord.com/channels/{ctx.guild.id}/{ctx.channel.id}/{replied_message.id}" else: await ctx.send("Please reply to a message you want to be reminded about.") return await ctx.send(f"Okay, I will remind you in {duration} to check out the message you referenced: {message_link}") # Wait for the specified duration await asyncio.sleep(delay) # Send a reminder message with the link to the original message await ctx.send(f"{ctx.author.mention}, it's time to check out your message! Here is the link: {message_link}") except ValueError: await ctx.send("Invalid time format! Use a number followed by s (seconds), m (minutes), or h (hours).")Feel free to utilize this code and add it to your own Discord bot! As always, if this code is helpful please share it with your friends or on your own social media!
-
The Discord Bot Framework
I’m happy to announce the release of my Discord Bot Framework. A tool that I’ve spent a considerable amount of time working on to help people build and deploy Discord Bots quickly within AWS.

Let me first start off by saying I’ve never released a product. I’ve run a service business and I’m a consultant but I’ve never been a product developer. This release marks my first codebase that I’ve packaged and put together for developers and hobbyists to utilize.
So let’s talk about what this framework does. First and foremost it is not a fully working bot. There are pre-requisites that you must accomplish. The framework holds some example code for commands and message context responses which should be enough to get any Python developer started on building their bot. The framework also includes all of the required Terraform to deploy the bot within AWS.
When you launch the Terraform it will build a Docker image for you and deploy that image to ECR as well as launch the container within AWS Fargate. All of this lives behind a load balancer so that you can scale your bot’s resources as needed although I haven’t seen a Discord bot ever require that many resources!
I plan on supporting this project personally and providing support via email for the time being for anyone who purchases the framework.
Roadmap:
– GitHub Actions template for CI/CD
– More Bot example code for commands
– Bolt on packages for new functionalityI hope that this framework helps people get started on building bots for Discord. If you have any questions feel free to reach out to me at anytime!
-
Product Name Detection with AWS Bedrock & Anthropic Claude
Well, my AWS bill me a bit larger than normal this month due to testing this script. I thoroughly enjoy utilizing Generative AI to do work for me and I had some spare time to tackle this problem this week.
A client sent me a bunch of product images that were not named properly. All of the files were named something like “IMG_123.jpeg”. There was 63 total files so I decided rather than going through them one by one I would see if I could get one of Anthropic’s models to handle it for me and low and behold it was very successful!
I scripted out the workflow in Python and utilized AWS Bedrock’s platform to execute the interactions with the Claude 3 Haiku model. Take a look at the code below to see how this was executed.
if __name__ == "__main__": print("Processing images") files = os.listdir("photos") print(len(files)) for file in files: if file.endswith(".jpeg"): print(f"Sending {file} to Bedrock") with open(f"photos/{file}", "rb") as photo: prompt = f""" Looking at the image included, find and return the name of the product. Rules: 1. Return only the product name that has been determined. 2. Do not include any other text in your response like "the product determined..." """ model_response = bedrock_actions.converse( prompt, image_format="jpeg", encoded_image=photo.read(), max_tokens="2000", temperature=.01, top_p=0.999 ) print(model_response['output']) product_name = modify_product_name(model_response['output']['message']['content'][0]['text']) photo.close() if os.system(f"cp photos/{file} renamed_photos/{product_name}.jpeg") != 0: print("failed to move file") else: os.system(f"mv photos/{file} finished/{file}") sys.exit(0)The code will loop through all the files in a folder called “photos” passing each one to Bedrock and getting a response. There was a lot of characters that were returned that would either break the script or that are just not needed so I also wrote a function to handle those.
Ultimately, the script will copy the photo to a file named after the product and then move the original file into a folder called “finished”.
I’ve uploaded the code to GitHub and you can utilize it however you want!
-
Building a Generative AI Workflow with AWS Bedrock
I’ve finally been tasked with a Generative AI project to work on. I’ve done this workflow manually with ChatGPT in the past and it works quite well but, for this project, the requirement was to use Amazon Web Services’ new product “AWS Bedrock”.
The workflow takes in some code and writes a technical document to support a clear English understanding of what the code is going to accomplish. Using AWS Bedrock, the AI will write the document and output it to an S3 bucket.
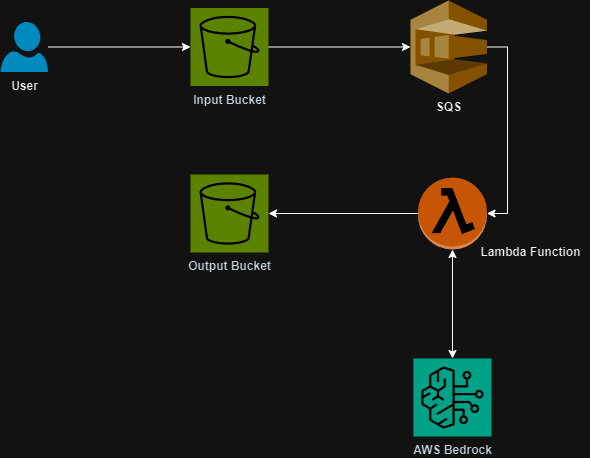
The architecture involves uploading the initial code to an S3 Bucket which will then send the request to an SQS queue and ultimately trigger a Lambda to prompt the AI and fulfill the output upload to a separate S3 bucket. Because this was a proof of concept, the Lambda function was a significant compute resource however going forward I am going to look at placing this code into a Docker container so that it can scale for larger code inputs.
Here is the architecture diagram:

Let’s take a look at some of the important code. First is the prompt management. I wrote a function that will take input of the code as well as a parameter of “prompt_type”. This will allow the function to be scalable to accommodate other prompts in the future.
def return_prompt(code, prompt_type): if prompt_type == "testPrompt": prompt1 = f"Human: <your prompt>. Assistant:" return prompt1The important thing to look at here is the format of the message. You have to include the “Human:” and the “Assistant:”. Without this formatting, your API call will error.
The next bit of code is what we use to prompt the Bedrock AI.
prompt_to_send = prompts.return_prompt(report_file, "testPrompt") body = { "prompt": prompt_to_send, "max_tokens_to_sample": 300, "temperature": 0.1, "top_p": 0.9 } accept = 'application/json' contentType = 'application/json' # Return Psuedo code bedrock_response = h.bedrock_actions.invoke_model(json.dumps(body, indent=2).encode('utf-8'), contentType, accept, modelId=modelid)def invoke_model(body, contentType, accept, modelId): print(f"Body being sent: {body}") try: response = bedrock_runtime.invoke_model( body=body, contentType=contentType, accept=accept, modelId=modelId ) return response except ClientError as e: print("Failed to invoke Bedrock model") print(e) return FalseThe body of our request is what configures Bedrock to run and create a response. These values can be tweaked as follows:
max_tokens_to_sample: This specifies the number of tokens to sample in your request. Amazon recommends setting this to 4000
TopP: Use a lower value to ignore less probable options.
Top K: Specify the number of token choices the model uses to generate the next token.
Temperature: Use a lower value to decrease randomness in the response.
You can read more about the inputs here.If you want to see more of this code take a look at my GitHub repository below. Feel free to use it wherever you want. If you have any questions be sure to reach out to me!
-
Convert Spotify Links to Youtube Links
In a continuation of my Discord Bot feature deployment, I found a need to convert Spotify links to YouTube links. I use Youtube music for my music streaming needs and the rest of the Discord uses Spotify.
With the help of ChatGPT, I created a script that converts Spotify links to Youtube links! This utilizes both the Spotify API and Youtube APIs to grab track information and format search queries to return a relevant Youtube link.
The code consists of two primary functions which I have shared below. One to get the artist and track names and another to query YouTube. Combined, we can return a YouTube link to a multitude of applications.
def get_spotify_track_info(spotify_url): track_id = sp.track(spotify_url)['id'] track_info = sp.track(track_id) return { 'name': track_info['name'], 'artists': [artist['name'] for artist in track_info['artists']] } def search_youtube_video(track_info): search_query = f"{track_info['name']} {track_info['artists'][0]} official video" request = youtube.search().list(q=search_query, part='snippet', type='video', maxResults=1) response = request.execute() video_id = response['items'][0]['id']['videoId'] return f"https://www.youtube.com/watch?v={video_id}"I took this code and incorporated it into my Discord bot so that anytime a user posts a Spotify link it will automatically convert it to a Youtube link. Here is an example:

If you want to utilize this code check out the Github link below. As always, if you found this article helpful please share it across your social media.
Github – https://github.com/avansledright/spotify-to-youtube
-
Automated Lambda Testing
Look, I know there are a bunch of test frameworks that you could use for your Lambda functions. But what if you wanted something simple? I spent an afternoon putting together what I would want in a testing pipeline that returns a simple “Success/Fail” type response to me via Email.
An architecture diagram for your eyes:

The idea is to create a JSON object with a key and value pair of the name of the Lambda function and the test event to pass to the lambda. Once the file is uploaded to the S3 bucket the pipeline can be triggered where a Codebuild job will iterate through the Lambdas and their events. The Lambdas will be tested with the event and return whether or not they are successful. The results are then sent to an SNS topic to be distributed to the developers.

Going forward, I hope to automate adding new Lambda functions to the JSON file so that testing can also be scheduled.
I spent time packaging this solution up with all the appropriate Terraform files and code. If you are interested in this solution feel free to reach out and I can deliver the packaged application to you!
Sample Code: GitHub
-
SES Monitoring
I love AWS. But one thing they don’t do is build complete tools. SES is one of them. I recently started getting emails about high usage for one of the identities that I have set up for SES. I would assume that there was a way to track usage within CloudWatch but for the life of me I couldn’t find one. So I guess that means I need to build something.
The idea here is pretty simple, within SES identities you can set up a notification. So, I created an SNS topic and subscribed all delivery notifications to the topic. Then, subscribe a Lambda function to the topic. The lambda function acts as the processor for the records then formats them in a usable way and puts them into DynamoDB. I used the identity as the primary key. The result is a simple application architecture like the below image.

Every time an email is delivered the lambda function processes the event and checks the DynamoDB table to see if we have an existing record. If the identity is already present in the table it returns the “count” value so that we can increment the value. The “destination” value appends the destination of the email being sent. Below is a sample of the code I used to put the object into the DynamoDB Table.
def put_dynamo_object(dynamo_object): count = str(dynamo_get_item(dynamo_object)) if count == None or count == 0: count = str(1) else: count = int(count) + 1 # get email address from the long string source_string = dynamo_object['source'] email_match = match = re.search(r'[\w.+-]+@[\w-]+\.[\w.-]+', source_string) email = match.group(0) try: table.update_item( Key={ 'identity': email }, AttributeUpdates={ 'details': { 'Value': { 'caller_identity': dynamo_object['caller_identity'], 'source': dynamo_object['source'], 'destination': dynamo_object['destination'], 'count': str(count) } } } ) return True except ClientError as e: print("Failed to put record") print(e) return FalseIf you want to use this code feel free to reach out to me and I will share with you the Terraform to deploy the application and as always, reach out with questions or feedback!
-
Building a Discord Bot with Python and AWS
I’m a member of a lot of Discord servers. The one I participate in most is one with my brothers and our friends. In this server, we joke around a lot about people posting off-topic messages in the various text channels and we give them fake “warnings”. I decided to take this a step further and create a bot where we could track the warnings and then present them in a leaderboard.
The Discord bot API documentation is great and allowed me to quickly get a proof of concept up and running. I then relied on my Python, Terraform, and AWS skills to get the bot up and running quickly. Below is a simple architecture diagram that I started and will most likely be adding to as the members of the server request more features.

We have three current commands, !warning, !feature, !leaderboard. The !warning command takes input of a tagged user. It then uses the Boto3 library for Python and adds the attribute to the user in the table. Here is the code:
# Adds an attribute to a user def add_warning_to_user(username, attribute): client = boto3.resource("dynamodb", region_name="us-west-2", aws_access_key_id=os.getenv('AWS_KEY'), aws_secret_access_key=os.getenv('AWS_SECRET')) table = client.Table(table_name) print("adding", attribute, "to", str(username)) try: response = table.update_item( Key={'username': str(username)}, AttributeUpdates={attribute: { 'Value': str(dynamodb.get_warning_count_of_user(username, attribute) + 1) } } ) print(response) except ClientError as e: print("Failed to update count") print(e) return False return TrueI have another function within this code that will call out to the DynamoDB table and gets the user’s current value so that we can increment the count.
The !leaderboard command takes input of an “attribute” I built it this way so that we can have future attributes added to users without having to rebuild everything from scratch. To get the data I used the DynamoDB scan function to retrieve all of the data for all the users and then filter within the Python application on just the attribute that we are requesting the leaderboard for. I then have a function that formats the leaderboard into something that the bot can publish back to the server.
def create_table(data, attribute): if attribute == "warning_count": attribute = "Warnings" table = "" rows = [] rows.append("``` ") rows.append(f"{attribute}: Leaderboard") for key, value in data.items(): rows.append(f"{key}: {str(value)}") rows.append("``` ") for row in rows: table += " " + row + "\n " return tableThis code I want to revisit to make the formatting cleaner as the list gets longer. But for now it works as intended.
The last function I created so that the users could submit feature requests. The code is very simple and the command !feature takes the input of all text following the command and passes it to an SNS function I wrote which sends an email to me containing the user’s feature request. I have hopes that I can transition this to create some sort of Jira task or other workflow. Below is the bot’s code to handle this interaction:
@client.command(name="feature", help="sends a feature request") async def send_feature_request(ctx, *, args): print("THIS IS THE FEATURE REQUEST", args) if sns.send_message(args) == True: await ctx.send("Your request has been sent") else: await ctx.send("Failed to send your request. Plz try again later.")Right now the bot is running inside a Docker container within my homelab. I need to create better logging and implement some sort of logging server so that I can better handle errors as well as monitoring in case of any outages.
If you have questions about building Discord bots or AWS and its various components feel free to reach out to me at any time. This was a great project that I worked on over a few days and it was great to see it come together quickly!
-
Deleting MANY Lambda Function Versions
I recently came across a challenge where I wanted to purge old Lambda Function versions. Some of the functions had over 65 versions!
The code below will iterate through a text file with a Lambda function defined on each line. It will get a list of all the versions and delete any version that is not the highest version or any versions that are attached to an alias.
import boto3 from botocore.exceptions import ClientError client = boto3.client("lambda", region_name='us-west-2') def delete_function_version(function_name, version): try: response = client.delete_function( FunctionName=function_name, Qualifier=str(version) ) except ClientError as e: print("Failed to delete version of", function_name, "version number", str(version)) print(e) def get_layer_versions(function_name): try: response = client.list_versions_by_function( FunctionName=function_name ) return response['Versions'] except ClientError as e: print('failed to get info for', function_name) print(e) if __name__ == "__main__": print("Starting lambda update") with open("lambda_list.txt", "r") as text: lambda_list = text.read().splitlines() text.close() version_info_results = {} for lambda_function in lambda_list: print("Working with lambda", lambda_function) lambda_versions = get_layer_versions(lambda_function) lambda_version_list = [] for version in lambda_versions: version_number = version['Version'] if version_number == "$LATEST": pass else: lambda_version_list.append(int(version_number)) for lambda_version in lambda_version_list: if lambda_version == max(lambda_version_list): print("This is the latest version skipping", str(lambda_version)) pass else: print("Deleting version", lambda_version, "of", lambda_function) delete_function_version(lambda_function, lambda_version)To use this function you first need to populate the text file with any Lambda function(s) that you want to evaluate and then execute the Python script.
I hope that this helps you or a coworker!
EDIT: Thanks to Alex Iliev for testing and finding some bugs in this code!